Pennock's Fiero Forum
  Technical Discussion & Questions - Archive
  Fiero Restoration - Upper Frame Rails

T H I S   I S   A N   A R C H I V E D   T O P I C
  

Email This Page to Someone! | Printable Version


Fiero Restoration - Upper Frame Rails by rubyredfiero
Started on: 11-11-2005 09:26 AM
Replies: 7
Last post by: 3800superfast on 04-06-2006 01:33 AM
rubyredfiero
Member
Posts: 720
From: Belle River, Ontario, Canada
Registered: Jul 2003


Feedback score: (1)
Leave feedback


Total ratings: 58
Rate this member

Report this Post11-11-2005 09:26 AM Click Here to See the Profile for rubyredfieroSend a Private Message to rubyredfieroDirect Link to This Post
This is the thread showing how I repair the frame rails. Usually the trunk corners are also gone along with the rail. You can click on that topic here //www.fiero.nl/forum/Forum2/HTML/068398.html
When I removed the rear clip this is what I found on the passenger's side with similar corrosion on the other side.

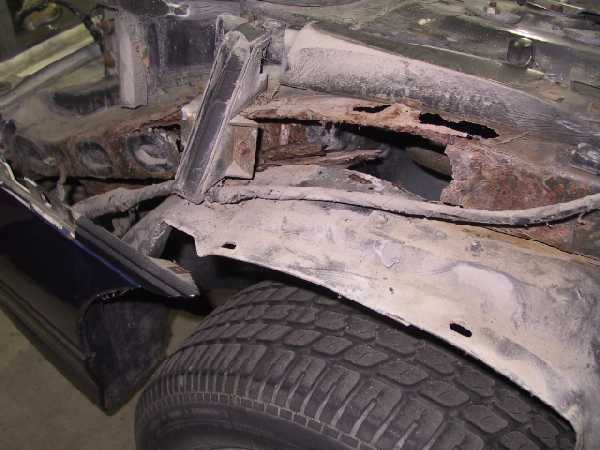
Start by removing all the attached items and noted the locations of all clips and how the wiring harness is routed. Take pics before removing something. Special attention need to be paid to the location of the plastic bracket with two screws that spaces/supports the rear clip. You will need to drill two new holes in the new rail to reattach this bracket. Also note where the little pads where the clip bolts to, are located if one is gone. If you are unlucky and one is missing you may have to put the clip back on and locate the hole by transferring the hole from the clip. Then remove the rear clip again. One closest to the glass is for the Z-bracket that locates the grille, the other two bolts the clip down. In this car I was able to save the area where these little pads are welded on the original rail. I make these rails in pairs, so I took a pair and cut one end to fit this car. These rails are made out of 2x2x.070 wall square tubing, notched in four places, bent and welded. When done the rails match the original rails as seen in the following pic.
Here's the drivers side.

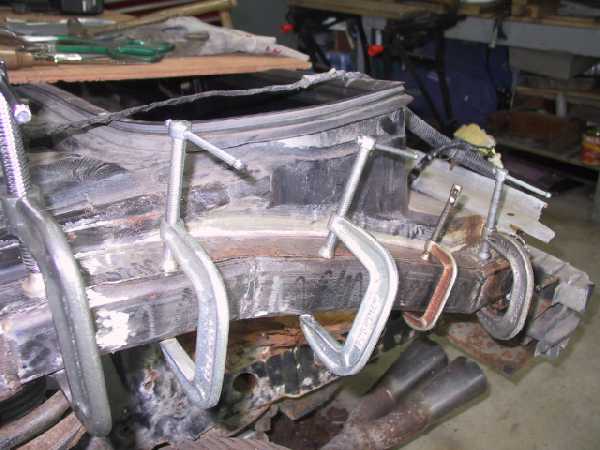
Again make sure the edges to be welded are touching the rail to avoid burn thru. I was told to use stitch welding and I like it. By removing bad sections with some kind of saw (I use a cutting wheel), it gives you clean material. Caution: experiment before you start if you're a newbie at welding. Also you cannot weld to rust, so make sure you have clean virgin metal. I use .023" solid wire with argon mix and use the push method. The driver's side was not as bad as the pass side. Note the amount of the old rail that was still good. Almost the entire top face allowed me to use clamps. The welded pic shows the pass side with hardly any lip to clamp. I had to use some long, some short welder clamps and normal c-clamps to weld the pass side. But perseverance (spelling?) is on my side. Here's the pass side all welded up.

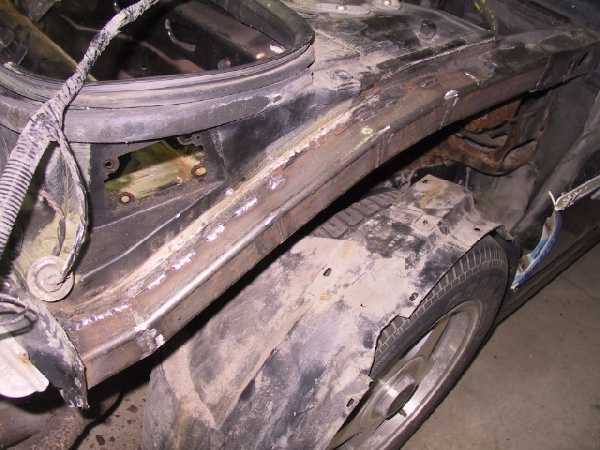
After I had the new rails in place I had new metal to weld the trunk corners to. See my other thread "Fiero Restoration - Trunk Corners". Now add the new holes for the plastic bracket and any holes for the harness clips. The last IMPORTANT step is to take a 13/64" drill (1/64" larger than a 3/16") and drill the rail thru pads for the rear clip. If you don't the screw will not go thru cuz they are too long. If the hole you drill is too small you will end up breaking the screw. Too big of a drill and the screw will not pull down tight. Then screw the bolt in the holes before you put the clip on, to form the thread in the new hole and if it breaks it's easier to chase out. I proly have to edit this to add or fix sections so refer to the start again later.

Edited to add a drawing of the rail for those who want to build a set for themselves.

[This message has been edited by rubyredfiero (edited 04-05-2006).]

IP: Logged
PFF
System Bot
theogre
Member
Posts: 32235
From: USA
Registered: Mar 99


Feedback score: N/A
Leave feedback


Total ratings: 568
Rate this member

Report this Post11-11-2005 11:09 AM Click Here to See the Profile for theogreClick Here to visit theogre's HomePageSend a Private Message to theogreDirect Link to This Post
Nice job...

To prevent rust...

Try roofing mastic. The stuff what coems in cans, not caulk tubes. Coat everything with it. It will seal all the microscopic holes etc. Allot of people would probably say Por 15 but for this sort of repair I'd go with something thick and gooy. The mastic will stick to any clean painted or metal surface permanently. It won't chip off if things hit it.

------------------
Dr. Ian Malcolm: Yeah, but your scientists were so preoccupied with whether or not they could, they didn't stop to think if they should.
(Jurasic Park)

The Ogre's Fiero Cave (It's also at the top of every forum page...)

IP: Logged
rubyredfiero
Member
Posts: 720
From: Belle River, Ontario, Canada
Registered: Jul 2003


Feedback score: (1)
Leave feedback


Total ratings: 58
Rate this member

Report this Post11-11-2005 12:30 PM Click Here to See the Profile for rubyredfieroSend a Private Message to rubyredfieroDirect Link to This Post
theogre - thx for the compliment by all, that's a good point about the sealer. I use BULLDOG underbody rubberized asphalt in paste form. It also comes in spray, but I use a wooden paint mixer or an old paint brush with cut bristles to apply the goop. I use it after I complete the repairs especially the trunk corners. It stinks for a couple of days till it dries. It never gets hard but dry to the touch, something like what's at the bottom of the Fiero trunk.
IP: Logged
rubyredfiero
Member
Posts: 720
From: Belle River, Ontario, Canada
Registered: Jul 2003


Feedback score: (1)
Leave feedback


Total ratings: 58
Rate this member

Report this Post04-05-2006 04:06 PM Click Here to See the Profile for rubyredfieroSend a Private Message to rubyredfieroDirect Link to This Post
I added a drawing of the rail - see it below my sig.
IP: Logged
LetTheGoodTimesRoll
Member
Posts: 44
From: New Brunswick, Canada
Registered: Jan 2006


Feedback score: N/A
Leave feedback

Rate this member

Report this Post04-05-2006 06:06 PM Click Here to See the Profile for LetTheGoodTimesRollSend a Private Message to LetTheGoodTimesRollDirect Link to This Post
This is exactly what i was looking for. I found a few rust holes in my upper frame rails, plus my trunk corners are toast. Seeing this makes me feel so much better. I want to wait fix it this winter were it isn't that serious a problem and i want to drive the car as much as i can this summer, and i havn't got my welder yet. But i think i caught it in time, i don't want it to get like the car in the picture!

Thanks for the awsome how-to rubyredfiero!

Stuart

IP: Logged
RWDPLZ
Member
Posts: 15013
From: Michigan
Registered: May 2002


Feedback score:    (11)
Leave feedback


Total ratings: 304
Rate this member

Report this Post04-05-2006 09:51 PM Click Here to See the Profile for RWDPLZClick Here to visit RWDPLZ's HomePageSend a Private Message to RWDPLZDirect Link to This Post
My passenger-side rail looks exactly like that first pic But my trunk area is mint? Seems like the car is rotting from the battery outward...

------------------

1984 Fiero SE

IP: Logged
Jncomutt
Member
Posts: 8899
From: Charlotte, NC
Registered: Apr 2001


Feedback score: (3)
Leave feedback


Total ratings: 221
Rate this member

Report this Post04-06-2006 12:50 AM Click Here to See the Profile for JncomuttSend a Private Message to JncomuttDirect Link to This Post
It also rots there due to the ground connection for the rear harness
IP: Logged
3800superfast
Member
Posts: 8568
From: ohio U.S.
Registered: Apr 2004


Feedback score: N/A
Leave feedback


Total ratings: 191
Rate this member

Report this Post04-06-2006 01:33 AM Click Here to See the Profile for 3800superfastSend a Private Message to 3800superfastDirect Link to This Post
Very nice resto work there--I made a parts car out of GT that looked like that when I took off the rear clip, Mine was probally worse --if thats believeable.. Thanks for post & pics..
IP: Logged


All times are ET (US)

T H I S   I S   A N   A R C H I V E D   T O P I C
  

Contact Us | Back To Main Page

Advertizing on PFF | Fiero Parts Vendors
PFF Merchandise | Fiero Gallery | Ogre's Cave
Real-Time Chat | Fiero Related Auctions on eBay


Copyright (c) 1999, C. Pennock