Pennock's Fiero Forum
  Technical Discussion & Questions - Archive
  Rebuild an 88 steering rack with me

T H I S   I S   A N   A R C H I V E D   T O P I C
  

Email This Page to Someone! | Printable Version


Rebuild an 88 steering rack with me by smartaxel
Started on: 07-05-2005 09:07 PM
Replies: 29
Last post by: smartaxel on 03-02-2006 08:57 PM
smartaxel
Member
Posts: 2823
From: Michigan
Registered: Feb 2002


Feedback score:    (15)
Leave feedback


Total ratings: 83
Rate this member

Report this Post07-05-2005 09:07 PM Click Here to See the Profile for smartaxelClick Here to visit smartaxel's HomePageSend a Private Message to smartaxelDirect Link to This Post
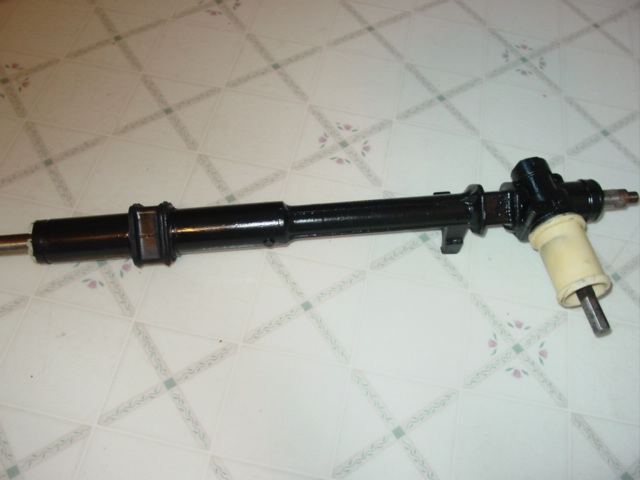
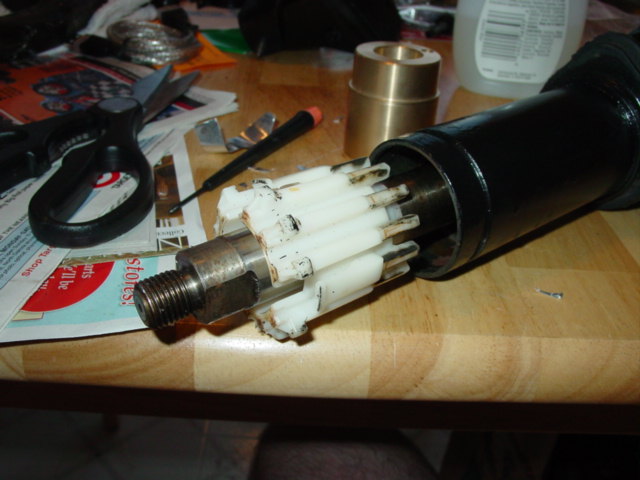
I'm completely rebuilding an 88 suspension/car. If there is anything you want pics of, let me know. For now, I don't think I have seen any pics/rebuilds of an 88 rack, so here you are. It's rediculously easy to replace the rack bushing using Rodney's replacement bushing. My old plastic one was still somewhat tight, but rodney's one just makes a BIG difference.

Remove rack from car and clean up with a little Marine Clean. Wives love it when you use the kitchen sink!!

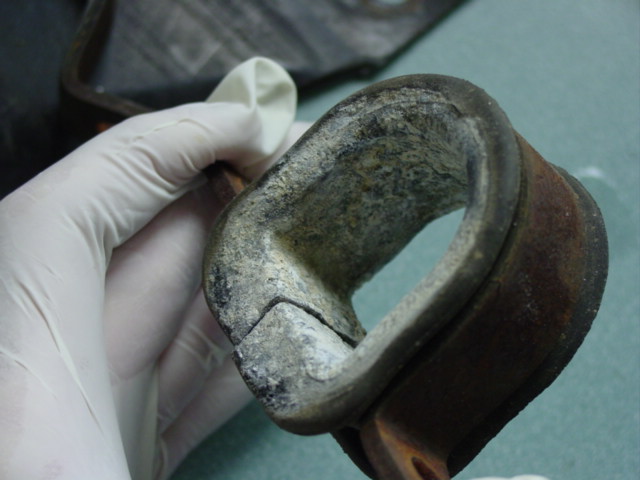
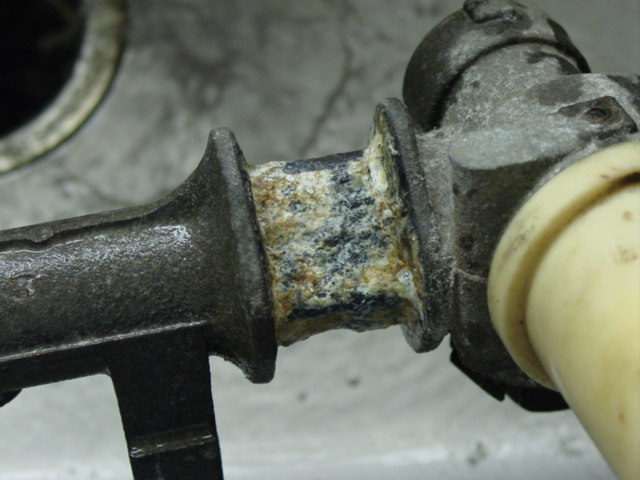
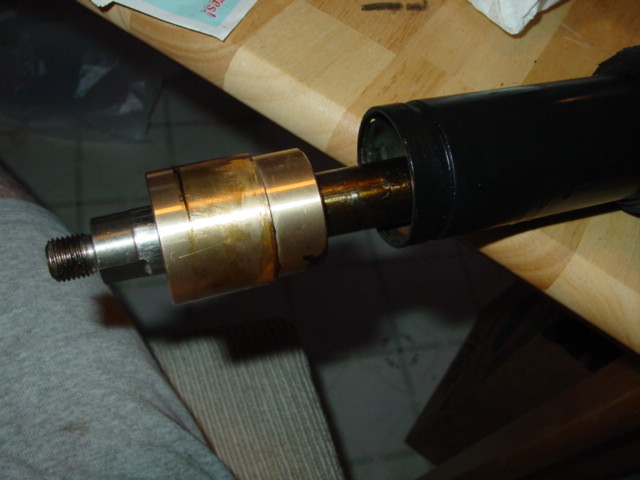
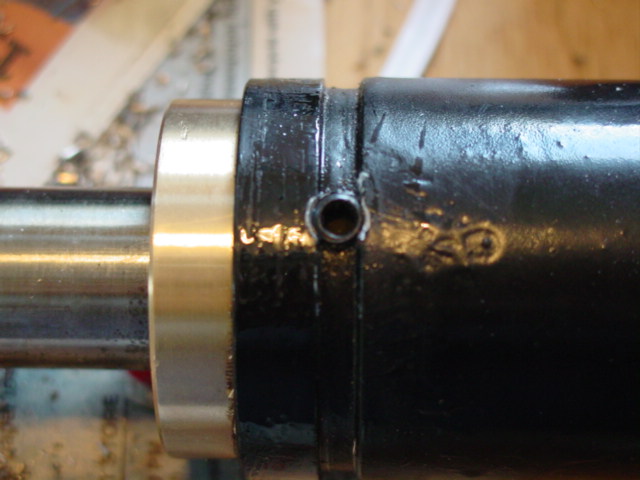
Pay CLOSE attention to the area where the mounts/rubber were. Seems salt gets in there and corrodes the entire rack. I wire brushed all the gunk off and used heavy POR-15 to take up the extra space the corrosion once took up.

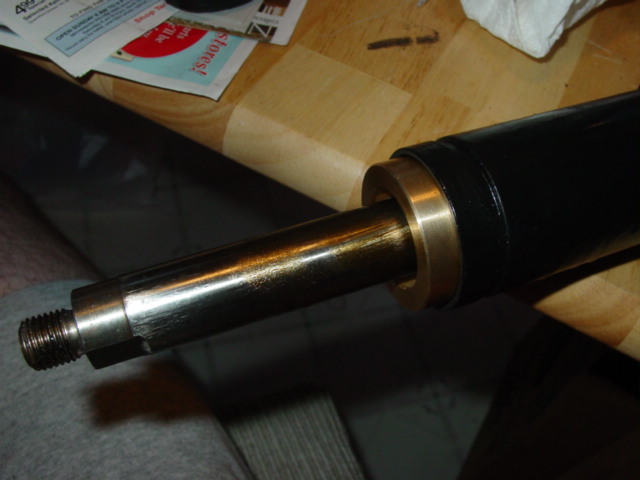
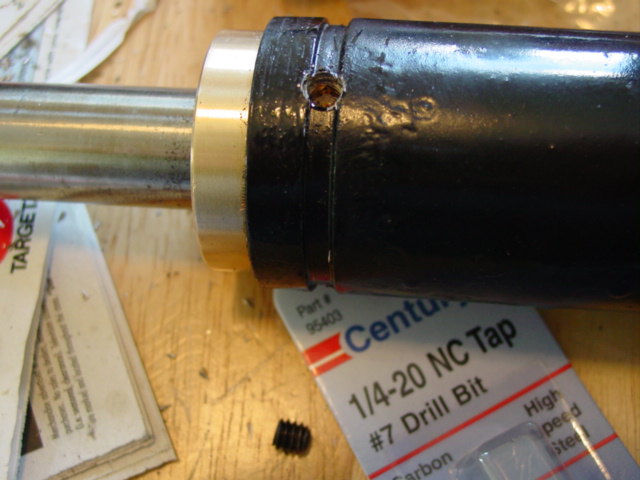
Paint the rack with a LOT of POR-15 , especially in the corroded areas.

Now, order Rodney's bushing

[This message has been edited by smartaxel (edited 07-05-2005).]

IP: Logged
PFF
System Bot
smartaxel
Member
Posts: 2823
From: Michigan
Registered: Feb 2002


Feedback score:    (15)
Leave feedback


Total ratings: 83
Rate this member

Report this Post07-05-2005 09:16 PM Click Here to See the Profile for smartaxelClick Here to visit smartaxel's HomePageSend a Private Message to smartaxelDirect Link to This Post
OK, You have Rodney's bushing?

Remove the old plastic bushing following Rodney's instructions (EASY).

Now slide the new bushing in place, smaller side in.

I choose to use set screws, and drilled and tapped the holes using a 1/4-20 NC Tap and #7 drill bit.

Then I locktited and installed the set screws.

Done.. A LOT easier then I expected, and there is NO PLAY in my rack at all now.

IP: Logged
jetman
Member
Posts: 7788
From: Sterling Heights Mich
Registered: Dec 2002


Feedback score: (4)
Leave feedback


Total ratings: 273
Rate this member

Report this Post07-05-2005 10:10 PM Click Here to See the Profile for jetmanClick Here to visit jetman's HomePageSend a Private Message to jetmanDirect Link to This Post
Outstanding job, nice photos too.
I thought that only single guys could use the kitchen sink as a parts cleaner!
I'll see you when I need my rack rebuilt!
You did great!
Tm

------------------
jetman
Silver 86 SE 2M6 4-speed, with
"check wallet light"

IP: Logged
fierohoho
Member
Posts: 3494
From: Corner of No and Where
Registered: Apr 2001


Feedback score: (3)
Leave feedback


Total ratings: 221
Rate this member

Report this Post07-05-2005 10:51 PM Click Here to See the Profile for fierohohoSend a Private Message to fierohohoDirect Link to This Post
Good thread and excellent pics, however, I do have a couple questions/requests.

Do you have pics of how the old bushing was held in, I realize Rodney's kit has the instructions but I don't have one and would like to know what's involved.

You drilled and tapped a hole to hold Rodney's bushing in with a set screw, is there another way for the bushing to be held in.

I've yet to pull a rack apart so I'm ignorant to this stuff, thanks.

Steve

IP: Logged
MstangsBware
Member
Posts: 11509
From: TEXAS
Registered: Mar 2002


Feedback score:    (108)
Leave feedback


Total ratings: 459
Rate this member

Report this Post07-05-2005 10:55 PM Click Here to See the Profile for MstangsBwareSend a Private Message to MstangsBwareDirect Link to This Post
I am fixing to do this so I am glad this Thread got started.
IP: Logged
JamesCurtis
Member
Posts: 2019
From: Omaha, NE
Registered: Oct 2003


Feedback score: N/A
Leave feedback


Total ratings: 64
Rate this member

Report this Post07-06-2005 12:43 AM Click Here to See the Profile for JamesCurtisSend a Private Message to JamesCurtisDirect Link to This Post
awesome thread, definitely a + for you. I've been looking to do this for a while now

------------------

IP: Logged
smartaxel
Member
Posts: 2823
From: Michigan
Registered: Feb 2002


Feedback score:    (15)
Leave feedback


Total ratings: 83
Rate this member

Report this Post07-06-2005 08:08 AM Click Here to See the Profile for smartaxelClick Here to visit smartaxel's HomePageSend a Private Message to smartaxelDirect Link to This Post
Jetman,

Thanks again for the seat cleaning stuff.(I dont think you saw my "thanks" thread). I have yet to finish them, but they came out NICE. If you ever need help with anything, let me know!

IP: Logged
smartaxel
Member
Posts: 2823
From: Michigan
Registered: Feb 2002


Feedback score:    (15)
Leave feedback


Total ratings: 83
Rate this member

Report this Post07-06-2005 08:23 AM Click Here to See the Profile for smartaxelClick Here to visit smartaxel's HomePageSend a Private Message to smartaxelDirect Link to This Post

smartaxel

2823 posts
Member since Feb 2002
Steve,

If you look above at the plastic bushing pic above, you can see a clip facing you. That is what held it in place. There are three total. They just clip into a lip inside the rack. you take a screw driver and pop them off. Takes all of 20 seconds!

I chose to drill/tap cause i thought it would be nice and flush. Rodney includes 2 self tapping screws and also 2 stainless rivets which are all you need. His instructions mention that some people have chosen the option of drilling/tapping. The drill and tap set was only $4.00 at the hardware store, so I chose that one, but it is far from necessary. Was my first time drilling/tapping. That also was pretty EZ.

 
quote
Originally posted by fierohoho:

...
Do you have pics of how the old bushing was held in, I realize Rodney's kit has the instructions but I don't have one and would like to know what's involved..... is there another way for the bushing to be held in.I've yet to pull a rack apart so I'm ignorant to this stuff, thanks.

Steve

[This message has been edited by smartaxel (edited 07-06-2005).]

IP: Logged
Dodgerunner
Member
Posts: 9686
From: Lincoln, Nebraska
Registered: Sep 2004


Feedback score:    (61)
Leave feedback


Total ratings: 323
Rate this member

Report this Post07-06-2005 12:39 PM Click Here to See the Profile for DodgerunnerClick Here to visit Dodgerunner's HomePageSend a Private Message to DodgerunnerDirect Link to This Post
Now I would coat the set screws with some rust proofing. Probably will never have to remove them, but who knows.....

Set those black screws like to rust really fast.

IP: Logged
sspeedstreet
Member
Posts: 2306
From: Santa Maria, CA
Registered: Dec 2002


Feedback score:    (18)
Leave feedback


Total ratings: 53
Rate this member

Report this Post07-06-2005 04:36 PM Click Here to See the Profile for sspeedstreetSend a Private Message to sspeedstreetDirect Link to This Post
 
quote
Originally posted by smartaxel:

Then I locktited and installed the set screws.

I love spellcheck. Whenever I find a geat how-to write-up like this I save it to my "Fiero" file. "locktited" became "lactated"

IP: Logged
smartaxel
Member
Posts: 2823
From: Michigan
Registered: Feb 2002


Feedback score:    (15)
Leave feedback


Total ratings: 83
Rate this member

Report this Post07-06-2005 05:22 PM Click Here to See the Profile for smartaxelClick Here to visit smartaxel's HomePageSend a Private Message to smartaxelDirect Link to This Post
 
quote
[B]Originally posted by sspeedstreet:[/B
I love spellcheck. Whenever I find a geat how-to write-up like this I save it to my "Fiero" file. "locktited" became "lactated"

I NEVER lactated on my set screws.. Say what you want, produce any pics you want. It wan't me lactating. LOL.

IP: Logged
PFF
System Bot
TG oreiF 8891
Member
Posts: 776
From: Cleveland, Ohio; USA
Registered: Aug 2004


Feedback score: (2)
Leave feedback

Rate this member

Report this Post09-06-2005 11:35 PM Click Here to See the Profile for TG oreiF 8891Send a Private Message to TG oreiF 8891Direct Link to This Post
Bump to add to favorites.

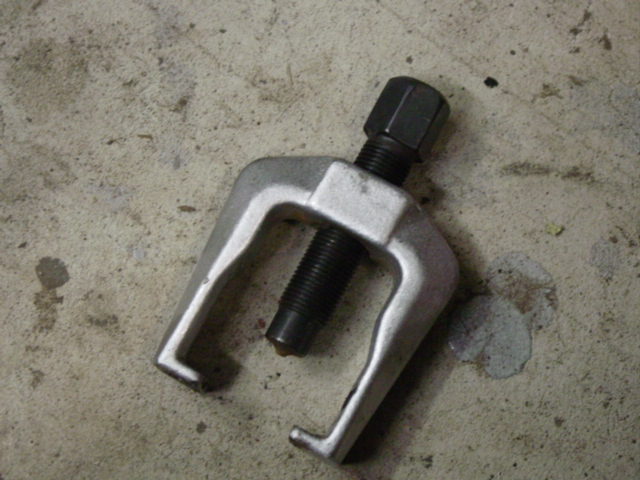
Reviving this because I think I need to replace the bushing as well. My steering rack moves up and down at the nylon bushing, so I assume I need the brass replacement. How exactly do you remove the tie-rods to get the bushing in place? I have heard a "puller" is easier than using the pickle fork? I don't really know how to use the fork I bought anyway, but where do I get a tie-rod puller for this car, Harbour freight?

[This message has been edited by TG oreiF 8891 (edited 09-06-2005).]

IP: Logged
smartaxel
Member
Posts: 2823
From: Michigan
Registered: Feb 2002


Feedback score:    (15)
Leave feedback


Total ratings: 83
Rate this member

Report this Post09-07-2005 08:05 AM Click Here to See the Profile for smartaxelClick Here to visit smartaxel's HomePageSend a Private Message to smartaxelDirect Link to This Post
I used a puller that came in a kit at a local Murrays. They have a tool "borrowing" section. I got it there. I have a pic of it at home, and can add it to this, if reminded. I believe you can buy the tool itself relatively cheap, but I didnt know what size to get, so I went with the kit.

Basically, it slides over the control arm/tie rod connection, then it it wrenched on till the tie rod comes off. I'll get a pic later tonight.

IP: Logged
TG oreiF 8891
Member
Posts: 776
From: Cleveland, Ohio; USA
Registered: Aug 2004


Feedback score: (2)
Leave feedback

Rate this member

Report this Post09-07-2005 08:14 AM Click Here to See the Profile for TG oreiF 8891Send a Private Message to TG oreiF 8891Direct Link to This Post
I think I get the idea, but if you could find a picture that would be awesome. Thanks for the great write-up, + for you.
IP: Logged
Raydar
Member
Posts: 40721
From: Carrollton GA. Out in the... country.
Registered: Oct 1999


Feedback score:    (13)
Leave feedback


Total ratings: 460
Rate this member

Report this Post09-07-2005 10:47 AM Click Here to See the Profile for RaydarSend a Private Message to RaydarDirect Link to This Post
 
quote
Originally posted by TG oreiF 8891:

How exactly do you remove the tie-rods to get the bushing in place? I have heard a "puller" is easier than using the pickle fork? I don't really know how to use the fork I bought anyway, but where do I get a tie-rod puller for this car, Harbour freight?

FWIW, the exact name of the tool I use is a "pitman arm puller".
It works so well that I've owned a pickle fork for 20 years and have never used it.

IP: Logged
smartaxel
Member
Posts: 2823
From: Michigan
Registered: Feb 2002


Feedback score:    (15)
Leave feedback


Total ratings: 83
Rate this member

Report this Post09-07-2005 06:05 PM Click Here to See the Profile for smartaxelClick Here to visit smartaxel's HomePageSend a Private Message to smartaxelDirect Link to This Post
I think Raydar is on the money. I use Rodney's Balljoint tool to remove the control arms, and this thing to remove the tie-rods. Looks like it IS a pitman arm puller. I think there are two sizes, at least there seemed to be when I got this one. I used the smaller one.

This is it in position. I just set one of Rodney's Tie Rod ends there to show how it works, but you get the point!

[This message has been edited by smartaxel (edited 09-07-2005).]

IP: Logged
TG oreiF 8891
Member
Posts: 776
From: Cleveland, Ohio; USA
Registered: Aug 2004


Feedback score: (2)
Leave feedback

Rate this member

Report this Post09-09-2005 08:06 PM Click Here to See the Profile for TG oreiF 8891Send a Private Message to TG oreiF 8891Direct Link to This Post
Awesome, thanks for the pictures, I'll have to go buy one. I saw one at Harbour Freight for $3.99.
IP: Logged
jchad
Member
Posts: 33
From: Iowa
Registered: Sep 2005


Feedback score: N/A
Leave feedback

Rate this member

Report this Post09-09-2005 09:21 PM Click Here to See the Profile for jchadSend a Private Message to jchadDirect Link to This Post
Hope you have an easier time putting your rack back in then I did! I couldn't get the dd rod to go back into the intemediate shaft! I had to take the rack out again, remove the steering column, pound the intemediate shaft onto the rack, and then wedge the rack back up into place. which required removing the spare tire tray, and the two rubber hoses from the radiator, and a lot of grunts and groans. It was nearly impossible to pull the rubber cover over the intermediate shaft. Then i put the other half of the intermediate shaft onto the part connectet to the rack from inside the car. I do not recommend doing it this way, you can probably pound half of the intermediate shaft onto the rack with the help of a friend if you bolt the rack back in place first.
Anyways good luck!
IP: Logged
smartaxel
Member
Posts: 2823
From: Michigan
Registered: Feb 2002


Feedback score:    (15)
Leave feedback


Total ratings: 83
Rate this member

Report this Post09-09-2005 09:57 PM Click Here to See the Profile for smartaxelClick Here to visit smartaxel's HomePageSend a Private Message to smartaxelDirect Link to This Post
Yeah, the intermediate shaft was kinda a pain.

On mine, it seemed there was a slight edge on it. Darn thing wouldn't go back on. I used a little sand paper to clean it up, and remove the rough edging. then greased it liberally. I also removed the bucket for better clearance. What I did was get it onto the steering wheel shaft, then get it slighty onto the rack, then screwed the rack in place. in my case, the screwing in the rack pressed the rack into the intermediate shaft. Everything seems good.

IP: Logged
2000RagTop
Member
Posts: 3999
From: Sussex, (Milwaukee) Wi. USA, Earth
Registered: Jun 2003


Feedback score: (2)
Leave feedback


Total ratings: 140
Rate this member

Report this Post10-15-2005 09:56 PM Click Here to See the Profile for 2000RagTopSend a Private Message to 2000RagTopDirect Link to This Post
up
IP: Logged
BrewCheese
Member
Posts: 1809
From: NW Indiana
Registered: Feb 2003


Feedback score: (5)
Leave feedback

Rate this member

Report this Post10-16-2005 12:48 AM Click Here to See the Profile for BrewCheeseSend a Private Message to BrewCheeseDirect Link to This Post
Awesome write up and Thanks for posting! This is one of the projects I have on my winter list and its nice to see everything step by step before you have to do it. Just out of curiosity did you have any problems removing the bolts that hold the rack to the crossmemeber. Ive using penitrating oil on them every couple days but still worried about breaking them off.

Thanks,
Jason

IP: Logged
PFF
System Bot
smartaxel
Member
Posts: 2823
From: Michigan
Registered: Feb 2002


Feedback score:    (15)
Leave feedback


Total ratings: 83
Rate this member

Report this Post10-16-2005 07:59 PM Click Here to See the Profile for smartaxelClick Here to visit smartaxel's HomePageSend a Private Message to smartaxelDirect Link to This Post
Three came out clean, one bolt broke. It was a pain. I drilled it, then tried to use a bolt extractor bit to remove it. The bolt extractor bit broke off in the hole, causing more grief, cause those are a pain to drill.. After more drilling, and more grief, I got the old bolt chunks out, and tapped the hole again, and replace the bolt. Think that took linger then removing the rack!

It was a pain in the tail/

IP: Logged
theogre
Member
Posts: 32246
From: USA
Registered: Mar 99


Feedback score: N/A
Leave feedback


Total ratings: 568
Rate this member

Report this Post10-16-2005 09:52 PM Click Here to See the Profile for theogreClick Here to visit theogre's HomePageSend a Private Message to theogreDirect Link to This Post
Good pictures.

A general comment...

Always use the pitman arm puller for the rod ends and a tool like Rodney's for the control arms unless you are replacing the rod end or joints. The fork separators will almost always trash the boots and can even trash the joint itself. Pounding the fork into a rod end can damage the rack.

You can get the pitman tool in the loaner pool at autozone and some others.

------------------
Dr. Ian Malcolm: Yeah, but your scientists were so preoccupied with whether or not they could, they didn't stop to think if they should.
(Jurasic Park)

The Ogre's Fiero Cave (It's also at the top of every forum page...)

IP: Logged
ig88vsbobafett
Member
Posts: 3446
From: Cheyenne Wyoming
Registered: Oct 2001


Feedback score:    (8)
Leave feedback


Total ratings: 71
Rate this member

Report this Post11-21-2005 03:16 PM Click Here to See the Profile for ig88vsbobafettSend a Private Message to ig88vsbobafettDirect Link to This Post
I just wanted to Bump this for Ppl who didnt see it the first time (I am doing this as we speek)
IP: Logged
ig88vsbobafett
Member
Posts: 3446
From: Cheyenne Wyoming
Registered: Oct 2001


Feedback score:    (8)
Leave feedback


Total ratings: 71
Rate this member

Report this Post11-23-2005 05:28 PM Click Here to See the Profile for ig88vsbobafettSend a Private Message to ig88vsbobafettDirect Link to This Post
One thing guys do you greese the steering rack after you chang the bushing ?
IP: Logged
USFiero
Member
Posts: 4873
From: Everywhere and Middle of Nowhere
Registered: Mar 2002


Feedback score: N/A
Leave feedback


Total ratings: 109
Rate this member

Report this Post02-28-2006 09:19 AM Click Here to See the Profile for USFieroSend a Private Message to USFieroDirect Link to This Post
bump to mark it

------------------
John DuRette
Custom 85 SE/87 Coupe
"Kinda makes you nostalgic for a Members Only jacket"

IP: Logged
2000RagTop
Member
Posts: 3999
From: Sussex, (Milwaukee) Wi. USA, Earth
Registered: Jun 2003


Feedback score: (2)
Leave feedback


Total ratings: 140
Rate this member

Report this Post02-28-2006 11:26 AM Click Here to See the Profile for 2000RagTopSend a Private Message to 2000RagTopDirect Link to This Post
 
quote
Originally posted by ig88vsbobafett:

One thing guys do you greese the steering rack after you chang the bushing ?

Good question! Should the rack get greased while or after changing the bushing?

------------------

88GT/Auto/Beechwood Leather/SunRoof/Wing/JVC-CD-Sub-Woofer/225/45/17 Michelin Pilots/All Opts Ex.T-Tops

<<< <<< Pix of my GT / ** Pix of my Formula** / Pix of my Vettes >>> >>>
*** *** *** *** *** * "If you appreciate my contribution, please rate me. Thanks"* *** *** *** *** ***

IP: Logged
Phoenix
Member
Posts: 112
From: St. Bonifacius, MN USA
Registered: Mar 2000


Feedback score: N/A
Leave feedback

Rate this member

Report this Post02-28-2006 01:01 PM Click Here to See the Profile for PhoenixClick Here to visit Phoenix's HomePageSend a Private Message to PhoenixDirect Link to This Post
Has anyone replaced the pinion bearing on the rack? When I removed the nut holding the pinion to the bearing the pinion shaft droped out of ther rack. What I need to know is the indexing of the pinion shaft to the rack. Also, I have had 2 racks completely destroy this bearing - anyone else experiance this failure?

Thanks

IP: Logged
2000RagTop
Member
Posts: 3999
From: Sussex, (Milwaukee) Wi. USA, Earth
Registered: Jun 2003


Feedback score: (2)
Leave feedback


Total ratings: 140
Rate this member

Report this Post03-02-2006 01:25 PM Click Here to See the Profile for 2000RagTopSend a Private Message to 2000RagTopDirect Link to This Post
 
quote
Originally posted by ig88vsbobafett:

One thing guys do you greese the steering rack after you chang the bushing ?

Good question! Should the rack get greased while or after changing the bushing?

IP: Logged
smartaxel
Member
Posts: 2823
From: Michigan
Registered: Feb 2002


Feedback score:    (15)
Leave feedback


Total ratings: 83
Rate this member

Report this Post03-02-2006 08:57 PM Click Here to See the Profile for smartaxelClick Here to visit smartaxel's HomePageSend a Private Message to smartaxelDirect Link to This Post
Whoa.. Saved from the archives, eh?

I don't know if it should be greased or not. Personally, I did. I used some good grease on the new bushing-side. I figure it can't hurt.

IP: Logged


All times are ET (US)

T H I S   I S   A N   A R C H I V E D   T O P I C
  

Contact Us | Back To Main Page

Advertizing on PFF | Fiero Parts Vendors
PFF Merchandise | Fiero Gallery | Ogre's Cave
Real-Time Chat | Fiero Related Auctions on eBay


Copyright (c) 1999, C. Pennock