The reason for it being too wide is that its width was based on the backspacing of the 88 Formula fronts and the hub is just too large for any stock Fiero wheel to fit. The bearing hub diameter is too large and If I turned it down to fit the Fiero wheel it would be very, very thin. So I have to use another wheel and subsequently a narrower axle (I am not buying new wheels). I have two to pick from unless someone else wants to give me a couple of aluminum wheels.
Here is an American racing wheel 16x6: This wheel will require the axle to be at least 1 1/2 inches narrower. The main issue with this wheel is that the dust cap on the axle sticks out further than the wheel and will keep me from putting the covers back on: This will most likely be my spare (fits both the trailer and the 88 GT - 12" brakes so stock spare wont fit)
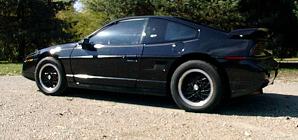
Here is wheel option #2. It is a 16x7 stock 1991 Grand Prix wheel. It is closer to the stock GT wheel design wise and fits the axle better. The dust cover fits within the wheel and If I trim off some of the stock center cap it will fit back on. Or I may just paint the dust cover black and leave it as is. I have not figured out how much I will have to remove from the axle width for these wheels, but probably in the 3-4" range.
Here is the axle with one of each wheel on it:
That is it for tonight. Maybe Tuesday I will start the process of narrowing the axle...
IP: Logged
09:02 PM
87SEbeast Member
Posts: 354 From: Breinigsville, PA Registered: Jun 2004
If you do make this one successfully, how interested would you be in making another for an SE notchback with the GT ground effects. It would need to be able to haul a halfstack guitar amp, which is four 12'' speakers. I would be very interested if you were so inclined.
Great job on the write-up....and the best of luck kyle
[This message has been edited by 87SEbeast (edited 01-17-2005).]
I don't have a hitch on my GT yet, but it will be recessed behind the liscense plate so it will not be visible when not needed. I plan to document this as well.
Very interested to see how you do this. I want to do a hitch the same way, but don't know how or what to anchor it to under there. BTW, great job on the trailer so far. I'd like to do one of those some day, too.
------------------ 86 SE 4 spd - 86 GT auto - 86 SE auto 85 GT parts car
IP: Logged
12:36 AM
Darth Vader Member
Posts: 388 From: Sullivan, IL Registered: Oct 2002
I have two to pick from unless someone else wants to give me a couple of aluminum wheels.
I don't know about giving, but these are cheap for new wheels. A friend has these not sure how much he would what but I can check if your interested, But I do have a set of 4 just like these but factory painted gray 16x6 I'd let go for $125 or maybe some kind of trade, I�m open for suggestions might even get my friend involved if you like the polished. I like how the trailer coming along can't what to see it when your done.
------------------ You Don't Know the Power of the Darkside
[This message has been edited by Darth Vader (edited 01-18-2005).]
IP: Logged
02:35 AM
fieroguru Member
Posts: 12128 From: Champaign, IL Registered: Aug 2003
Thanks for the input everyone. Brian, you will have to bring those over so I can make sure they will fit over the hub (also are they the dual bolt pattern behind the cover?). You should stop by this weekend (I have the heat running...)
Here is the tow rig: I am looking for something either stock fiero GT looking or something to match the wheels on the tow rig. It will be getting painted all black this winter... hopefully!
Jefrysuko, the 88 Fiero hub is too thin to enlarge it enough to clear the hub. I might have been able to split the difference and turn down the hub and enlarge the wheel, but I don't have any way to enlarge the hole in the wheel.
Besides... 2 hrs and I have a shortened axle.
Trailer axles tubes (the part that connects each side) is not true, they have an arch to pinch the wheels in at the bottom so that fully loaded they are more flat than sagging down. This make it a bit more challenging to narrow.
I set it up on my frame rack. I found the center and will be taking a total of 3" out of the width. To deal with the curvature, I used some 1" aluminum shims and found where they just touched the bottom of the axle and marked the location on the axle. This way when the center is removed, I can slide the two sides together, reposition the shims, true up the sides and weld the axle back together without messing up the toe or camber on the axle.
Here is the axle prior to cutting with the saws all:
The removed section:
Joint was prepped for good penetration (axle is 3/16" wall)
Everything lined back up:
Here is the modified axle with the Grand Prix wheels mounted:
Maybe Wednesday I will measure the toe and camber on both sides to see how close I was. Plus if I was off a bit on the toe, I want to make sure when I mount the axle the toe in portion faces forward.
That's it for today...
IP: Logged
09:20 PM
Jan 19th, 2005
Darth Vader Member
Posts: 388 From: Sullivan, IL Registered: Oct 2002
Brian, give me a call if you plan to come over saturday- 217-273-1169.
Well tonight I wanted to check how accurate I was welding my axle back up. I centered some steel stock that was 48" long to the hubs and clamped them in place. I measured between these two sections the top was 57 3/16" and the bottom side was 57 3/8". So I have 3/16" change over 48" = 0.2238 degrees toe. Not too shabby. I marked the axle so I will install it with the toe in at the front.
Now on to the springs. The axle came with 1000lb springs (each is 1000lbs). They originally had 3 leafs, but that was WAY too stiff. So I removed all but the main leaf. I was able to lean on the spring and compress it maybe 1" and I weigh 250 lbs. These may still be too stiff. A buddy at work is giving me a set of Jeep front leaf springs that are 2" wide and probably 36" long. I suspenct the single main leaf will be too weak, but they have 5 or 6 leaves. If it starts too soft I should be able to add a leaf or two till I get it the way that I want it. The good thing is the springs attach under the axle, so all the new leafs would mount under the main leaf and under the axle - so I dont have to wory too much about the additional leaves increasing rid height just because they mount between the main leaf and the axle.
I have been slacking on the trailer - mostly because I am waiting to buy the steel for the trailer frame.
I have been busy swapping a 2.8 into my other 88 and stripped my 88 GT to the chassis to get it ready for paint. I am hoping to get back to the trailer in a week or two after I get the steel.
IP: Logged
08:58 AM
Feb 20th, 2005
fieroguru Member
Posts: 12128 From: Champaign, IL Registered: Aug 2003
Well the trailer finally made it back on the top of the priority list (or at least what I wanted to work on). It did get some time a couple of weeks ago, just because it was in the way. My 88 needed the frame rack, so off the trailer came. Here is a pic of the 88 GT that will be pulling the trailer.... It too must be put back together for the Power Tour!
Back to the trailer...
I got some 2x2x1/8� steel tube and some 1x1x14ga steel tube earlier this week, so it was time to make this thing roll. I welded up the rectangular section making sure everything stayed square and flat. The trailer frame is 42 �� wide by 45 �� long. The length is important for how I mounted the remainder of the Fiero chassis to the frame.
In the front just under the frame rail there is a bracket that stick down. The front of the frame is pressed up against this bracket centered from side to side and clamped in place.
The rear ended up on a slight recess in the rear frame rail. The trailer frame was sliced to allow the seam welded portion of the rear frame rail slide down into the trailer frame.
Once the frame was positioned like I thought is should be, I wanted to double check the rest of the body to ensure that it stayed square. To aide in doing this it was time to install the hood. It no longer fit in the rear and I had to take 4 �: out of the rear. I measured 2 1/8� from each side and marked the hood. Clamped a piece of 1x16ga� steel bar I had around making sure the front was flush to the side and the rear hit my new mark. Then a cut off wheel on my grinder made quick work of the hood and the steel kept me pretty straight. Did the same for the other side as well. The inner support was starting to get in the way from allowing the hood to close, so I removed the support from the crumple zone recesses backwards. Now the hood would close, so it was properly aligned to the front fenders and fascia and tightened down. The gaps at the backside were real close, so I just had to pursued them slightly till they matched. Then the trailer frame was welded to the Fiero chassis.
Once the frame was welded in, it was time for the axle. I slid the axle under the frame and mounted the tires. Then I spaced the wheels from the trailer frame with some scrap steel to make sure they were right side to side (Note: make sure you junk tires on the wheels are the same size and brand � if not, at least notice they are different and measure from the wheel, not the tire!) I noticed the tire difference while mocking thinks up and making sure each side had the same gap to the fender as well as to the frame! Now to set the axle, and to make it square, I positioned the PS to where it �looked� good in the wheel well and clamped the front spring perch to the frame and snugged the rear of the leaf to the frame as well (springs still loose on the axle). Then took an 8� length of scrap steel tube and placed it about 4 feet in front of the car about 20� off of the ground. I then took a brick and placed it on top so the steel would not get bumped easily. Then I made the steel the same distance from the front corner torx bolts that hold the metal fascia bracket on. Now I had a good spot to measure to the wheel centerline. Measured the PS and then made the DS match � after it was clamped (it changed slightly since I was lifting the axle up as it was clamped). Then welded them in solid! Then took the wheels back off and did the other side and the rear slider.
Don�t go anywhere... there is more!
[This message has been edited by fieroguru (edited 02-20-2005).]
IP: Logged
02:37 PM
fieroguru Member
Posts: 12128 From: Champaign, IL Registered: Aug 2003
So now the frame, axle and hood are all on, so it is time to make this thing look like a trailer!
Here it is with just the rear skin of the deck lid sitting on it:
Unfortunately, that is it for today...
Merging the rear decklid to the front fascia will be �interesting� to say the least. I will probably just try to use as little of the rear decklid and remove the inner portion since it goes up and I need to match the hood which goes down. I should have enough scrap left over from the SMC panels to make this all work...
IP: Logged
02:40 PM
Feb 22nd, 2005
fieroguru Member
Posts: 12128 From: Champaign, IL Registered: Aug 2003
Focused on the framework for the floor today. I want as much storage as possible, so the floor will be recessed down below the 2x2 frame and lower than the axle as well. There will be a hump in the center to clear the axle. The floor will be 6 3/4" below the top of the 2x2 frame. I used 1x1x1/8" angle to make the frame. The inside of the angle base is the same as the inside of the 2x2 frame. This should make it easier to attach the 16ga sheet metal that will be trimming out the inside of the trailer (floor will be 1/8" steel).
Here is the rear floor frame: The rear floor is 38 1/2" x 16". You can also see the 1x1 braces that I added between the 2x2 frame and the bottom supports for the wheel well structure. This stiffened up the rear quite a bit.
Here is the front floor frame: The front floor area is slightly larger at 38 1/2" x 19". You can also see the start of the tongue.
After much thought, I decided to make the tongue come out from under the fascia.
Since the floor will be covered with 16ga welded to the frame, it will be plenty strong to counter act any bending forces on the tongue. So the tongue starts at back of the rear floor and comes forward. But this tube was exactly 2" too low to be snug against the fascia, so I stacked another tube on it. Then a small gusset was added to tie the tongue directly to the 2x2 frame (for all axial forces). Then the tongue was sliced on the chop saw 3 times to bend it up and then another 3 times to level it back out.
I think Sunday I will tighten up the suspension nuts and bolts and take this trailer out for a shake down run on the highway.
In case anyone wonders, I am still planning on using the Grand Prix wheels, but these aluminum wheels are the proper diameter (I haven't got my new tires yet for the grand prix wheels).
[This message has been edited by fieroguru (edited 02-26-2005).]
Took the trailer out for a road test with the bravada. It pulled straight and stable (even at 80). It is completely empty, but still was very well behaved and if you didn't know it was there you probably would not notice it at all. It will ride even better when it is loaded with my floor jack, jack stands, tools and 2 weeks worth of clothes!
Empty it has minimal tongue weight (maybe 20-30 lbs), but since I went with a longer tongue, the hitch still stays seated on the ball and does not rock back and forth.
Time to start putting in the 16ga panels....
IP: Logged
11:51 AM
fieroguru Member
Posts: 12128 From: Champaign, IL Registered: Aug 2003
Well the floor is now in. The side panels are welded in and the floor and front/rear panels are just 2 pieces. I ended up using 16ga for the entire floor - mostly because it was plenty stiff (I can jump up and down on the rear floor) and I didn't feel like pulling the 1/8" sheet out from hiding (which would require moving about 10 engines to get to...)
Here is a pic of the sides and the front floor panel:
Here is the rear panel:
Here is the floor with the rear installed:
By the end of next weekend I want to have the interior trimmed out with just the body work and paint left. Then I will take another break from the trailer and focus on putting the 88 back together.
IP: Logged
04:52 PM
Kento Member
Posts: 4218 From: Beautifull Winston Salem NC Registered: Jun 2003
OK, I have to ask this, will you also be mocking up a Pair of Exhaust tips out the back???? That would be sooo sweet!
------------------ 4.9 Caddy ON CRADLE in Garage! Car in Driveway! ACK! **************************************** http://home.cfl.rr.com/fierose Central Florida Fieros http://www.centralfloridafieros.org Proud Member and founder of the DOWN SOUTH SUNNY WINTER PICK ON SNOW PEOPLE COALITION!
IP: Logged
08:21 PM
Feb 28th, 2005
fieroturbo Member
Posts: 1085 From: Orefield, PA Registered: Jan 2003
The exhaust tips could be a fun edition! I will have to think about it.
I am a decent welder, but far from great. My welder is a 110V craftsman wire welder with flux core wire... nothing special. The 4 things that made me a better welder are - 1. Must have good ground - use brass ground clamp 2. Make sure you can see what you are doing (there are different tints for the hood window) 3. Crank the heat till you burn through then either turn it down 1 setting or just move the head faster 4. Watch where you have been, not where you are going.
IP: Logged
03:44 AM
Kento Member
Posts: 4218 From: Beautifull Winston Salem NC Registered: Jun 2003
The exhaust tips could be a fun edition! I will have to think about it.
OHHHH one more thing, you could wire in some LED's in Each of the tips and have them work with the T/S or Brake Lights. or a different color all together
------------------ 4.9 Caddy ON CRADLE in Garage! Car in Driveway! ACK! **************************************** http://home.cfl.rr.com/fierose Central Florida Fieros http://www.centralfloridafieros.org Proud Member and founder of the DOWN SOUTH SUNNY WINTER PICK ON SNOW PEOPLE COALITION!
I was thinking about your trailer project today and wondered how much farther you've gotten. It's looking really good! I bet you got some strange looks pulling around the front of a car!
IP: Logged
09:05 PM
Mar 3rd, 2005
fieroguru Member
Posts: 12128 From: Champaign, IL Registered: Aug 2003
It has been a no progress type of week. Been super busy at work, but I have been thinking about the trailer. I should be able to put another sizable dent in it this weekend, but after that I need to start getting the 88 back together.
IP: Logged
06:39 AM
Mar 5th, 2005
fieroguru Member
Posts: 12128 From: Champaign, IL Registered: Aug 2003
I got a whole lot of nothing done this week, but have started to make some more progress. I focused on bonding the fenders to the rear section instead of more interior sheet metal work.
I got some SMC bonding adhesive and used some scrap SMC panels to make a lip on the backside of the rear portion. I wanted to get about a 2" wide backing support for the fenders to be adhered to. Then once the lip was created, I ground down the last 2" of the backside of the fender, drilled a bunch of 1/8" holes, applied more bonding adhesive and clamped them together.
The adhesive came through the 1/8" holes as planned. Getting the plastic to stay bonded to the SMC will be a challenge and I figured I would allow the SMC adhesive to go through the fenders and bond to more SMC adhesive on the front side. I am hopeful that this will provide a good bond.
Once dry I ground down the seam about 2" on both sides and took quite a bit of material away from the fender and the rear panel.
Now I will be able to apply some more bonding adhesive and some matte to help keep the seam from cracking. Before I apply more bonding adhesive, I want to minimize the amount of vibration and movement of the fender. It is bolted solid on top with all the factory connections, but the belt line where the rear fascia mounts is still free to move. I am going to build a steel backing plate (welded to the chassis) for the belt line so the bottom of the fender and the rear fascia will be held in place and not permitted to move.
IP: Logged
03:08 PM
Mar 6th, 2005
fieroguru Member
Posts: 12128 From: Champaign, IL Registered: Aug 2003
The decklid is narrower than the fender and makes a nasty hole.
After much pondering, I decided it would look best if the rear decklid was as wide as the front. So out came the saw and the rear piece was cut in line with the tops of the fenders. Then more body work:
The body work for the fender sides was started and just roughed into the general shape:
IP: Logged
07:30 PM
PFF
System Bot
Mar 13th, 2005
fieroguru Member
Posts: 12128 From: Champaign, IL Registered: Aug 2003
I worked on the trailer off an on this week and weekend. The main focus was the body work and finishing the metal for the interior.
The interior is done, with the exception of DAing it and spraying in the truck bed liner to seal up all the seams between the panels.
All the sheet metal is 16ga and the majority of the panels are bent on both ends to keep the panels straight and to make them strong (not that they need to be). This trailer is now pretty much a tank - with the 16ga interior tied into everything.
There is an upturned lip along the inside of the fenders. I will cut this down about 1" below the hood line. Then some weather stripping will be installed all around to seal tight against the hood.
Storage volume is 19.09 cubic feet... should be plenty!
There is an upturned lip along the inside of the fenders. I will cut this down about 1" below the hood line. Then some weather stripping will be installed all around to seal tight against the hood.
Good idea. I wouldn't think the wife would be happy if her trunk space wasn't water tight. The thought of her stuffing you into the trailer so she has the passenger seat for storage comes to mind
Get going on that body work though. I am anxious to see how that turns out.
------------------
IP: Logged
02:03 PM
fieroguru Member
Posts: 12128 From: Champaign, IL Registered: Aug 2003
Jefry - it is wide enough to put in some Fiero buckets in case I do have to ride in the trailer. I wanted to upper portion wide enough for some seats in case this thing ever sees parade duty (without hood). She would have to learn how to drive a stick first... one more reason not to teach her! The water is just 1 concern, exhaust fumes is the other. Wouldn't want all our stuff to smell like exhaust for two weeks... that would most certainly put me in the doghouse (or trailer).
I will go take some pictures of the panels off the trailer.
IP: Logged
02:10 PM
fieroguru Member
Posts: 12128 From: Champaign, IL Registered: Aug 2003
Here is the naked trailer going on its 2nd test drive to the car wash to get clean:
Here it is clean:
Hung up to dry:
The trailer chassis is pretty much ready to prep for paint!
I will call the DMV this week to see how much of a hassle this will be to get a title for this and plate (are vanity trailer parts available in IL? - I am going to find out).
I am been working on stripping all the plastic panels, so nothing really new to show except the trailer now is more silver color than black.
I did score this today:
Home built trailer VIN. Cost $65 and didn't require anything (no inspection) and the plates were $18. So now I have that aspect of the project complete!
wow man!! love this thred!! if i were to ever (and im not) put a trailor hitch on my fiero i would definatly do this!!!!!, i have a few questions tho
1. how did you hide/cover/seal the headlight slots 2. ever think about your cars exaust beating down on it? 3. how much does that baby weigh!!, im guessing...150lbs, kinda bulky, but not bad at all!!!!
IP: Logged
09:22 PM
fieroguru Member
Posts: 12128 From: Champaign, IL Registered: Aug 2003
The headlights will be sealed off from below. I want to keep the outline on top... I just don't think it would look the same without them.
The entire luggage space will be sealed off. The steel panels will be coated inside and out with truck bead liner and the hood will have weather stripping to seal it to the storage compartment to help ensure the exhaust vapor will not get soaked up by our bags.
Weight... I don't know but my guess is that empty it will be in the 250 to 350 lb. range. I will have to take the house scale out when Sara is not home and check the weight at each wheel and the tounge.


 You Don't Know the Power of the Darkside


