Pennock's Fiero Forum
  Technical Discussion & Questions - Archive
  Dash Buildup

T H I S   I S   A N   A R C H I V E D   T O P I C
  

Email This Page to Someone! | Printable Version


Dash Buildup by FinoFiero
Started on: 06-29-2005 12:17 PM
Replies: 20
Last post by: AaronZ34 on 08-31-2005 03:24 PM
FinoFiero
Member
Posts: 97
From:
Registered: Apr 2005


Feedback score: N/A
Leave feedback

Rate this member

Report this Post06-29-2005 12:17 PM Click Here to See the Profile for FinoFieroSend a Private Message to FinoFieroDirect Link to This Post
Here is the buildup I promised. it is based upon the fiberglass dash shell, center console and door panels from PISA. If I had the dash in once, I had it in and out at least 100 times, getting it to fit just right.

First off let me say, I decided to use the existing instruments and bezels. I may change the bezels to carbon fiber, or even aluminum at a later date. But at this time, I used what I had, because I'm on a tight budget. At least I got it done in a reasonable timeframe. Somewhere around 80 hrs by now, is my guess.

I started by ripping out the old dash and console cover.

The first thing I did was replace the two screw blind nuts on the passenger side. On the original dash the screws under the speaker cover screwed here. I replace d them with 1/4 X 20.

I then drilled two holes in the glove box area for 2 6" 1/4 X 20 bolts

Next I bent the shift lever tube back about 2" I placed a pipe over the shift tube and bent it, only to find out that the ignition key would not release. For the life of me, I couldn't see how that would stop the key from disengaging, as the base of the shift tube did not seem to move at all, but it did. So I bent the tube back straight again, until the key would release. Then I used an electrical conduit bender (hickey) and put a slight bend in the tube.

I knew I wanted to use the shift face plate and ashtrays, so I cut out the new console.

I also knew I wanted to use the existing radio, and AC contro mounting. So I cut down the original moutning box and set it on the console. (I did replace the radio with one that fits later Pointiacs and it sounds absolutely fabulous.)

Next I sat the instrument cluster in place.

[This message has been edited by FinoFiero (edited 06-29-2005).]

IP: Logged
PFF
System Bot
FinoFiero
Member
Posts: 97
From:
Registered: Apr 2005


Feedback score: N/A
Leave feedback

Rate this member

Report this Post06-29-2005 12:20 PM Click Here to See the Profile for FinoFieroSend a Private Message to FinoFieroDirect Link to This Post
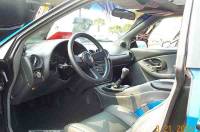
And then temporarily installed the dash so I could see how everything started to line up.


I continued working on the Radio and AC mounting until I was satisfied.

One I was fairly satisifed with how everything was coming together, I started upholstering the dash. I used 3M 99 Contact Spray Adhesive to glue 1/4" closed cell foam to the fiberglass shell.

IP: Logged
FinoFiero
Member
Posts: 97
From:
Registered: Apr 2005


Feedback score: N/A
Leave feedback

Rate this member

Report this Post06-29-2005 12:21 PM Click Here to See the Profile for FinoFieroSend a Private Message to FinoFieroDirect Link to This Post

FinoFiero

97 posts
Member since Apr 2005
The I started upholstering with a heavy vinyl. I sewed two pieces to form the cover that goes over the instrument cluster.

I then took a single piece (after making a paper pattern) and covered the rest of the dash. A simple statement, but difficult to do so as to not get wrinkles...

Here is the covered dash in the car. The speakers, and glove box are yet to be done.

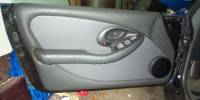
Next I startted on the door panel. I removed the carpeting and vinly from the old panel. I lightly poured acetone on the carpet, getting it moist, the carpet easily separated from the panel. With the panel now ready to accept the new panel. I fiberglassed in a piece of wood in the arm reest, under the recess in the panel. This would serve as the interior door handle for pulling the door closed.

I attached the new door panel over the old panel using rivets and 'great foam' (the foam youuse around the house for sealing holes). I shoved the nozzel in as many places as I could injecting the foam. I figured that stuff is so sticky, that when it dries it would securely hold thw two panels together. It worked great.

Here is the finished door panel.

And here is the completed interior.

Hope everyone enjoys the hard work that went into this. I'm sure there will be some detractors and nay-sayers as usual, I guess all I can say is I'm happy with it, and at least I got it done and did not just talk about doing it.

FinoFiero

IP: Logged
87FieroGT
Member
Posts: 494
From: Harlingen, TX, U.S.A.
Registered: May 99


Feedback score: (1)
Leave feedback

Rate this member

Report this Post06-29-2005 01:13 PM Click Here to See the Profile for 87FieroGTSend a Private Message to 87FieroGTDirect Link to This Post
Good job on the dash. It looks great.
IP: Logged
Sullivan
Member
Posts: 538
From:
Registered: Apr 2005


Feedback score: (1)
Leave feedback

Rate this member

Report this Post06-29-2005 01:19 PM Click Here to See the Profile for SullivanSend a Private Message to SullivanDirect Link to This Post
I agree with last post looks great I really like the door panels.
IP: Logged
88formttp
Member
Posts: 187
From: Las Vegas, NV./ N.W. Indiana, Munster
Registered: Jan 2005


Feedback score: N/A
Leave feedback

Rate this member

Report this Post06-29-2005 03:22 PM Click Here to See the Profile for 88formttpSend a Private Message to 88formttpDirect Link to This Post
WOW that is how the 88 should have been done.
IP: Logged
mrfixit58
Member
Posts: 3330
From: Seffner, Fl, USA
Registered: Jul 99


Feedback score: N/A
Leave feedback


Total ratings: 113
Rate this member

Report this Post06-29-2005 04:50 PM Click Here to See the Profile for mrfixit58Send a Private Message to mrfixit58Direct Link to This Post
Very nicly done. It's amazing what a little creativity and some fiberglass can do.

Great job,

------------------
Roy

double-click on this link to follow my interior build-up https://www.fiero.nl/forum/Forum1/HTML/023174.html

Blue 87 GT w/ 4th generation Firebird interior.
Suncoast Fieros

Judged "Best Custom Interior" at the 20th Anniversary Show @ Pontiac, Mich - 7/2003
Judged "Best Custom Interior" at the 8th Annual Fiero Fun Weekend @ Daytona - 3/2004
Judged "Best Custom Interior" at the 9th Annual Fiero Fun Weekend @ Daytona - 3/2005

IP: Logged
ivychamp99
Member
Posts: 163
From: New York
Registered: Jul 2002


Feedback score: N/A
Leave feedback

Rate this member

Report this Post06-29-2005 08:37 PM Click Here to See the Profile for ivychamp99Send a Private Message to ivychamp99Direct Link to This Post
very nice thanks for the write up. a plus for ya!
IP: Logged
TennT
Member
Posts: 1523
From: Humboldt, Tenn
Registered: Nov 2002


Feedback score: (1)
Leave feedback

Rate this member

Report this Post06-30-2005 12:03 AM Click Here to See the Profile for TennTSend a Private Message to TennTDirect Link to This Post
a +
Nice work.
tg
IP: Logged
sonic50
Member
Posts: 3873
From: All over the USA
Registered: Aug 2004


Feedback score: N/A
Leave feedback


Total ratings: 92
Rate this member

Report this Post06-30-2005 10:30 AM Click Here to See the Profile for sonic50Send a Private Message to sonic50Direct Link to This Post
that is cool! You want to do it to my car for me

------------------


http://www.iamanascarfan.com/


I am the signature virus, please put me in your signature so I can spread

IP: Logged
Strange Brew
Member
Posts: 106
From: Calgary, Alberta, Canada
Registered: Mar 2005


Feedback score: N/A
Leave feedback

Rate this member

Report this Post07-04-2005 07:38 PM Click Here to See the Profile for Strange BrewSend a Private Message to Strange BrewDirect Link to This Post
Excellent Job.....Outstanding!!! Thanks for sharing.

------------------
88 Fiero GT
85 Fiero GT
05 Pontiac G6
90 Buick Grand Sport 4 Seater
What’s Behind You Is Of Little Consequence

IP: Logged
PFF
System Bot
Saxman
Member
Posts: 5155
From: Melbourne, FL
Registered: May 2005


Feedback score:    (8)
Leave feedback


Total ratings: 114
Rate this member

Report this Post07-19-2005 09:34 PM Click Here to See the Profile for SaxmanClick Here to visit Saxman's HomePageSend a Private Message to SaxmanDirect Link to This Post
Nice work covering it yourself! Very impressive. I need some pointers on how you finished the edges.

------------------

IP: Logged
87convert
Member
Posts: 539
From: Mesa, Az USA
Registered: Jun 2003


Feedback score: (2)
Leave feedback

Rate this member

Report this Post08-01-2005 02:58 PM Click Here to See the Profile for 87convertSend a Private Message to 87convertDirect Link to This Post
Great build thread. I have a few comments and I will post some pics later.

Interesting to see how two people with the same task come to some of the same solutions. I also cut down the stock console skeleton to mount the radio and A/C control head. I did not use the stock center A/C outlet. Just used two in the sides. In the place of the center outlet I installed a headlight control from a 96 Bonneville, the trunk release switch and the HUD controller. I made some brackets to pick up the stock front firewall mounting locations and glassed them to the underside of the dash on the right. I also made some brackets to pick up the lower side mounting points. Instead of the stock Fiero shifter plate I got a plate and shifter head from a 93 Seville and cut the shifter arm down instead of bending it. This has the added advantage of selector call outs for a 4spd auto tranny which I plan to install later. I cut the lower cover from the Fiero to fit under the steering column to give the lower section a finished look.

Great work and you inspired me to get going and finish.

Rolland

IP: Logged
FinoFiero
Member
Posts: 97
From:
Registered: Apr 2005


Feedback score: N/A
Leave feedback

Rate this member

Report this Post08-01-2005 03:03 PM Click Here to See the Profile for FinoFieroSend a Private Message to FinoFieroDirect Link to This Post
 
quote
Originally posted by Saxman:

Nice work covering it yourself! Very impressive. I need some pointers on how you finished the edges.

Thanks for the compliments.

I'm not sure what edges you are talking about. If you can be a bit more specific, I'll try my best to either describe what I did, or take a picture.

Fino

IP: Logged
Saxman
Member
Posts: 5155
From: Melbourne, FL
Registered: May 2005


Feedback score:    (8)
Leave feedback


Total ratings: 114
Rate this member

Report this Post08-31-2005 12:57 AM Click Here to See the Profile for SaxmanClick Here to visit Saxman's HomePageSend a Private Message to SaxmanDirect Link to This Post
I was talking about the front "sewn" edges around the steering wheel bulge. How did you get it so nice?
IP: Logged
dguy
Member
Posts: 2416
From: Beckwith Township, ON, Canada
Registered: Jan 2003


Feedback score: N/A
Leave feedback


Total ratings: 97
Rate this member

Report this Post08-31-2005 09:48 AM Click Here to See the Profile for dguySend a Private Message to dguyDirect Link to This Post
Nice work!

I see a driver's side dash speaker, but none on the passenger side?

IP: Logged
Kohburn
Member
Posts: 7349
From: Oriental, NC
Registered: Jul 2003


Feedback score: N/A
Leave feedback


Total ratings: 188
Rate this member

Report this Post08-31-2005 10:30 AM Click Here to See the Profile for KohburnSend a Private Message to KohburnDirect Link to This Post
i really like the doors - i think they would even look right in place with a stock dash..
IP: Logged
Mickey_Moose
Member
Posts: 7573
From: Edmonton, AB, Canada
Registered: May 2001


Feedback score: (3)
Leave feedback


Total ratings: 145
Rate this member

Report this Post08-31-2005 10:54 AM Click Here to See the Profile for Mickey_MooseSend a Private Message to Mickey_MooseDirect Link to This Post
Excellent

May I ask how you attached the material to the dash? Thanks

Tim

IP: Logged
RCR
Member
Posts: 4432
From: Shelby Twp Mi
Registered: Sep 2002


Feedback score:    (7)
Leave feedback


Total ratings: 102
Rate this member

Report this Post08-31-2005 12:14 PM Click Here to See the Profile for RCRSend a Private Message to RCRDirect Link to This Post
That's a real nice job. Looks great.

Bob

IP: Logged
dguy
Member
Posts: 2416
From: Beckwith Township, ON, Canada
Registered: Jan 2003


Feedback score: N/A
Leave feedback


Total ratings: 97
Rate this member

Report this Post08-31-2005 02:42 PM Click Here to See the Profile for dguySend a Private Message to dguyDirect Link to This Post
 
quote
Originally posted by Mickey_Moose:

May I ask how you attached the material to the dash?

See post #2, just below the fourth photograph.

IP: Logged
AaronZ34
Member
Posts: 2322
From: Colorado Springs, CO
Registered: Oct 2004


Feedback score: N/A
Leave feedback


Total ratings: 408
User Banned

Report this Post08-31-2005 03:24 PM Click Here to See the Profile for AaronZ34Click Here to visit AaronZ34's HomePageSend a Private Message to AaronZ34Direct Link to This Post
I like it, it looks good.

A few questions if I may...

What about the passenger side dash speaker?

Can you show a picture of the cubby between the driver/passenger?

Can you show a pic of the glove box with it open?

Thanks!!!

------------------

"Item might be dangerous and cause death, do not use in a real car."
"Proper capitalization is the difference between helping your Uncle Jack off a horse and helping your uncle jack off a horse."

IP: Logged
PFF
System Bot


All times are ET (US)

T H I S   I S   A N   A R C H I V E D   T O P I C
  

Contact Us | Back To Main Page

Advertizing on PFF | Fiero Parts Vendors
PFF Merchandise | Fiero Gallery
Real-Time Chat | Fiero Related Auctions on eBay


Copyright (c) 1999, C. Pennock