Overkill in the cooling system is what I am after.
All last year I ran a custom brass radiator core within the stock Fiero end tanks. This rad had the max number of cooling fins for a brass radiator and did a very good job keeping my ZZ4 SBC well under 200 all last summer.
A couple weeks ago in FL with the engine running lean, pulling a 1000 lbs trailer, and 95 degree temps my car finally got to 220, but not over. Sure some would say just fix the timing (which I am doing - new chip should be here this week!), but I also plan to hook up AC and I NEVER want the engine temp to get above 190 no matter what kind of abuse I put the car through. Overkill is what I am after.
The new radiator is a 26" x 19" Tru-Kool radiator from Speedway motors http://www.speedwaymotors.com/ for 159.95. It dwarfs the old stock Fiero sized radiator:
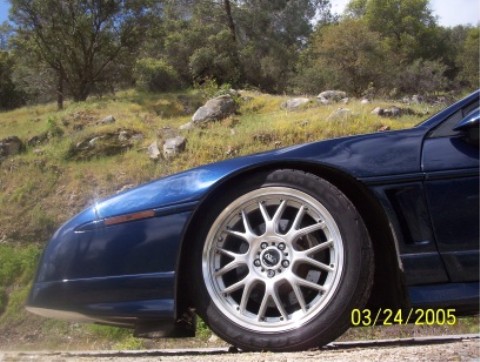
Here is the Before pic:
IP: Logged
08:34 PM
PFF
System Bot
fieroguru Member
Posts: 12128 From: Champaign, IL Registered: Aug 2003
Now, with the radiator being larger in all three dimensions, getting it to fit is the key to this whole upgrade.
I removed the hood and headlights just to have more room to work (and get better pictures), but this really is not necessary and will cause additional work later.
Remove the radiator and all the hoses and brackets that connect to it. I left the AC intact to help guide placement of the new radiator. The new radiator is 25 7/8" wide and it will not fit without some minor trimming on the upper flanges of the frame rails that protrude towards the radiator. Here is the DS frame rail: Notice the notch that was left there from the factory and the AC lines directly below this frame rail lip. All we need to do is elongate this notch towards the front of the car and flush with the backside of the AC core like so: Two slivers of metal have now been removed, but they were separate and no spot welds were removed.
On the PS there is not a factory notch: Using the hole that used to hold the headlight harness as a corner, a notch about the same size as the DS is cut. Again there are two slivers of unconnected steel removed. In fact the lower portion of the seam already had the notch cut out, so only the top portion got cut for the majority of the notch. Again no spot welds were removed.
Now there is 26 3/8" between the frame rails and the radiator will fit with 1/4" on both sides.
I was planning on having to make a new lower support, but due to the radiator slimming up on the bottom, it actually fits in the stock lower radiator bracket! I just have to relocate the rubber isolators about 1" to the outside to line back up with the weld line in the side tanks.
That's it for today. I need to reinstall the hood to define the maximum height and then review what fabrication will be needed to reuse the stock radiator support.
Nice write up- A '+' for you. While you have the Fiero radiator out and before it gets to the dumpster, will you measure the overall length, height and the size of the core please. I am looking at an aftermarket radiator and it 'looks' like a good fit, but I'd like to be sure. Thanks!
So far, you doing exactly what I did to get the Nova radiator in. I wish I would have known about the radiator you bought. That thing looks like it would cool a moster truck!
------------------ 1986 SE 350 V8
IP: Logged
06:51 AM
Alex4mula Member
Posts: 7403 From: Canton, MI US Registered: Dec 1999
Thanks for the +'s and compliments. The part # is 917-347-26
I did some more test fitting today and noticed that my radiator is warped - lay it flat and 1 side it raised up almost an inch! The box looked pretty good so it probably was made that way. So I will be sending it back, but not until it is used to figure out a few more things.
The location and orientation of the radiator cap is not ideal and it defines the installed height of the radiator in the car due to it hitting the hood hinge bracket on the PS. Also in the stock location at the highest installed height, the coolant outlet is right where the sway bar wants to be on the 88's.... This will complicate things a bit.
To adhere to the water neck and swaybar issues, I removed the AC section to allow the radiator to tilt more the to the front and to allow it to move up some more. Then the AC section will be relocated down a couple inches. The AC lines should be able to be bent to accommodate this relocation (but I will do that later).
It is a tight fit, but here is the radiator with a hose on the outlet and the stock fan co-existing with the sway bar (and hood). [imghttp://images.andale.com/f2/115/106/3766561/1120992371804_Test_fit_1.jpg[/img]
To get it to fit I did have to extend the cut sections I made earlier up the hood hinge section of the rail flange:
With this radiator being 19" tall, it is a bit taller than ideal. It is about 1/2" above the bottom of the front cross member, but it is back about 3-4 inches from where the old radiator was. It should be OK as long as I don't make it a habit to jump parking blocks or doing any serious off roading!
[This message has been edited by fieroguru (edited 06-27-2005).]
IP: Logged
09:28 PM
Jul 4th, 2005
fieroguru Member
Posts: 12128 From: Champaign, IL Registered: Aug 2003
The 19" tall radiator will not be for everyone, but for me I want the absolute largest radiator that can be fit into the Fiero, and without breaking the bank.
For anyone who wants to spend more $$$ on a 16" tall radiator - contact Dwayne at Ron Davis Radiators (dwayne@rondavisradiators.com). They sell a 26 x 16 (along with other 16" tall ones), part # is 1A-26163. This radiator comes with the larger Chevy inlet and outlet (1 1/2 and 1 3/4) runs $239.00 + shipping. They will install the smaller 1 1/4" inlet and outlet before sending it to you for $294.00 This radiator will still require modification to your fiero due to its width, but the 24" wide one may be able to be used with minimal mods. I have not checked the location of the outlet for clearance to the swaybar, so please do so before buying one.
Now back to my 19" radiator install:
RADIATOR BRACKETS: The brackets to support the weight of the radiator are 1" x 3/16 steel bar. Each is bolted on the top close to where the AC condenser was attached and then there are a couple bends before it bolts to the 88 front cross member (these brackets are 88 only, but something similar could be done for the 84-87).
Here is the upper attachment:
Here is the lower attachment:
To keep the radiator off the steel and to help cushion its ride, I picked up some 3x8 x 3/4 foam that is adhesive backed from Home Depot. Here are the brackets with the foam ran down the area where the radiator and the brackets will come in contact with each other:
COOLING FAN: The Fiero cooling fan will be reused because it is almost perfect for the larger core. The fan covers all but 2 of the finned rows and is as wide as the fins are on the cooling tubes. The fan shroud is about 1/4" deeper along the sides than at the top or bottom. I cut the sides to match the top and bottom so the shroud could lay flat on the radiator. Once the sides were trimmed I set the fan on the radiator and marked the location for Four 1/8" holes. There is a 1/4" circle outline in the shroud at each corner, so I used them for the locations of my new holes. Then using a small wire with a rounded tip, I pushed through the new hole, and into the cooling fins (not the water tubes) of the radiator. Once all the way through I bent the cooling fins with the wire to allow a 1/8" x 4" bolt to pass through. The bolt has a 3/4" steel washer and a rubber washer on the radiator side. I also put 1 round of black electrical tape on the length of the bolt to minimize vibration. The backside gets the 3/4" washer and a 6-32 nylock nut. Here is the head of the bolt on the radiator side:
Here is the fan fully mounted:
The studs were then cut flush with a cutoff wheel and the radiator went back in the car for the last time (hopefully).
IP: Logged
02:59 PM
fieroguru Member
Posts: 12128 From: Champaign, IL Registered: Aug 2003
COOLANT HOSES: The new radiator has a 1 1/2" inlet and 1 3/4" outlet and the stock Fiero hoses are 1 1/4" so something has to be changed. I took some measurements and then went to Autozone to look to see what they had on their hose racks.
Coolant Outlet Hose: 88 owners are in luck!!! Autozone hose #886812 ($11.99) (282 is the large # on the sticker) is a near perfect fit! It has a 1 3/4" end and a 1 1/4" end. The 1 1/4" does need to be shortened about 2", but once done it connects the radiator to the stock coolant tube 84-87 owners need to go hose shopping for something that will fit their application.
Here is the lower hose installed:
Coolant Inlet Hose: I did not find a complete hose for this one, but I am not done searching for it. However, Autozone hose #885830 ($9.99) is an "L" shaped hose with a 1 1/2" on the short leg and 1 1/4" on the long leg. Cutting the stock Fiero hose and splicing this hose in will make then needed connections. If you still have the plastic fishnet stuff on the stock hose, it will clear the two hose clamps and cover up the splice.
Here is the upper hose installed:
SEALING UP THE AIR GAPS: Air gaps around the top and sides of the radiator will allow air to pass on by the radiator vs. being forced through it. For this part I recycled the two rubber pieces that are attached to the stock lower radiator mount. One of these has a round cylinder and is setup for flange mounting. Cut this one in side and attach to the frame flange on either side of the radiator like so:
Use the "flattened V" shaped piece to reseal the top of the radiator to the front of the car. I actually used two of these so I could go from frame rail to frame rail. Test fit and trim for the brackets, the filler neck and the frame rails, then drill and attach with screws: The original holes in these can be filled with some silicone eventually.
IP: Logged
03:17 PM
fieroguru Member
Posts: 12128 From: Champaign, IL Registered: Aug 2003
UPPER RADIATOR BRACKETS: Gravity will do a good job keeping the radiator in place, but to be safe it is best to install some upper brackets to minimize potential movement. There are two 3/16" holes along the frame rail flanges. The one on the DS had a wire loom keeper in it. Those holes were enlarged to 5/16 and will be used to mount the upper brackets. Here are the upper brackets: Again the foam was used where the brackets will contact the radiator.
Here they are installed:
Now it is time to start on the changes to the bottom side.
IP: Logged
03:40 PM
PFF
System Bot
Jul 19th, 2005
ryan.hess Member
Posts: 20784 From: Orlando, FL Registered: Dec 2002
So maybe there's hope yet for the 84-89 corvette radiator.....
Stock fiero hoses would work, and it's exactly the same height as the fiero's, so it should be drop in... Aside from the 4" you gain in width... Well, and it being single row, and costing $130
_BUT_ ..... if you get one on ebay.....
...carry on! Just had to bump it so I could 'favorites' it.
btw- would it be any less work to install the 22" rad?
[This message has been edited by ryan.hess (edited 07-19-2005).]
IP: Logged
12:34 AM
fieroguru Member
Posts: 12128 From: Champaign, IL Registered: Aug 2003
I have had the car up to temp in the garage and the fan kicked on at 185 (hypertech fan switch). I placed my hand behind the radiator to feel the heat and WOW the air was HOT. Much hotter that it used to be. Must work well.
I am sure the corvette radiator could be made to fit, and the 406 SBC in my 86 Vette ran 180 all day long no matter what I did to it, so it would probably be a good upgrade for the $$$.
A 22x19 would require almost as much work as the 26x19. It is just too tall to use the stock brackets. It might be slightly more complicated on the upper brackets just due to it being a couple inches further away from the frame rail, but certainly doable.
Maybe this week I will finish up the underside, hook up AC and take it out for a test drive.
IP: Logged
08:05 AM
Aug 3rd, 2005
ryan.hess Member
Posts: 20784 From: Orlando, FL Registered: Dec 2002
Sorry, but no. It has been too hot and I have been busy doing everything but working on my Fiero! It MUST be back together before Fierorama, so it will have to come to the top of the list here shortly.
IP: Logged
05:11 PM
Aug 8th, 2005
fieroguru Member
Posts: 12128 From: Champaign, IL Registered: Aug 2003
I have started on creating a new air box to funnel the air from under the car into the radiator. The stock radiator had the rubber/plastic material that helped guide the air into the radiator, but I took all that out and have to recreate it.
I am thinking of using some lighter gauge steel or aluminum. Something that bends and holds its shape and is easy to cut with tin snips. But first I need to know the general shape, so out with the poster board and time to make some templates.
(about 2 hrs pass and lots and lots of poster board is on the floor before I come to this):
The general shape to cover the sides is now done. Each side will be 1 single piece and probably be riveted or bolted to the radiator support brackets and fastened to the sides of the fascia opening.
As you can see the lower air dam is off the car right now. The top of the stock air dam is about 2-3" higher than the bottom of the radiator, which I don't particularly care for. The bottom of the radiator is flush with the bottom of the front cross member and I only have about 4" of clearance to the cross member. So I am thinking of running a 1" rubber air deflector directly under the radiator and possibly using just the two outsides of the stock air deflector and a piece of 1x1/4" aluminum bar to bridge the gap and connect the rear corners of the fascia opening.
Any other thoughts?
[This message has been edited by fieroguru (edited 08-08-2005).]
IP: Logged
09:38 PM
Rickady88GT Member
Posts: 10648 From: Central CA Registered: Dec 2002
Is it just me, or does the rad hang below the air damb? My car scrapes the air damb as I go thu deep gutters. If my rad hung lower than the air damb I would have lost all my coolant along time ago. But that does look like a nice rad.
------------------
IP: Logged
11:12 PM
fieroguru Member
Posts: 12128 From: Champaign, IL Registered: Aug 2003
The radiator support brackets are flush with the bottom of the front cradle (the radiator is about 1/2" above these). This also makes the radiator at about the same elevation as the air dam, but it is much further back.
The lowest corner of the radiator will be at the lower corner of the front fascia (wheel well lower front corner) and 1 1/4" lower than this corner. This is also 5 1/2" behind the stock air dam. The distance behind is key to it surviving on the road. It is much closer to the axle centerline and will not see as much elevation change over irregular surfaces.
What is the front wheel well arch height on your 88? Mine is 25 1/2" and looks higher than yours.
I have ran this lower air dam for the last couple years. It has an added center section that lowered it an additional 1 1/2". I would hit it going in and out of parking lots, but on the road it was just fine. I am thinking of running just the lower section under the radiator.
[This message has been edited by fieroguru (edited 08-08-2005).]
IP: Logged
11:47 PM
Aug 9th, 2005
Rickady88GT Member
Posts: 10648 From: Central CA Registered: Dec 2002
My wheel is about 24 3/4. Two cut coils. If the bottom of the rad is that far back, how much room do you have to vent the hot air out? How close is it to the spare tire tub?
IP: Logged
12:47 AM
fieroguru Member
Posts: 12128 From: Champaign, IL Registered: Aug 2003
I don/t run the spare tire hub. The spare would not fit over my brakes and my battery is mounted directly on top of the cradle and back against the firewall. Eventually, it will be closed up more to give me a shelf across the top of the frame rails for some stereo amps, but even then there will be a nice open space under the self.
IP: Logged
07:25 AM
Aug 14th, 2005
fieroguru Member
Posts: 12128 From: Champaign, IL Registered: Aug 2003
I got the air box completed as well as the lower air dam. Here is the aluminum side panel before it was bent:
Here is what it looks like installed: The lower air dam is about 3/4" lower than stock on the side sections. I shimmed it starting with 1/4" from the fascia on the sides to 3/4" at the inside edge. Then i used another air dam to cut the small side sections to meet up with the remainder of the stock air dam (mounted to a 1x1/4" aluminum bar mounted to the radiator supports).
The ground clearance is not that bad. I will drive it a while and possible drop it in the center another inch.
On the backside, the fan clears the spare tire plastic compartment by about 8", so there will be plenty of room for air flow if you run the spare tire compartment.
I took it out for a test drive, everything was working like it should, but I develped a miss from a charred plug wire and set a VSS code (didn't have it fully seated). So when I get the wires fixed I will really put it through its paces.
[This message has been edited by fieroguru (edited 08-14-2005).]
IP: Logged
06:47 PM
PFF
System Bot
Aug 15th, 2005
HellYes Member
Posts: 736 From: CLifton, IL 60927 Registered: Mar 2005
Nice, I have the same radiator sitting in my shead. I plan on loosing my front compartment for my install but thats ok its my toy and will never be stock again. Thanks for taking the time to write up your install.
IP: Logged
06:22 AM
fieroguru Member
Posts: 12128 From: Champaign, IL Registered: Aug 2003
I have no intentions of selling the side panels - mainly because they only work with the Aero/GT fascia and the radiator must be at the same angle as mine (OK for 88's, unknown for 84-87). More often than not, they would not fit. There is a nice pic if you would like to copy. The aluminum came in a 2'x4' sheet for $16 and could be cut with household scissors.
Thanks for the compliment.
I hope to work on the AC condenser this week. I have already been told no Fierorama without AC.
IP: Logged
07:55 AM
Aug 21st, 2005
BERKELUSA Member
Posts: 262 From: Manchester, New Hampshire USA Registered: Apr 2005
Originally posted by fieroguru: Nope, no cap... even if I got one, it would just go on the shelf with all the other hats (I don't wear caps). I took it out and drove it quite a bit today. Cools great! I am planning on driving the car every day this week and stop messing with it. I still haven't touched the AC portion...
Got it today.. NO CAP?, Gezze and I wear hats.. WTH ! lol
Cant wait to get started on it..
Rob
IP: Logged
12:05 AM
fieroguru Member
Posts: 12128 From: Champaign, IL Registered: Aug 2003