Pennock's Fiero Forum
  Technical Discussion & Questions - Archive
  4.9 auto tensioner bracket solved

T H I S   I S   A N   A R C H I V E D   T O P I C
  

Email This Page to Someone! | Printable Version


4.9 auto tensioner bracket solved by Mickey_Moose
Started on: 06-28-2004 11:30 AM
Replies: 32
Last post by: EngineerBill on 05-20-2005 03:18 AM
Mickey_Moose
Member
Posts: 7497
From: Edmonton, AB, Canada
Registered: May 2001


Feedback score: (3)
Leave feedback


Total ratings: 143
Rate this member

Report this Post06-28-2004 11:30 AM Click Here to See the Profile for Mickey_MooseClick Here to visit Mickey_Moose's HomePageSend a Private Message to Mickey_MooseDirect Link to This Post
Thought I would share this with everyone with a 4.9 that wishes to use the 3.4 Camaro spring tensioner with the stock Caddy alternator and mount. Your thoughts appreciated.

With this bracket all pulleys are in correct alignment for proper belt alignment.

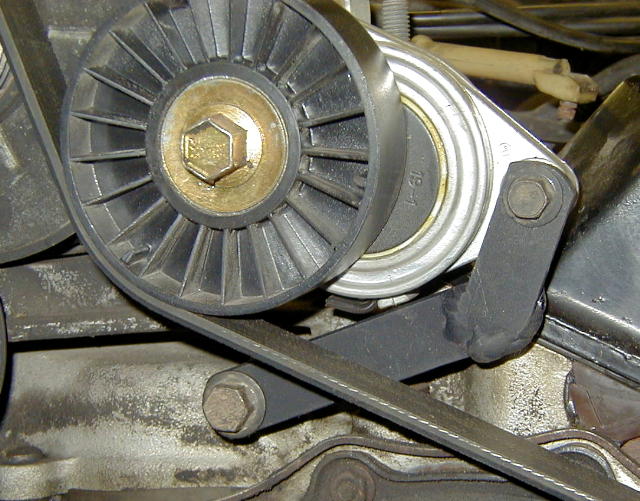
slight modification is need to this 'L' shaped support bracket behind the water pump to accept the tensioner bracket:

tensioner bracket/tensioner mounted - a spacer was also needed between the tensioner and the stock alternator housing for proper pulley alignment (a longer alternator bolt is also needed - 110mm):

all together:

If you use this method, please give credit where due...a LOT of time and thought went into this. There should be enough info here for you to make your own, as to how and where it goes - measurements can be taken from your motor. I am not sure I am willing to give out the exact measurements, as the last thing I want to do is make it too easy for someone else to bang these out and sell them to line their own pockets.

But I am at least willing to share what it looks like so others can do something similar.

Tim

[This message has been edited by Mickey_Moose (edited 06-28-2004).]

IP: Logged
PFF
System Bot
Dragon1
Member
Posts: 888
From: Racine,Wisconsin
Registered: Sep 2002


Feedback score: (1)
Leave feedback

Rate this member

Report this Post06-28-2004 12:10 PM Click Here to See the Profile for Dragon1Send a Private Message to Dragon1Direct Link to This Post
Very nice, make me one and I'll help you test it....

Dragon1/Brian

IP: Logged
Raydar
Member
Posts: 40728
From: Carrollton GA. Out in the... country.
Registered: Oct 1999


Feedback score:    (13)
Leave feedback


Total ratings: 460
Rate this member

Report this Post06-28-2004 12:19 PM Click Here to See the Profile for RaydarSend a Private Message to RaydarDirect Link to This Post
Very cool!

I have a question, though.
The pulley just below the alternator... Is it smooth or ribbed?
Looks ribbed in the pic. Maybe just a bit of rust on it, or something.
Just wondering about a smooth belt on a ribbed pulley. If I'm tripping, please pardon my dumb-azz, question.

------------------
Raydar
88 3.4 coupe...........

Coming soon...
88 Formula, presently under the knife.

Read Nealz Nuze!

IP: Logged
Dragon1
Member
Posts: 888
From: Racine,Wisconsin
Registered: Sep 2002


Feedback score: (1)
Leave feedback

Rate this member

Report this Post06-28-2004 12:21 PM Click Here to See the Profile for Dragon1Send a Private Message to Dragon1Direct Link to This Post
some are smooth and some are ribbed, depends on which side of the belt they push against...

Dragon1/Brian

IP: Logged
Mickey_Moose
Member
Posts: 7497
From: Edmonton, AB, Canada
Registered: May 2001


Feedback score: (3)
Leave feedback


Total ratings: 143
Rate this member

Report this Post06-28-2004 12:33 PM Click Here to See the Profile for Mickey_MooseClick Here to visit Mickey_Moose's HomePageSend a Private Message to Mickey_MooseDirect Link to This Post
Pulley under the alternator is smooth (stock pulley that came with the block). It is a 2 piece pulley however, so there is a seam down the center. Can kinda of see it in the 2nd pic (mostly cut off - just to the left of the tensioner). The pulley was left on so I get more belt contacting the crank pulley - although, it's not a whole lot more

Tim

[This message has been edited by Mickey_Moose (edited 06-28-2004).]

IP: Logged
Vonov
Member
Posts: 3745
From: Nashville,TN,USA
Registered: May 2004


Feedback score: N/A
Leave feedback


Total ratings: 84
Rate this member

Report this Post06-30-2004 11:01 PM Click Here to See the Profile for VonovSend a Private Message to VonovDirect Link to This Post
Thank you for the how-to...time to hit the boneyard again (sigh)...

Oh, and a plus for you...

IP: Logged
Cooter
Member
Posts: 6328
From: Alabama, USA
Registered: Jun 99


Feedback score:    (11)
Leave feedback


Total ratings: 138
Rate this member

Report this Post06-30-2004 11:18 PM Click Here to See the Profile for CooterSend a Private Message to CooterDirect Link to This Post
Nice work- I was wondering how other folks were running their belt on the Caddy. My car is similiar except I used a tensioner from a Mazda that has the bolt you tighten to move the pulley. I like your's better.
IP: Logged
FieroMaster88
Member
Posts: 7680
From: Mattawan, MI
Registered: Nov 2000


Feedback score:    (43)
Leave feedback


Total ratings: 168
Rate this member

Report this Post07-27-2004 08:16 PM Click Here to See the Profile for FieroMaster88Send a Private Message to FieroMaster88Direct Link to This Post
Bump.

Oh yeah, what is the pully from thats next to the waterpump pully and above the AC? I'm trying to figure that out so I can get my belt setup finished...

Thanks!

IP: Logged
Kento
Member
Posts: 4218
From: Beautifull Winston Salem NC
Registered: Jun 2003


Feedback score: (2)
Leave feedback


Total ratings: 131
Rate this member

Report this Post07-27-2004 09:26 PM Click Here to See the Profile for KentoSend a Private Message to KentoDirect Link to This Post
Here is our mounting set up.

We used a Spare braket off the Caddy and Bolted it to the Head.

Thank You for the idea

------------------
4.9 Caddy in Garage! Car in Driveway! ACK!

****************************************
http://home.cfl.rr.com/fierose
Central Florida Fieros
http://www.centralfloridafieros.org

IP: Logged
Mickey_Moose
Member
Posts: 7497
From: Edmonton, AB, Canada
Registered: May 2001


Feedback score: (3)
Leave feedback


Total ratings: 143
Rate this member

Report this Post07-28-2004 11:53 AM Click Here to See the Profile for Mickey_MooseClick Here to visit Mickey_Moose's HomePageSend a Private Message to Mickey_MooseDirect Link to This Post
Looks good, unfortunatly I had to go the way I did because of the breather (4.9 valve covers are worth more than a ton of gold around here).

FieroMaster88 - I used this pulley: Dayco 89015 ( NAPA 38008) is a 70mm 6 groove. Dayco 89009 is a slightly larger pulley as well (6 mm bigger).

[This message has been edited by Mickey_Moose (edited 07-28-2004).]

IP: Logged
Kento
Member
Posts: 4218
From: Beautifull Winston Salem NC
Registered: Jun 2003


Feedback score: (2)
Leave feedback


Total ratings: 131
Rate this member

Report this Post07-28-2004 12:02 PM Click Here to See the Profile for KentoSend a Private Message to KentoDirect Link to This Post
 
quote
Originally posted by Mickey_Moose:

Looks good, unfortunatly I had to go the way I did because of the breather (4.9 valve covers are worth more than a ton of gold around here).

FieroMaster88 - I used this pulley: Dayco 89015 ( NAPA 38008) is a 70mm 6 groove.


We only replaced the trunk side VC so Jeff could put oil in it when he does a change.

IP: Logged
PFF
System Bot
Fieroking
Member
Posts: 2144
From: Coeur D Alene Idaho USA
Registered: Jun 2002


Feedback score:    (11)
Leave feedback


Total ratings: 78
Rate this member

Report this Post07-28-2004 07:06 PM Click Here to See the Profile for FierokingClick Here to visit Fieroking's HomePageSend a Private Message to FierokingDirect Link to This Post
Thanks Mickey your idea worked great. I built a tensioner just like yours and am very happy with it. I do have an extra valve cover if you are interested drop me an email.

Joe Sokol
85 SE 5 Speed 2.8 V6
88 Formula/GT 5 Speed 4.9 Caddy with Allante Intake

IP: Logged
moto838
Member
Posts: 139
From: Edgewater Co. Jeferson
Registered: Mar 2004


Feedback score: N/A
Leave feedback

Rate this member

Report this Post10-30-2004 09:08 AM Click Here to See the Profile for moto838Send a Private Message to moto838Direct Link to This Post
Hey guys; What belt length are you using with this combo. this realy looks sweet. Joe
IP: Logged
collinwestphal
Member
Posts: 698
From: Waukesha, WI, USA
Registered: Jun 2003


Feedback score: N/A
Leave feedback

Rate this member

Report this Post10-30-2004 09:55 AM Click Here to See the Profile for collinwestphalSend a Private Message to collinwestphalDirect Link to This Post
Thiss is how I did mine too. Except my bracket goes down to the torx bit right below the tensioner.
IP: Logged
Mickey_Moose
Member
Posts: 7497
From: Edmonton, AB, Canada
Registered: May 2001


Feedback score: (3)
Leave feedback


Total ratings: 143
Rate this member

Report this Post10-31-2004 12:53 AM Click Here to See the Profile for Mickey_MooseClick Here to visit Mickey_Moose's HomePageSend a Private Message to Mickey_MooseDirect Link to This Post
I don't remember exactly the size but it was in the 80/80.5/81 range (I can't find the paper that had all this info on it right now) - I also ended up using the larger size pulley for the idler (76 mm - I think it was).

Tim

IP: Logged
moto838
Member
Posts: 139
From: Edgewater Co. Jeferson
Registered: Mar 2004


Feedback score: N/A
Leave feedback

Rate this member

Report this Post10-31-2004 08:04 AM Click Here to See the Profile for moto838Send a Private Message to moto838Direct Link to This Post
Tim; Thanks for the help, when I started my swap I made up a bracket that used the original tensioner it fits in the car but was real tight on clearance, so in the scrap pile it goes. I won't allow time spent to justifiy using a part I don't like!
A+ for your sharing This with us.
cheers beers n gears Joe
IP: Logged
GT
Member
Posts: 911
From: Silver Spring, MD USA
Registered: May 2003


Feedback score: N/A
Leave feedback

Rate this member

Report this Post02-09-2005 06:25 PM Click Here to See the Profile for GTSend a Private Message to GTDirect Link to This Post
I've read through this thread several times and I can't figure out where the pulley above the A/C compressor came from or the bracket to the right of the 3.4 tensioner came from. Fieromaster88 asked about the pulley but I never saw a response. Anybody know where either of these items are from?

Thanks
Rick

[This message has been edited by GT (edited 02-09-2005).]

IP: Logged
Kento
Member
Posts: 4218
From: Beautifull Winston Salem NC
Registered: Jun 2003


Feedback score: (2)
Leave feedback


Total ratings: 131
Rate this member

Report this Post02-09-2005 06:37 PM Click Here to See the Profile for KentoSend a Private Message to KentoDirect Link to This Post
 
quote
Originally posted by GT:

I've read through this thread several times and I can't figure out where the pulley above the A/C compressor came from or the bracket to the right of the 3.4 tensioner came from. Fieromaster88 asked about the pulley but I never saw a response. Anybody know where either of these items are from?

Thanks
Rick

Idler Pulley, 90 Chevy Astro Van 4.3 V6 NO FACTORY A/C

Mounts in a Bolt Hole on the end of the W/P that normally supports some Caddy thingy (not the green one) not used

The Bracket is from some Caddy bracket that is shaped like an "A" and you just cut one leg off it.

[This message has been edited by Kento (edited 02-09-2005).]

IP: Logged
Kento
Member
Posts: 4218
From: Beautifull Winston Salem NC
Registered: Jun 2003


Feedback score: (2)
Leave feedback


Total ratings: 131
Rate this member

Report this Post02-09-2005 06:38 PM Click Here to See the Profile for KentoSend a Private Message to KentoDirect Link to This Post

Kento

4218 posts
Member since Jun 2003
 
quote
Originally posted by moto838:

Hey guys; What belt length are you using with this combo. this realy looks sweet. Joe

If You use the Stock Fiero A/C Compress & Alt (87 Duke), you only need a 76" belt

IP: Logged
GT
Member
Posts: 911
From: Silver Spring, MD USA
Registered: May 2003


Feedback score: N/A
Leave feedback

Rate this member

Report this Post02-09-2005 06:47 PM Click Here to See the Profile for GTSend a Private Message to GTDirect Link to This Post
 
quote
Idler Pulley, 90 Chevy Astro Van 4.3 V6 NO FACTORY A/C

Aha... thanks Kento. Anyone know where the black bracket to the right of the tensioner came from in Mickey_Moose's pictures?

 
quote
If You use the Stock Fiero A/C Compress & Alt (87 Duke), you only need a 76" belt

Two more questions then...

1. Are you saying I can use my stock AC compressor with the original pulley?
2) Do the Caddy computers properly control the stock Fiero A/C system?

Thanks

IP: Logged
Kento
Member
Posts: 4218
From: Beautifull Winston Salem NC
Registered: Jun 2003


Feedback score: (2)
Leave feedback


Total ratings: 131
Rate this member

Report this Post02-09-2005 07:31 PM Click Here to See the Profile for KentoSend a Private Message to KentoDirect Link to This Post
 
quote
Originally posted by GT:

Aha... thanks Kento. Anyone know where the black bracket to the right of the tensioner came from in Mickey_Moose's pictures?

That one he made himself. I know Mine, Jeff's and 85Lamb are using the "A" bracket


quote
Originally posted by GT:

Two more questions then...

1. Are you saying I can use my stock AC compressor with the original pulley?
2) Do the Caddy computers properly control the stock Fiero A/C system?

Thanks


1. Yes, with some extra Brackets, it will work.
2. I dont think so as I have thrown out my computer. I am going Carb NO MORE EMPTY WALLET LIGHT!!!

IP: Logged
PFF
System Bot
GT
Member
Posts: 911
From: Silver Spring, MD USA
Registered: May 2003


Feedback score: N/A
Leave feedback

Rate this member

Report this Post02-09-2005 07:48 PM Click Here to See the Profile for GTSend a Private Message to GTDirect Link to This Post
I've just started so my 'Check Wallet Light" hasn't come on yet. But I hear a squeaking sound, I think it's coming from the wife...
IP: Logged
collinwestphal
Member
Posts: 698
From: Waukesha, WI, USA
Registered: Jun 2003


Feedback score: N/A
Leave feedback

Rate this member

Report this Post02-10-2005 09:37 AM Click Here to See the Profile for collinwestphalSend a Private Message to collinwestphalDirect Link to This Post
there is a much easier bracket to make than the one on the top, and it will give you more alternator wrap than these. I'll post pics on saturday. You run the other end of the bracket to the torx bolt in the intake manifold. along with a few washers for spacing. at least I think thats what I did.
IP: Logged
Mickey_Moose
Member
Posts: 7497
From: Edmonton, AB, Canada
Registered: May 2001


Feedback score: (3)
Leave feedback


Total ratings: 143
Rate this member

Report this Post02-10-2005 12:00 PM Click Here to See the Profile for Mickey_MooseClick Here to visit Mickey_Moose's HomePageSend a Private Message to Mickey_MooseDirect Link to This Post
Hmmm...missed this thread some how...

Anyways, the tensioner bracket I am using is completely scratched build from some 5" flat bar. Email me if you are wanting the pattern and measurements. I believe my belt size is 80.5, but I am also using the larger idler pulley (Dayco part # 89009).

collinwestphal >> I originally tried something like you are describing, but I found it very awkward to get the belt on and then the tension was not too my liking (the tensioner was almost at it's minimum tension). But I would still like to see pictures of your setup

Stock A/C >> as far as I know you need to install the Caddy pulley on the stock a/c for the belt.

Tim

IP: Logged
Kento
Member
Posts: 4218
From: Beautifull Winston Salem NC
Registered: Jun 2003


Feedback score: (2)
Leave feedback


Total ratings: 131
Rate this member

Report this Post02-10-2005 12:58 PM Click Here to See the Profile for KentoSend a Private Message to KentoDirect Link to This Post
 
quote
Originally posted by Mickey_Moose:

Stock A/C >> as far as I know you need to install the Caddy pulley on the stock a/c for the belt.

Tim

87/88 Tech 4's used a 6 groove pully as well so you just need to rig up mounting points. if you use a V6 or 84-86 Duke you will have to swap clutch/pulley to the caddy one.

IP: Logged
jeffndebrus
Member
Posts: 2772
From: Jacksonville, Fl- usa
Registered: Aug 2001


Feedback score: (1)
Leave feedback


Total ratings: 85
Rate this member

Report this Post02-10-2005 05:02 PM Click Here to See the Profile for jeffndebrusSend a Private Message to jeffndebrusDirect Link to This Post
I just moved up to an 80" belt where I had been using a 79.5. I have a brand new caddy a/c compressor.

------------------
Proud Member of the DOWN SOUTH SUNNY WINTER drive your Fiero Naked Coalition.

85 4.9SE 4T60E Parks harness/ Rockcrawl chip-- No I do not want to race!

IP: Logged
collinwestphal
Member
Posts: 698
From: Waukesha, WI, USA
Registered: Jun 2003


Feedback score: N/A
Leave feedback

Rate this member

Report this Post02-10-2005 07:00 PM Click Here to See the Profile for collinwestphalSend a Private Message to collinwestphalDirect Link to This Post
mickeymouse...The way I have mine, its very easy to remove the belt. You do have to find the correct size belt. I was assuming that anyone wanting to make a custom belt system would get a different belt than the stock one. I went and bought 3 belts around the approximate size, and tried them all till one worked the best. then I just returned the other 2. Parts stores usually don't mind at all. I'll still get some pics of mine. It works like a charm. (and I have tried my share of belt setups)
IP: Logged
OldBob
Member
Posts: 393
From: Ludington, Michigan, USA
Registered: Oct 2004


Feedback score: (1)
Leave feedback

Rate this member

Report this Post03-18-2005 07:33 PM Click Here to See the Profile for OldBobSend a Private Message to OldBobDirect Link to This Post
Here's my version of a bracket for the bel tensioner.

The material is 1/4" x 3/4" hot rolled steel.
The short leg is 2" long with a 11/32" hole in the end.
The long leg is 4" long with a 13/32" hole in the end.
The angle between the two legs is 50 degrees.
The two legs overlap about a half inch at the weld. The short leg
is in front of the long leg.
There is a 15/16" long spacer between the lower bolt and the
threaded hole in the manifold.

There is a stop projection on the stationary part of the tensioner
which can be removed which will allow more movement of the
arm in the clockwise direction. Gives a little more room to slip
the belt on.

Bob

[This message has been edited by OldBob (edited 03-18-2005).]

IP: Logged
EngineerBill
Member
Posts: 117
From: California
Registered: Apr 2005


Feedback score: N/A
Leave feedback

Rate this member

Report this Post04-26-2005 03:29 PM Click Here to See the Profile for EngineerBillClick Here to visit EngineerBill's HomePageSend a Private Message to EngineerBillDirect Link to This Post
I like your bracket Bob. I had made one very similar. You don't have to modify any of the engine parts and it is very much out of the way of everything else. My steel was a little thicker so my spacer is a little less thick in the back. I guess I have a little fun with curves when I get a torch in my hand but the bracket is essentially the same.

------------------
Engineer Bill

DesignerSoftware.us

IP: Logged
fourpoint9
Member
Posts: 1058
From: Long Beach, WA, USA
Registered: Feb 2004


Feedback score: (2)
Leave feedback

Rate this member

Report this Post04-27-2005 12:58 AM Click Here to See the Profile for fourpoint9Click Here to visit fourpoint9's HomePageSend a Private Message to fourpoint9Direct Link to This Post
Here's mine:

------------------

87 notchback 4.9L swap in progress
Custom LED Notchback Tail Lights

[This message has been edited by fourpoint9 (edited 04-27-2005).]

IP: Logged
GT
Member
Posts: 911
From: Silver Spring, MD USA
Registered: May 2003


Feedback score: N/A
Leave feedback

Rate this member

Report this Post05-20-2005 12:13 AM Click Here to See the Profile for GTSend a Private Message to GTDirect Link to This Post
bump for Captain Fiero...
IP: Logged
PFF
System Bot
Capt Fiero
Member
Posts: 7657
From: British Columbia, Canada
Registered: Feb 2000


Feedback score: N/A
Leave feedback


Total ratings: 260
Rate this member

Report this Post05-20-2005 12:17 AM Click Here to See the Profile for Capt FieroClick Here to visit Capt Fiero's HomePageSend a Private Message to Capt FieroDirect Link to This Post
Cool Cool, Thank You.
IP: Logged
EngineerBill
Member
Posts: 117
From: California
Registered: Apr 2005


Feedback score: N/A
Leave feedback

Rate this member

Report this Post05-20-2005 03:18 AM Click Here to See the Profile for EngineerBillClick Here to visit EngineerBill's HomePageSend a Private Message to EngineerBillDirect Link to This Post
Nice colors, fourpoint9! Very clean!
IP: Logged


All times are ET (US)

T H I S   I S   A N   A R C H I V E D   T O P I C
  

Contact Us | Back To Main Page

Advertizing on PFF | Fiero Parts Vendors
PFF Merchandise | Fiero Gallery | Ogre's Cave
Real-Time Chat | Fiero Related Auctions on eBay


Copyright (c) 1999, C. Pennock