As I said earlier in this post, YellowArtero wants this car to require as little maintenance as possible. Therefore, we elected to go with an OEM plug wire set and 100,000 mile spark plugs. The stock spark plugs for the 95-earlier engines are AC Delco copper R42LTSM's which only last about 30,000 miles or so. The 96-up engines came with Platinum tipped plugs but GM has since superceded the platinum plugs in favor of the iridum plugs. Perhaps GM finally realized that the platinum tips like to fall off the electrodes and get caught between the piston and cylinder wall?
Anyway, I installed a set of Iridum AC Delco plugs: 41-985. Gap to 0.045" and torque to 11 ft/lbs. While gapping, take special care not to damage the thin electrode.
You can choose to use other plugs if you wish but I have had very good experience with Iritiums in everything I put them in. You can get these plugs for a little less than $5 ea from gmpartsdirect, and they carry a 100,000 mile warranty.
IP: Logged
07:11 PM
Darth Fiero Member
Posts: 5921 From: Waterloo, Indiana Registered: Oct 2002
Next on the list of things to do is to prep the engine for the installation of the lower intake manifold. Since this is crate motor, everything is coated in a thin layer of cosmoline, an oily-protective coating. Carb or brake cleaner will easily remove this coating.
Before installing the lower intake on the 3.4 DOHC engine, be sure to install the PCV hose, otherwise it will be a bear to do later.
While waiting on the gasket surfaces to dry, prepare the bolts for installation. Notice the 12 intake bolts with rubber grommets. These are what you will typically find on these engines. However, notice the two, 2-inch long metric silver-color bolts. The factory engines do not normally come with these two shiny bolts but you might want to go get some from the hardware store as they aid in the installation of the lower intake. In my case, the core motor I picked up had recently had intake gaskets replaced on it and the mechanic left them in the lower intake for me.
Once your surfaces are dry, you can install the lower intake manifold and gaskets. Coat the two longer bolts with motor oil and install them in the vertical holes located in the center portion of the intake.
Carefully tighten these two bolts down EVENLY until the other intake bolt holes line up with the threaded holes in the cylinder heads. DO NOT TIGHTEN THE VERTICAL BOLTS ALL THE WAY DOWN. Only go far enough to line up all the intake bolt holes.
Once you have lined up all the intake holes, coat the 12 intake bolts with blue loctite (one drop each is pleanty) and install them in the intake manifold. Starting in the center portion of the intake, hand tighten all intake bolts working your way out from the center in a circular pattern. Once all of the bolts are hand-tightened, use the same sequence and tighten them all down to 18 ft/lbs. (do not torque the 2 vertical bolts)
Once the lower intake bolts are torqued, you can remove the 2 vertical bolts. I choose to no leave them in the lower intake because the factory doesn't.
The core motor I picked up also had a factory oil-cooler installed. Since we already had this part, I saw no reason not to use it, especially since this is a 4-speed car and the highway RPMs will be a little higher.
Before installing this oil cooler, be sure to flush it out really good and install a new gasket. You can use a gasket from a PF 47 or 52 oil filter. Also, the block might require some prepping before installation. Since this crate motor did not come with an oil cooler, it already had a threaded insert installed in the block for the filter to thread directly to. There was also a pipe plug that was plugging the coolant core passage that needed to be removed as well.
Install the oil cooler coolant hose connection into the block and make sure the oil filter fitting threads are clean and clear.
Now install the cleaned oil cooler and torque the hollow threaded rod that holds it on to 24 ft/lbs. I chose to coat this rod with blue loctite on the block end so it would not come out when you take the oil filter off.
Now you can use the original molded heater hose (if it was in good condition) or a piece of 1/2" or 5/8" heater hose to connect the block to the oil cooler. Be sure to install this hose before you install the coil pack or you might have a hard time installing it later. Once the hose is on, you can install the coil pack (if you choose to put it in this location). Notice the reformed oil dipstick tube. I like my tubing bender.
You don't have to put the coil pack here but I think it is a good location for the Fiero since it is very easy to get to and it is out of the way. You can also bend your oil dipstick tube differently or not at all, but I feel this way makes it easier to check the oil level with the engine installed in the car.
[This message has been edited by Darth Fiero (edited 04-26-2004).]
IP: Logged
07:37 PM
Darth Fiero Member
Posts: 5921 From: Waterloo, Indiana Registered: Oct 2002
Moving on, time to install the manual transmission flywheel and clutch kit. Remove the auto transmission flexplate bolts, spacer, and flexplate (if you have them). The auto trans flexplate bolts are too short for use with the manual flywheel, so you will need to use different ones. Since new bolts are inexpensive, I chose to buy new ones for this job. Otherwise you run the risk of using a bolt that has already yeilded and might break down the road or during assembly. Before installing the flywheel, inspect the oil pan gasket, rear main seal, and cam tunnel core plug for leakage. Now would be a good time to replace these seals if they are bad.
Install the flywheel, making sure to align the hole in the crank to the extra hole in the flywheel. Coat your new flywheel bolts with blue loctite, and install all of them and tighten by hand. Once all the bolts are hand tight, torque the bolts to 61 ft/lbs in a star pattern. Once the bolts are tightened, you can clean the flywheel with brake or carb cleaner and let dry.
With the flywheel on, you can prepare the clutch disc and pressure plate for installation. Before doing that, make sure the crank pilot hole is clean and then put in a light coat of lithium grease or equiv. Make sure you clutch disc is clean and dry, and install it onto the flywheel with the raised spring dampener area facing away from the engine. The clutch pilot alignment tool will hold the clutch disc on the engine.
Now, install the cleaned pressure plate assembly onto the flywheel and clutch disc. You can hold it in place with two bolts.
Here again, I elected to use NEW clutch cover bolts and lightly coated them with blue loctite. The factory 2.8L clutch cover bolts I removed from the stock Fiero engine had lock washers as well so I installed new ones on these bolts. Hand tighten all clutch cover bolts down EVENLY, making sure the clutch disc is centered. Once the pressure plate is hand tight, you can begin tightening it on with a small rachet. Special care must be taken while installing a pressure plate so as to not bind it up. I usually work in a star pattern and only turn each bolt about 1/2 to 1 full turn at a time until the pressure plate is fully seated against the flywheel. Before torquing, check to make sure the clutch alignment tool easily slides in and out of the clutch disc and pilot hole. If not, loosen the pressure plate and re-center the disc. If the alignment tool slides easily, you can now torque the pressure plate bolts to 18 ft/lbs, in a star pattern.
Once the clutch assembly is on, it is time to install the transmission. Be sure to clean the input shaft and lightly lube the release bearing support shaft with lithium grease or equiv. Install the throwout (release) bearing and check operation and alignment with the release fork. Once that is done, you can mate the transmission to the block. If you lined up the clutch components correctly, everything should slide together with relative ease. I coated all the bellhousing bolts with blue loctite and installed them, tightening by hand to make sure the transmission mated to the engine evenly and tighten.
IP: Logged
08:01 PM
gascarracer Member
Posts: 129 From: Batavia, Ohio, USA Registered: Apr 2003
Speaking of studs, time to install the exhaust manifold. Clean your exhaust port surfaces and install your cleaned exhaust manifold studs. Be sure to put a drop of motor oil on the threads and then install your new gaskets.
Since I am going to route the exhaust on this engine like the stock Fiero does it, I am using two-front 3.4 exhaust manifolds. Make sure your manifolds are cleaned up and free from cracks, install them and the heat sheilds, and torque the exhaust nuts to 10 ft/lbs.
IP: Logged
11:29 PM
Apr 29th, 2004
Razor_Wing Member
Posts: 1753 From: Blowing Rock, NC, USA Registered: Apr 2003
I am swapping a 96 3.4 TDC in an 88 5speed. I am planning on routing the exhaust in the same fashion as you are. Do you know if I can replace the rear exhaust manifold with the front?
Thanks for all of your effort.
------------------ Ernie
1988 Silver GT One owner 47000 miles. Soon to be a 3.4 DOHC powered.
IP: Logged
12:12 PM
88-DOHC Member
Posts: 442 From: San Jose, CA, USA Registered: Dec 2001
I am swapping a 96 3.4 TDC in an 88 5speed. I am planning on routing the exhaust in the same fashion as you are. Do you know if I can replace the rear exhaust manifold with the front?
Thanks for all of your effort.
You can't do that trick on the 96 motors without making some sort of adapter plate.
IP: Logged
04:45 PM
PFF
System Bot
gascarracer Member
Posts: 129 From: Batavia, Ohio, USA Registered: Apr 2003
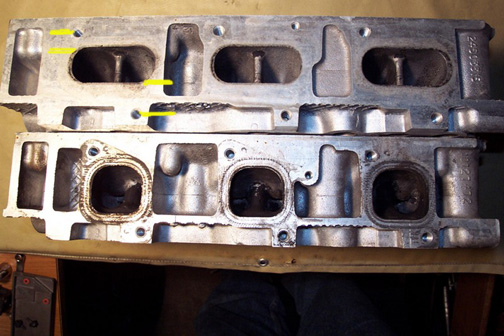
Although this doesn't pertain to me ('95), why? I know about the port shape differences, is it stud spacing?
It has nothing to do with the port shape difference or the stud spacing itself, it has to do with the fact that the studs are a mirror image of each side instead of copies. So if you take a front manifold and try to attach it to the rear you don't have any studs to go through the holes nor do the studs have any holes to go through to attach it to. Hence the reason I said you can't do it without making a adapter plate.
you're the man, Darth you are doing top quality work AND posting it here for others. BIG kudos to you for all that extra effort. I will be doing my tdc implant a bit later this summer and am watching this like a hawk!
I want to copy your steps over to a WORD doc for later reference; I expect you won't mind; that is in case anything ever happens to this thread (God forbid) or the site..........
THANKS for doing this for everyone!!!!!
IP: Logged
10:05 AM
May 3rd, 2004
Darth Fiero Member
Posts: 5921 From: Waterloo, Indiana Registered: Oct 2002
I want to copy your steps over to a WORD doc for later reference; I expect you won't mind
If I worried about someone "copying" my work, I wouldn't post it on the internet. I am not that kind of person. There are always going to be those people who will want to do the work themselves, no matter how much someone (or some company) tries to talk them out of it. My opinion is that education is the best communication tool between a business and a customer. I want to post the most detailed instructions that I can, therefore people like you can make your own judgement on if a swap of this magnatude is something you can handle by yourself, or if you would rather "hire" someone like me to do it for you. After all, is there a better way to show off the kind of work I do?
IP: Logged
03:09 AM
qwikgta Member
Posts: 4659 From: Virginia Beach, VA Registered: Jan 2001
I have to do some painting on my 3.4 DOHC valve covers and intake too. How do you prep the aluminum to do the job right. SHould i just send them out for powder coating or can i get a great looking "spray paint" job with the correct prep work
THanks
Rob
------------------ 88 TTop coupe (CJB #95), 96 3.4DOHC/5 speed in progress
Light travels faster than sound. This is why some people appear bright until you hear them speak
IP: Logged
11:22 AM
Darth Fiero Member
Posts: 5921 From: Waterloo, Indiana Registered: Oct 2002
I have to do some painting on my 3.4 DOHC valve covers and intake too. How do you prep the aluminum to do the job right. SHould i just send them out for powder coating or can i get a great looking "spray paint" job with the correct prep work
The only thing I have seen wrong with powdercoat is trying to get the shade of color you want. RAREW66 is painting the covers and intake for this motor and I think he is using an etching primer and a urathane based paint. PM him and I am sure he will be happy to let you know how he is doing it.
IP: Logged
01:14 PM
May 5th, 2004
gascarracer Member
Posts: 129 From: Batavia, Ohio, USA Registered: Apr 2003
Moving right along it is time to get this beast mounted to the cradle. First things first, you can use the stock 2.8L mounts, however, you are going to run into an issue concerning the bracket that mounts just beside the crank on the 3.4 DOHC. The massive front timing cover will interefere with this bracket as stamped so some trimming will need to be done. In the following two pictures I have tried my best to show you how far you need to shave off the sides of the bracket to clear the timing cover. Notice the arrow pointing to the drilled hole, I will talk more about this in a second.
Once these areas have been cut, you can bolt this bracket to the 3.4 DOHC just like it goes on the stock 2.8L.
The hole I drilled is for use with my favorite engine swap mounts, the 75 Dodge 1/2 ton 2WD 318 V8 motor mounts. These mounts are small and compact in size which allow for great flexibility. I am using 4 of these mounts on this swap in an attempt to get the engine and trans to sit about 1" lower on the cradle therefore to give better clearance up top. I don't know how well this is going to work yet but going back to stock mounts is just as easy as buying them and putting them on. Here is a pic of that bracket installed with one of the mounts I am talking about.
These mounts have 1/2" course threaded studs in them which means if you are using an existing hole in the cradle or on a bracket you will need to enlarge it to 1/2" or slightly bigger.
[This message has been edited by Darth Fiero (edited 05-06-2004).]
IP: Logged
12:48 AM
Darth Fiero Member
Posts: 5921 From: Waterloo, Indiana Registered: Oct 2002
Here is a picture of the mounts I am using along with what is left of the stock rear trans mount. I am using the bracket from the rear mount as a mounting point and to get the rubber off all you need to do is heat it up really good with a torch and it will melt or burn right off, whichever comes first.
Believe it or not that hole was already there and it only needed to be touched up with my 1/2" drill bit.
Now, the dodge truck mount will go right on the mount bracket but when bolted together, it will not fit in the cradle. You will need to cut part of the cradle out to clear the nut and stud of the mount.
Once the "slot" is cut, you can insert the mount. Notice the slot is big enough to allow the mount to slide left to right in order to properly line up the engine/trans assy to the cradle.
IP: Logged
12:55 AM
Darth Fiero Member
Posts: 5921 From: Waterloo, Indiana Registered: Oct 2002
For the front trans mount I did pretty much the same thing, drilled out the existing trans mount bracket hole to 1/2" and then melted the rubber off the old front trans mount and enlarged the hole so it would accept the dodge motor mount. Since these mounts are thinner than the stock rubber, you will need to orient the mounts so the engine sits lower in the cradle.
Using the 4-speed manual trans, I noticed it did come very close to sitting right on the cradle in two areas. One was right by the starter and the other was right by the front control arm bushing on the driver's side. A little heat and some slight massaging of the cradle clearanced these areas just right to prevent any metal-to-metal contact.
[This message has been edited by Darth Fiero (edited 05-06-2004).]
IP: Logged
01:01 AM
Darth Fiero Member
Posts: 5921 From: Waterloo, Indiana Registered: Oct 2002
Concerning the factory engine shock absorber. Since this engine is lower on the cradle, I can't really use it. Besides that the 3.4's A/C compressor will hit the part that bolts to the block. Now the core (1992 Lumina) 3.4 motor I got had a mount that bolted to the front of the block behind the A/C compressor. This is a hydrualic mount filled with oil and these do allow for a lot of movement which would not exactly be a good thing in this car. Therefore, I removed the hydraulic mount and modified the bracket to accept a dodge truck mount.
To bolt the mount to the cradle, you will need to fabricate some kind of a bracket and either weld or bolt it to the cradle. I my case, I welded it. Again, another issue came up since this engine sits so low on the cradle. This front mount bracket hit the cradle where it is formed up to allow room for the exhaust. Some quick notching of the bracket did the trick.
Its close, but it works. Keep in mind that these dodge truck mounts that I am using only cost $3.99 each and are designed to work on a 318 V8 so they should be able to handle this 3.4 DOHC engine just fine. The engine sits about as low as it can on the cradle. Any lower and the oil pan area at the drain plug would sit below the bottom of the cradle. Again, I have not finished this project yet so I don't know if the axles will interfere with the cradle or not. If so, I can always shim up the 4 corners for clearance.
As for the swap itself it will need to be delayed a day or two while I change out the coolant tubes on this car. The person who owned it before put straight water in the cooling system which bursted the cooling tubes running to the front. I will let you know how fun of a job that ends up turning into.
IP: Logged
01:12 AM
gascarracer Member
Posts: 129 From: Batavia, Ohio, USA Registered: Apr 2003
Another fantastic episode. This is great documentation. This is the best step by step swap instructions for this swap ever. Can't wat for the next installment.
Thanks for your Time, Energy and Effort.
------------------ Ernie
1988 Silver GT One owner 47000 miles. Soon to be a 3.4 DOHC powered.
IP: Logged
12:11 PM
Spyhunter Member
Posts: 1254 From: San Francisco, CA Registered: Feb 2002
I am watching really closely to see what happens with the axle shafts - have you used these Dodge mounts before on this or something similar? Maybe they worked on a 3800? Just wondering where the idea came from/what you DID use them in and how THAT one turned out for 'all-round' clearance. I will be using my 284 trans that came with my 3.4 so expect to do some fabbing; but the axle clearance/setup is very intriguing!! PLUS the bonus of lowering the centre of gravity!!!! THAT I like!!!! Can't think of a downside to the Dodge mounts at all. Excellent documentation, Darth, keep it up! -GP
IP: Logged
01:51 PM
Darth Fiero Member
Posts: 5921 From: Waterloo, Indiana Registered: Oct 2002
I am watching really closely to see what happens with the axle shafts - have you used these Dodge mounts before on this or something similar? Maybe they worked on a 3800? Just wondering where the idea came from/what you DID use them in and how THAT one turned out for 'all-round' clearance. I will be using my 284 trans that came with my 3.4 so expect to do some fabbing; but the axle clearance/setup is very intriguing!! PLUS the bonus of lowering the centre of gravity!!!! THAT I like!!!! Can't think of a downside to the Dodge mounts at all. Excellent documentation, Darth, keep it up! -GP
I have used the dodge mounts on my 3800 swaps in the past and have had very good luck with them. I stumbled upon them when I was looking thru a napa motor mount catalog one day while I was looking for something else.
IP: Logged
09:16 PM
May 7th, 2004
Darth Fiero Member
Posts: 5921 From: Waterloo, Indiana Registered: Oct 2002
Got the coolant tubes out. To remove them, you will need to pull both front wheels and the front spare tire well. The passenger side tube will come out pretty easy but the driver's side one is a little more difficult. First, you will need to undo the left front brake line at the flex hose and at the proportioning valve, and remove the screw holding it to the body as well as remove the bracket at the grommet so you can remove that brake line from the vehicle. You could just bend it up out of the way but I found this way is probably better because there is no risk of damage to the line. The other brake lines may need to be bent out of the way a little as well. You will also need to unbolt the rack and remove it from the linkage going to the steering column. Once these parts are out of the way, you can snake the left coolant tube out.
The driver's side tube is split (from water freezing) right under the front clamp so it is not usable. The passenger side tube did not show any damage but I cleaned it up with steel wool, and pressure checked it to 40psi -- NO LEAKS. I also pressure checked the radiator to 18psi and it also had no leaks so that is good news. Now all I have to do is go get a good driver's side tube tomorrow.
[This message has been edited by Darth Fiero (edited 05-09-2004).]
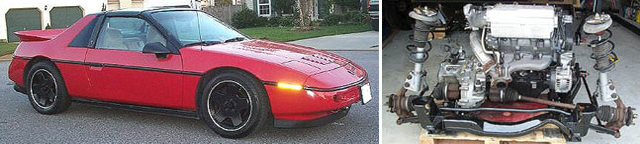
Got the cradle cleaned up and installed the engine onto it.
Notice the dolly and 2x4's that allow me to push the engine/cradle around so I can line it up. I use my engine cherry picker lift to lift the car up so I can push the engine/cradle into position and lower the car down. Check out my lifting tool:
Used a piece of box end tubing 1x1" steel and 7/16" grade 8 bolts and washers as well as a 2200lb test eye bolt.
Now that the engine is in, I could tell how level it was. It was off a little and I had to either lift the pass side or lower the driver's side of the powertrain. Because the driver's side cannot be lowered any more due to trans to cradle clearance, I shimmed up the pass side by about 1/4". It is pretty close, after everything is on the engine and the lid is back on it will be easier to line everything up but for now it looks good. BTW, this is NOT the intake plenum I am using, this is just for fitting purposes.
The powertrain being installed has revealed some interesting things. I installed the shift cables and clutch slave cyl and it appears that there will not be quite enough room to run the exhaust crossover pipe like it is routed stock. I will have to bring it out around the tranny by the driver's side frame rail. There is a lot of room over there now since the engine/trans sits lower on the cradle. BTW, I did install the driver's side axle and there is almost an inch of clearance between the CV tripod end and the cradle so no worries there.
In the coming days I will work on the exhaust and wiring. The painted intake and valve covers will be the last things to go on.
IP: Logged
01:08 AM
Erik Member
Posts: 5625 From: Des Moines, Iowa Registered: Jul 2002
The powertrain being installed has revealed some interesting things. I installed the shift cables and clutch slave cyl and it appears that there will not be quite enough room to run the exhaust crossover pipe like it is routed stock. I will have to bring it out around the tranny by the driver's side frame rail. There is a lot of room over there now since the engine/trans sits lower on the cradle. BTW, I did install the driver's side axle and there is almost an inch of clearance between the CV tripod end and the cradle so no worries there.
In the coming days I will work on the exhaust and wiring. The painted intake and valve covers will be the last things to go on.
Darth, I ran into that problem myself with the shift cables and shift cable bracket interfering with the crossover as well as the slave bracket interfering with the crossover. I see that your slave cylinder is different but cant tell if the slave bracket is the same config as mine was before modifying. Anyway, here are the mods I did to be able to use the stock crossover, maybe this will help you. It works great for me
------------------
[This message has been edited by Erik (edited 05-12-2004).]
IP: Logged
04:41 AM
Darth Fiero Member
Posts: 5921 From: Waterloo, Indiana Registered: Oct 2002
I appreciate the info but I can't use the stock crossover anyway because I am using 2 front manifolds. I have an idea that I think will work fine we will see how it turns out.
IP: Logged
01:52 PM
mrfixit58 Member
Posts: 3330 From: Seffner, Fl, USA Registered: Jul 99
Darth -- As you may have read, I've just aquired a 95 3.4 DOHC out of a Grand Prix. I want to run this behind a 5-speed. Can you re-flash a chip that will eliminate the auto-trans and the EGR? If not, do you know anyone who is can?
Darth: can you tell how the axle clearance issue is? (using the Dodge mounts) I am assuming it is fine since you haven't mentioned it.......??? However I am interested in whatever numbers you could put on it; ie 2" from axle to the frame above or below, etc etc.......??? If you don't mind, how close is it (to anything, I guess) and disregarding this specific situation, would there be room at the axle/frame for the engine/trans to go even lower?
(I have a 284 so it may be a different animal for mounting on the cradle) I want to mount it as low as possible.
Do you have to worry about any suspension stops or they are not affected by this? tia!! gp
Makes 1.5" drop-mounts for the Getrag 282 mounted to a 3800sc in the pre'88 cradle, along w/ 3.8 engine mounts I've contacted him and he may be interested in the TDC swap, but doesn't do a front engine mount for the 3.4 @ this time, if someone were to design one, gift him the drawings you might get a free mount and he'd (we'd) get a new product. Darth thinks (and I tend to agree) 1.5" may be too low for axle clearance and the oil-pan may hang too low as well.
Norm
IP: Logged
08:20 PM
Darth Fiero Member
Posts: 5921 From: Waterloo, Indiana Registered: Oct 2002
Darth -- As you may have read, I've just aquired a 95 3.4 DOHC out of a Grand Prix. I want to run this behind a 5-speed. Can you re-flash a chip that will eliminate the auto-trans and the EGR? If not, do you know anyone who is can?
Thanks, Roy
Roy, I can only do chips for the 91-93 computers (16149396 ECM) at this time. But if you have a 95 harness it should not be too hard to get that harness to work with the older ECM. I have pinouts and diagrams for both.
FIERO308--
I have not checked right axle clearance but I know the left axle to cradle is about 3/4" or so, don't have exact measurements yet but will soon. Can't lower the engine any more or the oil pan will sit lower than the cradle.
IP: Logged
11:41 PM
May 13th, 2004
Erik Member
Posts: 5625 From: Des Moines, Iowa Registered: Jul 2002
I have not checked right axle clearance but I know the left axle to cradle is about 3/4" or so, don't have exact measurements yet but will soon. Can't lower the engine any more or the oil pan will sit lower than the cradle.
Darth, My oilpan is level with the bottom of the cradle and my right axle has enough clearance. Of course mine is a 88 cradle so it may not apply to the pre 88
[This message has been edited by Erik (edited 05-13-2004).]