Pennock's Fiero Forum
  Technical Discussion & Questions - Archive
  Recovering Sunvisors

T H I S   I S   A N   A R C H I V E D   T O P I C
  

Email This Page to Someone! | Printable Version


Recovering Sunvisors by grathke
Started on: 09-09-2004 03:06 PM
Replies: 24
Last post by: rogergarrison on 09-10-2004 02:31 PM
grathke
Member
Posts: 111
From: St. Louis MO
Registered: Aug 2004


Feedback score: N/A
Leave feedback

Rate this member

Report this Post09-09-2004 03:06 PM Click Here to See the Profile for grathkeSend a Private Message to grathkeDirect Link to This Post
I read with interest the article on this site showing how to recover the headliner with new material.

https://www.fiero.nl/cgi-bin/main.cgi?RecoveringHeadliner

This article had a wealth of information and made doing so a breeze. I think it took me about 90 minutes including repairing two significant cracks with 5 minute epoxy. The headliner turned out great. BUT the old sunvisors did not look very good. So instead of purchasing recovered ones, I decided to do my own. It was not all that difficult. The following messages detail the recovery process.

If you do your own headliner and sunvisors, do yourself a favor and mark which sunvisor hinge goes to which side of the car.

Glenn

[This message has been edited by grathke (edited 09-09-2004).]

IP: Logged
PFF
System Bot
grathke
Member
Posts: 111
From: St. Louis MO
Registered: Aug 2004


Feedback score: N/A
Leave feedback

Rate this member

Report this Post09-09-2004 03:09 PM Click Here to See the Profile for grathkeSend a Private Message to grathkeDirect Link to This Post
This is the before shot which clearly shows the wrinkles and loose fitting material.


IP: Logged
grathke
Member
Posts: 111
From: St. Louis MO
Registered: Aug 2004


Feedback score: N/A
Leave feedback

Rate this member

Report this Post09-09-2004 03:12 PM Click Here to See the Profile for grathkeSend a Private Message to grathkeDirect Link to This Post

grathke

111 posts
Member since Aug 2004
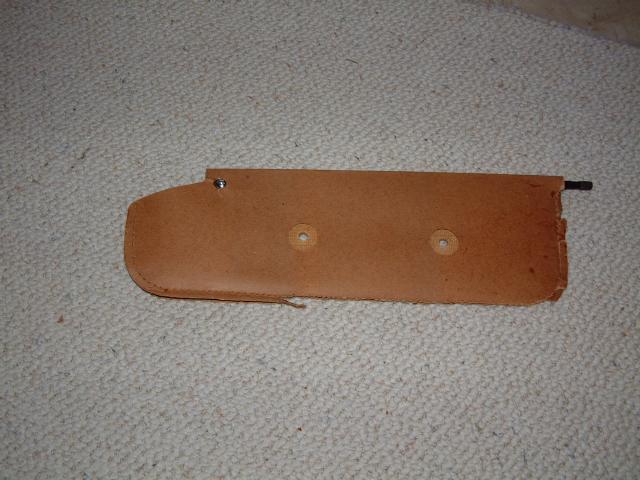
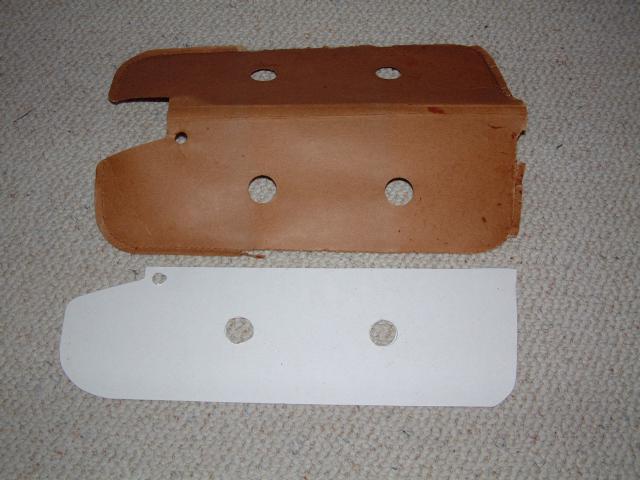
After taking off the old material, you are left with the cardboard 'frame'. Notice the missing cardboard along the edge. This is where the material is sewed through the cardboard.

IP: Logged
grathke
Member
Posts: 111
From: St. Louis MO
Registered: Aug 2004


Feedback score: N/A
Leave feedback

Rate this member

Report this Post09-09-2004 03:14 PM Click Here to See the Profile for grathkeSend a Private Message to grathkeDirect Link to This Post

grathke

111 posts
Member since Aug 2004
Inside the cardboard 'frame' is the hardboard core that gives the sunvisor its rigidity.

IP: Logged
grathke
Member
Posts: 111
From: St. Louis MO
Registered: Aug 2004


Feedback score: N/A
Leave feedback

Rate this member

Report this Post09-09-2004 03:15 PM Click Here to See the Profile for grathkeSend a Private Message to grathkeDirect Link to This Post

grathke

111 posts
Member since Aug 2004
Another shot of the two pieces inside the sunvisor.

IP: Logged
grathke
Member
Posts: 111
From: St. Louis MO
Registered: Aug 2004


Feedback score: N/A
Leave feedback

Rate this member

Report this Post09-09-2004 03:17 PM Click Here to See the Profile for grathkeSend a Private Message to grathkeDirect Link to This Post

grathke

111 posts
Member since Aug 2004
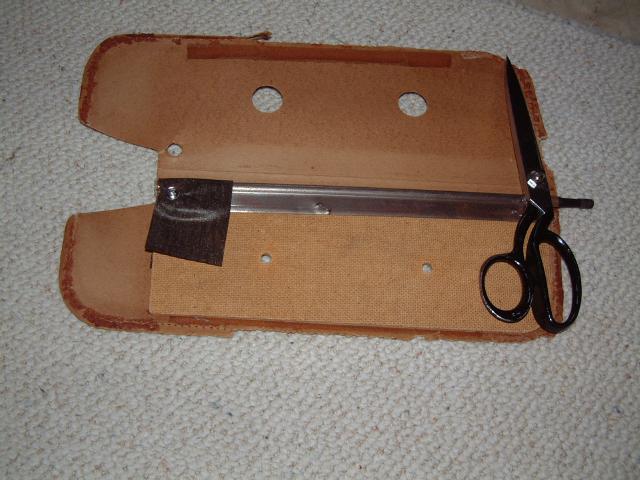
To fix the bad edges around the cardboard (where the material is sewed through the cardboard) I purchased some poster board at the local craft store and made it the same size as one side of the cardboard.

IP: Logged
grathke
Member
Posts: 111
From: St. Louis MO
Registered: Aug 2004


Feedback score: N/A
Leave feedback

Rate this member

Report this Post09-09-2004 03:19 PM Click Here to See the Profile for grathkeSend a Private Message to grathkeDirect Link to This Post

grathke

111 posts
Member since Aug 2004
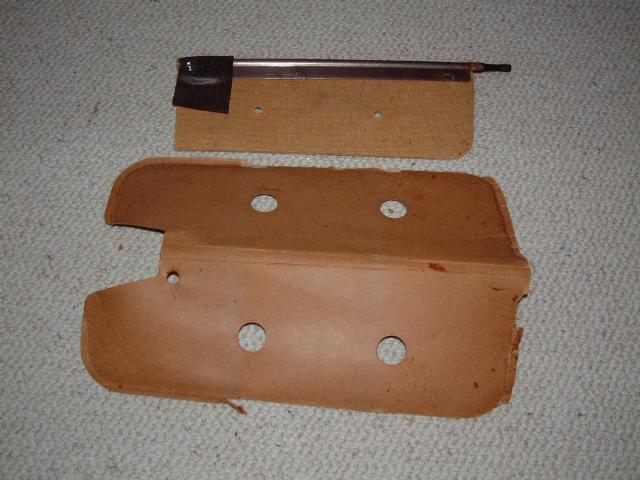
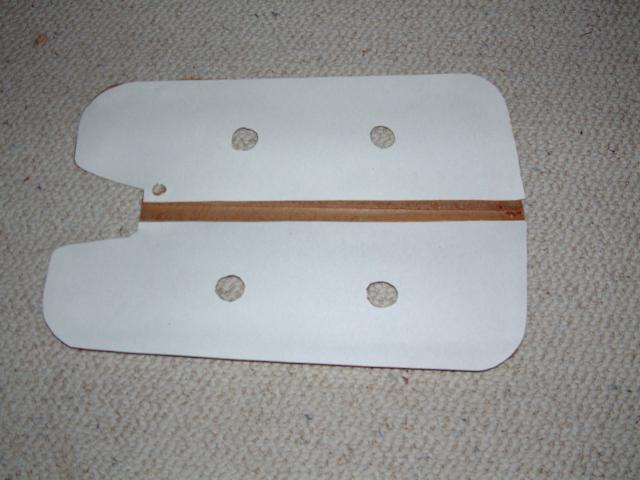
I then glued both new pieces to the insdie of the folded cardboard. I suppose I could have made a new cardboard 'frame' but decided on this method instead.

IP: Logged
grathke
Member
Posts: 111
From: St. Louis MO
Registered: Aug 2004


Feedback score: N/A
Leave feedback

Rate this member

Report this Post09-09-2004 03:21 PM Click Here to See the Profile for grathkeSend a Private Message to grathkeDirect Link to This Post

grathke

111 posts
Member since Aug 2004
Next, I glued the material to the cardboard. The original was not glued but I knew this would make it easier for me to work with.


IP: Logged
grathke
Member
Posts: 111
From: St. Louis MO
Registered: Aug 2004


Feedback score: N/A
Leave feedback

Rate this member

Report this Post09-09-2004 03:25 PM Click Here to See the Profile for grathkeSend a Private Message to grathkeDirect Link to This Post

grathke

111 posts
Member since Aug 2004
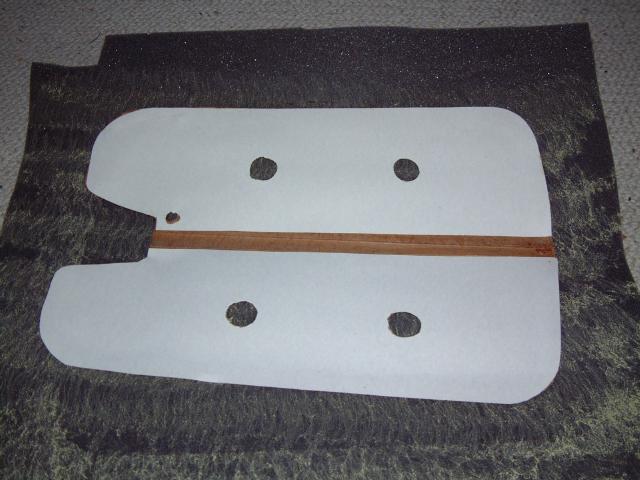
Then I trimmed the material sightly larger than the cardboard, and sprayed the edge with contact cement used in the previous step. Next I folded the material inward making a nice straight edge.

IP: Logged
grathke
Member
Posts: 111
From: St. Louis MO
Registered: Aug 2004


Feedback score: N/A
Leave feedback

Rate this member

Report this Post09-09-2004 03:29 PM Click Here to See the Profile for grathkeSend a Private Message to grathkeDirect Link to This Post

grathke

111 posts
Member since Aug 2004
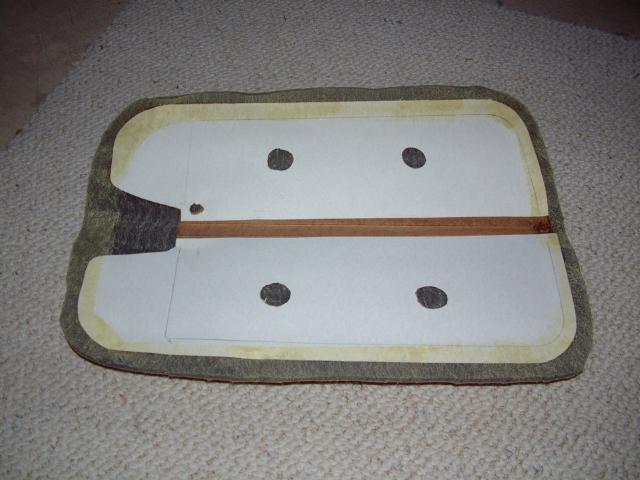
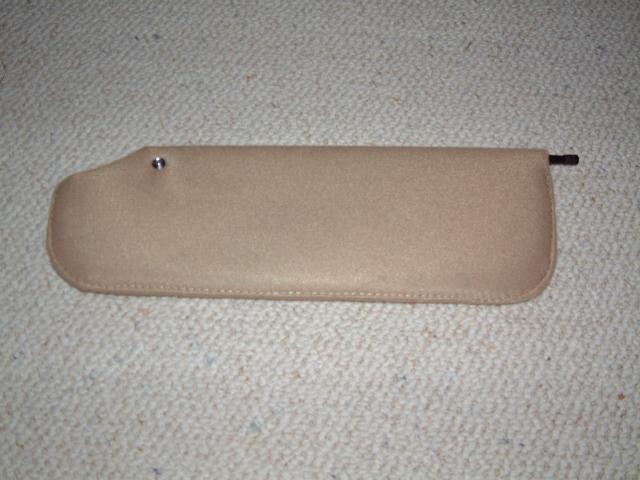
Lastly, I folded the covered visor, inserted the hardboard backing, aligned the edges all the way around and sewed it. In the final picture, you'll notice I did not make the map pockets. Personally I never like them because they stretch if you keep anything in them. If map pockets are desired, all you'd have to do is cover the visor in 3 pieces allowing for the two pockets.

This project was not difficult at all, and took about 45 minutes per visor. Now instead of purchasing visors for 79.00 I saved 72.00 for something else.
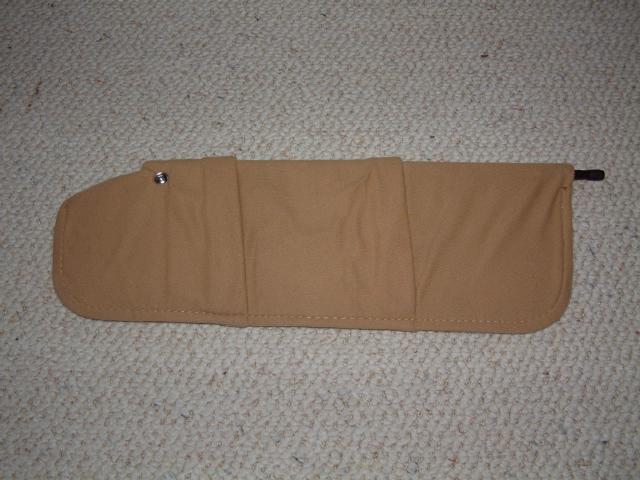
Before:


After:

[This message has been edited by grathke (edited 09-09-2004).]

IP: Logged
LZeitgeist
Member
Posts: 5662
From: Raleigh, NC, U.S.A.
Registered: Dec 2000


Feedback score:    (8)
Leave feedback


Total ratings: 126
Rate this member

Report this Post09-09-2004 03:33 PM Click Here to See the Profile for LZeitgeistSend a Private Message to LZeitgeistDirect Link to This Post
That's GREAT!!! I'd been thinking about doing something like this 'cuz my visors are pretty much shot, but wasn't ready to tear up my old visors trying to figure out the best way to do it... thank you!

+ for you!

------------------
Patrick W. Heinske -- LZeitgeist@aol.com
1988 Red Fiero Formula Convertible

IP: Logged
PFF
System Bot
Kohburn
Member
Posts: 7349
From: Oriental, NC
Registered: Jul 2003


Feedback score: N/A
Leave feedback


Total ratings: 188
Rate this member

Report this Post09-09-2004 03:38 PM Click Here to See the Profile for KohburnSend a Private Message to KohburnDirect Link to This Post
nice - thanks for thewrite up.. i'm doing the same process essentially with my seats.. visors will get their turn later
IP: Logged
Stinkin_V8
Member
Posts: 821
From: SK, Canada
Registered: Aug 2003


Feedback score: N/A
Leave feedback

Rate this member

Report this Post09-09-2004 03:42 PM Click Here to See the Profile for Stinkin_V8Send a Private Message to Stinkin_V8Direct Link to This Post
 
quote
Originally posted by grathke:

That looks awesome! Nice work and thanks for sharing.

Question: did you sew through the cardboard? If so, did you use an industrial sewing machine?

IP: Logged
grathke
Member
Posts: 111
From: St. Louis MO
Registered: Aug 2004


Feedback score: N/A
Leave feedback

Rate this member

Report this Post09-09-2004 03:51 PM Click Here to See the Profile for grathkeSend a Private Message to grathkeDirect Link to This Post
Thanks for asking. I did sew through the cardboard as was the original. I forgot to mention that I did use a commercial machine. I'm sure you could use a 'home' machine as long as you have a new needle and heavy duty thread.

Glenn

[This message has been edited by grathke (edited 09-09-2004).]

IP: Logged
Arns85GT
Member
Posts: 11159
From: London, Ontario, Canada
Registered: Jul 2003


Feedback score: (1)
Leave feedback


Total ratings: 202
Rate this member

Report this Post09-09-2004 03:58 PM Click Here to See the Profile for Arns85GTSend a Private Message to Arns85GTDirect Link to This Post
Great write-up and good illustrative pics.

+ for you, and thanks.

Arn

IP: Logged
zMacK
Member
Posts: 2194
From: NY
Registered: Apr 2004


Feedback score: N/A
Leave feedback


Total ratings: 79
Rate this member

Report this Post09-09-2004 04:58 PM Click Here to See the Profile for zMacKSend a Private Message to zMacKDirect Link to This Post
Now Im pissed I threw mine out... I didnt think it would be that easy
I glased off the holes when I redid my headliner.... whoops
IP: Logged
avengador1
Member
Posts: 35467
From: Orlando, Florida
Registered: Oct 2001


Feedback score:    (7)
Leave feedback


Total ratings: 571
Rate this member

Report this Post09-09-2004 06:45 PM Click Here to See the Profile for avengador1Send a Private Message to avengador1Direct Link to This Post
"+" for you, great write up and pictures.
IP: Logged
flyingbob
Member
Posts: 350
From: Thunder Bay Ontario Canada
Registered: Oct 2003


Feedback score: (2)
Leave feedback

Rate this member

Report this Post09-09-2004 09:34 PM Click Here to See the Profile for flyingbobSend a Private Message to flyingbobDirect Link to This Post
Great writeup Glenn and just in time to do mine to match the new head liner
Thanks for the info.
Bob
IP: Logged
mattm
Member
Posts: 1647
From: lancaster, pa
Registered: Aug 2003


Feedback score: N/A
Leave feedback


Total ratings: 60
Rate this member

Report this Post09-09-2004 09:42 PM Click Here to See the Profile for mattmSend a Private Message to mattmDirect Link to This Post
great thread, you get a +
IP: Logged
RWF
Member
Posts: 366
From: Brevard, NC. USA
Registered: Apr 2002


Feedback score: N/A
Leave feedback

Rate this member

Report this Post09-09-2004 10:33 PM Click Here to See the Profile for RWFSend a Private Message to RWFDirect Link to This Post
Thanks for taking the time to write this up...
IP: Logged
JT6666
Member
Posts: 355
From: Montgomery County, MD.
Registered: Nov 2003


Feedback score: N/A
Leave feedback

Rate this member

Report this Post09-10-2004 01:11 AM Click Here to See the Profile for JT6666Send a Private Message to JT6666Direct Link to This Post
Nicely Done-
When I saw the photo of the finished product, I thot they looked shiny like vinyl.
I guess that would be too thick to sew.
IP: Logged
PFF
System Bot
grathke
Member
Posts: 111
From: St. Louis MO
Registered: Aug 2004


Feedback score: N/A
Leave feedback

Rate this member

Report this Post09-10-2004 08:06 AM Click Here to See the Profile for grathkeSend a Private Message to grathkeDirect Link to This Post
Thanks.... No it is not vinyl.. It probably is the combination of the newness of the material, the flash and the angle. If you used a commercial machine, then it would be no problem going thru vinyl or even leather for that matter.

Glenn

IP: Logged
waddisme
Member
Posts: 76
From: taylorsville, nc, usa
Registered: Jun 2004


Feedback score: N/A
Leave feedback

Rate this member

Report this Post09-10-2004 09:59 AM Click Here to See the Profile for waddismeSend a Private Message to waddismeDirect Link to This Post
great post!! I think I will attempt to do mine. It looks pretty straight forward except for the sewing. My neighbor sews, so could i ask her to sew this without tearing up her machine?

------------------
'85 GT 2.8L Auto 120K DRIVEN DAILY

IP: Logged
Kohburn
Member
Posts: 7349
From: Oriental, NC
Registered: Jul 2003


Feedback score: N/A
Leave feedback


Total ratings: 188
Rate this member

Report this Post09-10-2004 10:00 AM Click Here to See the Profile for KohburnSend a Private Message to KohburnDirect Link to This Post
i'm using a battery operated 30$ sewing machine from target to do my seat upholstery.. it shouldn't harm her machine at all
IP: Logged
rogergarrison
Member
Posts: 49601
From: A Western Caribbean Island/ Columbus, Ohio
Registered: Apr 99


Feedback score: N/A
Leave feedback


Total ratings: 551
Rate this member

Report this Post09-10-2004 02:31 PM Click Here to See the Profile for rogergarrisonSend a Private Message to rogergarrisonDirect Link to This Post
Good job and write up.

If your visors are good, just bad fabric, you can get them done pretty cheap at auto upholsterer. I took mine, and some black naugahyde and got them both recovered for $20.

IP: Logged


All times are ET (US)

T H I S   I S   A N   A R C H I V E D   T O P I C
  

Contact Us | Back To Main Page

Advertizing on PFF | Fiero Parts Vendors
PFF Merchandise | Fiero Gallery | Ogre's Cave
Real-Time Chat | Fiero Related Auctions on eBay


Copyright (c) 1999, C. Pennock