Pennock's Fiero Forum
  Technical Discussion & Questions - Archive
  Cradle removal/Clutch replacement

T H I S   I S   A N   A R C H I V E D   T O P I C
  

Email This Page to Someone! | Printable Version


Cradle removal/Clutch replacement by Paul Prince
Started on: 09-04-2004 08:27 AM
Replies: 13
Last post by: Paul Prince on 09-05-2004 05:49 AM
Paul Prince
Member
Posts: 2935
From: Kansas City, MO
Registered: Dec 2002


Feedback score: N/A
Leave feedback


Total ratings: 110
Rate this member

Report this Post09-04-2004 08:27 AM Click Here to See the Profile for Paul PrinceSend a Private Message to Paul PrinceDirect Link to This Post
I have been meaning to post this for a while, just getting old and lazy

Drain coolant by removing 1/8 pipe plugs in coolant tubes.

Disconnect battery, negative first:

This images is larger than 100K. Click to view.

Scribe or paint line on hood hinges and remove hood:

This images is larger than 100K. Click to view.

Remove wheel, innerliner, caliper, rotor and hang caliper out of way:

This images is larger than 100K. Click to view.

Spray PB Blaster on all bolts to be removed, crossover pipe shown:

This images is larger than 100K. Click to view.

[This message has been edited by Paul Prince (edited 09-04-2004).]

IP: Logged
PFF
System Bot
Paul Prince
Member
Posts: 2935
From: Kansas City, MO
Registered: Dec 2002


Feedback score: N/A
Leave feedback


Total ratings: 110
Rate this member

Report this Post09-04-2004 08:33 AM Click Here to See the Profile for Paul PrinceSend a Private Message to Paul PrinceDirect Link to This Post
I remove knuckle bolts because I cannot get car high enough to clear car with struts attached:

This images is larger than 100K. Click to view.

Remove all coolant hoses and parking brake cable. Hoses that are attached to the body:

This images is larger than 100K. Click to view.

Remove throttle cable, cruise cable, shift cable(s) and slave if manual:

This images is larger than 100K. Click to view.

Take C-500 apart from body with 1/4" nut driver:

This images is larger than 100K. Click to view.


IP: Logged
Paul Prince
Member
Posts: 2935
From: Kansas City, MO
Registered: Dec 2002


Feedback score: N/A
Leave feedback


Total ratings: 110
Rate this member

Report this Post09-04-2004 08:37 AM Click Here to See the Profile for Paul PrinceSend a Private Message to Paul PrinceDirect Link to This Post

Paul Prince

2935 posts
Member since Dec 2002
Seperate C-500 by lifting up on locking tangs:

This images is larger than 100K. Click to view.

Use tubing wrench to take fuel lines apart:

This images is larger than 100K. Click to view.

Remove positive connections to the block attached to body, and the negative wire to the battery tray:

This images is larger than 100K. Click to view.

IP: Logged
Paul Prince
Member
Posts: 2935
From: Kansas City, MO
Registered: Dec 2002


Feedback score: N/A
Leave feedback


Total ratings: 110
Rate this member

Report this Post09-04-2004 08:42 AM Click Here to See the Profile for Paul PrinceSend a Private Message to Paul PrinceDirect Link to This Post

Paul Prince

2935 posts
Member since Dec 2002
Remove air filter housing and the remove fuel pump/AC relays attached to body:

This images is larger than 100K. Click to view.

Since the AC compressor on this customers car was siezed, I removed the compressor and line to body. If your system is charged you can hang compressor out of way:

This images is larger than 100K. Click to view.

I seperate knuckle from strut at this point:

This images is larger than 100K. Click to view.

IP: Logged
Paul Prince
Member
Posts: 2935
From: Kansas City, MO
Registered: Dec 2002


Feedback score: N/A
Leave feedback


Total ratings: 110
Rate this member

Report this Post09-04-2004 08:46 AM Click Here to See the Profile for Paul PrinceSend a Private Message to Paul PrinceDirect Link to This Post

Paul Prince

2935 posts
Member since Dec 2002
Go inside car with 7mm nut driver, philips screwdriver, T-15 torx and 10mm wrench. Remove console cover:

This images is larger than 100K. Click to view.

This images is larger than 100K. Click to view.

Remove ECM with 10mm wrench and unplug connectors at bottom:

This images is larger than 100K. Click to view.

This images is larger than 100K. Click to view.

IP: Logged
Paul Prince
Member
Posts: 2935
From: Kansas City, MO
Registered: Dec 2002


Feedback score: N/A
Leave feedback


Total ratings: 110
Rate this member

Report this Post09-04-2004 08:50 AM Click Here to See the Profile for Paul PrinceSend a Private Message to Paul PrinceDirect Link to This Post

Paul Prince

2935 posts
Member since Dec 2002
Remove ALDL with 7mm nutdriver:

This images is larger than 100K. Click to view.

Remove clip that holds harness in and feed the entire harness into engine compartment:

This images is larger than 100K. Click to view.

Place the inside harness on car and wire tie it so it doesn't catch on anything:

This images is larger than 100K. Click to view.

IP: Logged
Paul Prince
Member
Posts: 2935
From: Kansas City, MO
Registered: Dec 2002


Feedback score: N/A
Leave feedback


Total ratings: 110
Rate this member

Report this Post09-04-2004 08:56 AM Click Here to See the Profile for Paul PrinceSend a Private Message to Paul PrinceDirect Link to This Post

Paul Prince

2935 posts
Member since Dec 2002
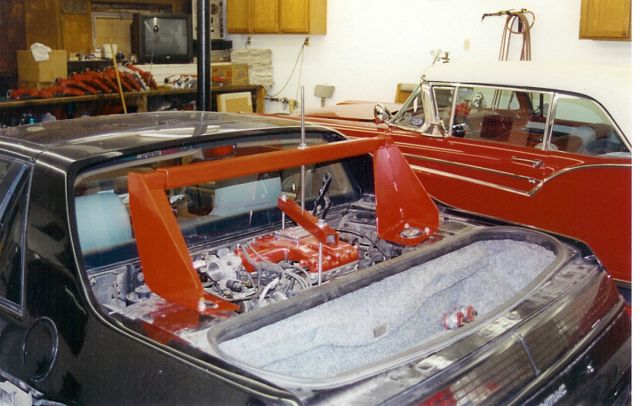
Place crane with chains and lifting device on car and then I use a 4 x 4 piece of wood under body lifting points. Raise car with crane to remove tension and remove front and rear cradle bolts, Lower engine on crane legs (mine are long). Then use 4 x 4 and jack to jack car up to clear car.
I remove cradle from side because I do not have room from rear. Engine out and tranny off:

This images is larger than 100K. Click to view.

Muffler does not look so good:

This images is larger than 100K. Click to view.

IP: Logged
Paul Prince
Member
Posts: 2935
From: Kansas City, MO
Registered: Dec 2002


Feedback score: N/A
Leave feedback


Total ratings: 110
Rate this member

Report this Post09-04-2004 09:09 AM Click Here to See the Profile for Paul PrinceSend a Private Message to Paul PrinceDirect Link to This Post

Paul Prince

2935 posts
Member since Dec 2002
Problem is clutch is worn, clutch fork is almost siezed and there is a crack in the case where the bearing is:

Once I replaced the clutch, put tranny on, and replaced the exhaust manifold bolts with Rodney's kit. Now is a good time to replace water pump. There is also a heat shield on firewall side that shoul be remove in the first steps.

Align cradle with car and push it in, attach crane hook, lower car slightly and line it up with cradle bolts. Pull cradle up and do the front cradle bolts first, then rear. Then is is a matter of attaching coolant hoses, harness back into engine, FP/AC relay, C-500, fuel lines, knuckles, shift cables, slave, battery cables.
Sorry for the short version, but this will hopefully give you and overview.........Paul

IP: Logged
RickN
Member
Posts: 2891
From: INDY, USA
Registered: Feb 2004


Feedback score: (2)
Leave feedback


Total ratings: 72
Rate this member

Report this Post09-04-2004 09:32 AM Click Here to See the Profile for RickNSend a Private Message to RickNDirect Link to This Post
Thanks for the posting. Good information. I've fortunately never needed to get this far into my Fiero so this is helpful for future reference. I have a comment and a question though.

I've found that the decklid is so easily realigned that marking anything in advance is not really necessary. With the side grills removed, loosely replace the hinge-to-decklid bolts, carefully close the hood while watching for interferences, Once the decklid is closed, tighten all the bolts.

I would not have expected to disconnect wiring harness inside the passenger compartment. Isn't there anyplace on the firewall in the engine bay that this can be disconnected?

Thanks again for the info!

------------------
RickN
White 88GT 5spd
White 85GT Auto

IP: Logged
Paul Prince
Member
Posts: 2935
From: Kansas City, MO
Registered: Dec 2002


Feedback score: N/A
Leave feedback


Total ratings: 110
Rate this member

Report this Post09-04-2004 09:47 AM Click Here to See the Profile for Paul PrinceSend a Private Message to Paul PrinceDirect Link to This Post
 
quote
Originally posted by RickN:

Isn't there anyplace on the firewall in the engine bay that this can be disconnected?

Thanks again for the info!

No, that harness connector is a one piece deal. The wires go into the connector, but there is no way to disconnect them at that point. They are solid. The decklid method you mentioned is also a good way to re-align the hood. This car BTW was an 87 GT.....Paul

IP: Logged
Patrick
Member
Posts: 39308
From: Vancouver, British Columbia, Canada
Registered: Apr 99


Feedback score: (1)
Leave feedback


Total ratings: 464
Rate this member

Report this Post09-04-2004 04:27 PM Click Here to See the Profile for PatrickSend a Private Message to PatrickDirect Link to This Post
Paul, excellent thread. Two things would make it better:

1) Do the same procedure with a Duke powered Fiero so that the pictures would look more like my Fieros.

2) Okay, on a more serious note, how about using a photo program to alter your images so that they appear in the thread itself (rather than having to click and view one at a time)?

[This message has been edited by Patrick (edited 09-04-2004).]

IP: Logged
PFF
System Bot
mypontiac2
Member
Posts: 326
From: Keokuk,Iowa
Registered: Dec 2001


Feedback score: (3)
Leave feedback

Rate this member

Report this Post09-04-2004 06:38 PM Click Here to See the Profile for mypontiac2Send a Private Message to mypontiac2Direct Link to This Post
Very nice write up. I always cheated by leaving the motor in the car. I use an engine support brace made by the Heartland club.

Ive done 3 Clutch jobs so far. It allows me to raise or lower the engine where I need it. It saves me the trouble of pulling the engine.
IP: Logged
sanderson
Member
Posts: 2203
From: corpus christi, texas, usa
Registered: Sep 2001


Feedback score: N/A
Leave feedback


Total ratings: 60
Rate this member

Report this Post09-04-2004 10:19 PM Click Here to See the Profile for sandersonSend a Private Message to sandersonDirect Link to This Post
I've done 4 cradle drops on Fieros. I pick the back of the car off the cradle with a 1 ton chainfall and a short length of chains with two hooks that go into the crossmemeber that runs across the top of the trunk under the carpet. Sit the cradle on a dolly, disconnect everything, remove the cradle bolts and the cradle is out in under 3 hours. Then you can work on everything in comfort and not be fighting hard to get bolts.
IP: Logged
Paul Prince
Member
Posts: 2935
From: Kansas City, MO
Registered: Dec 2002


Feedback score: N/A
Leave feedback


Total ratings: 110
Rate this member

Report this Post09-05-2004 05:49 AM Click Here to See the Profile for Paul PrinceSend a Private Message to Paul PrinceDirect Link to This Post
 
quote
Originally posted by Patrick:

2) Okay, on a more serious note, how about using a photo program to alter your images so that they appear in the thread itself (rather than having to click and view one at a time)?

I use photobucket.com and it seems lately that the photo's have been appearing as the little img icon on screen. Must have to do with size, or Cliff changed something?............Paul

IP: Logged


All times are ET (US)

T H I S   I S   A N   A R C H I V E D   T O P I C
  

Contact Us | Back To Main Page

Advertizing on PFF | Fiero Parts Vendors
PFF Merchandise | Fiero Gallery
Real-Time Chat | Fiero Related Auctions on eBay


Copyright (c) 1999, C. Pennock