I am starting a new thread here in the Tech section because this is really where it belongs. Secondly, I have some more pics, and if I post them on the other thread it would take forever for that thread to load for those of us who only have dial-up 56k. Anyway, you can view the other thread at: https://www.fiero.nl/forum/Forum1/HTML/037327.html
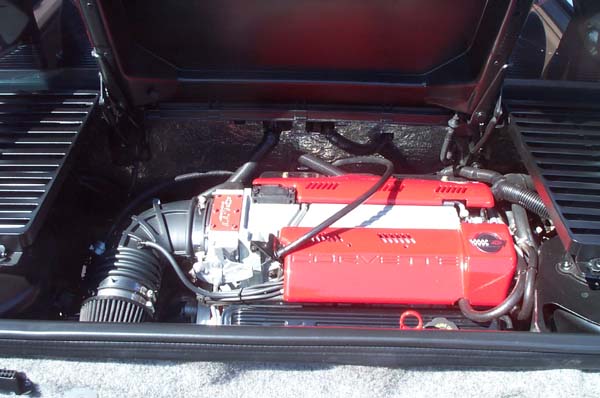
First, here is a pic of the installed LT1 with the corvette fuel rail covers. Just wanted to get a pic of them on there to see what it looked like.
Here is a picture of the Meziere WP116S electric water pump that we are using. It is mounted in the space just ahead of the right rear wheel. Yes, the inner wheel-well will be going back on to protect the pump and hoses from road debris.
Got the hoses hooked up to the thermostat housing and run thru the bulkhead down to the water pump.
Used the stock 2.8L coolant crossover tube off the V6 and bolted it to the firewall, this is the last hose I have to hook up and the cooling system is complete.
Here is where the 2.8L coolant tube comes up and connects to the water outlet / thermostat housing.
Like I said, only one coolant hose remaining to hook up. As soon as that is done, I move on to wiring as I am waiting on exhaust pieces to arrive.
------------------ power corrupts. absolute power corrupts absolutely. Custom GM Chip Burning | Fiero Engine Conversions | Turbocharging | dtcc.cz28.com
[This message has been edited by Darth Fiero (edited 01-16-2004).]
IP: Logged
07:24 PM
PFF
System Bot
BV MotorSports Member
Posts: 4821 From: Oak Hill, WV Registered: May 2001
Wow, you are doing some really nice work. I am impressed. I really enjoy to see someone thinking outside the box. Keep up the good work! BTW what yr LT1 are you using? I hope you have a 95+ with the vented opti-spark. God, I hate the non vented types. I had to replace my opti 3 times in one yr on my 94 Firehawk.
Funny thing about the reversed LT1 intake. Many moons ago I mentioned to a big name in fieros that it could be reversed and boy did I get flamed for going against the "norm". Then sure enough it starts to appear. Funny how things work out.
I have never been a fan of SBC fieros. The 4T60E/4T65HD when used with the SBC really perks my interest. I will have to have a chat with you sometime. Till then good luck to ya!
Steven
------------------ '02 Subaru WRX 14.61@91.87mph bone stock '95 R33 Nissan Skyline GTR V-Spec NISMO stage 1 400bhp '92 Mini Cooper 1.3i 74 brain-numbing hp!!! '87 Fiero GT 4.9/4T60e w/3.33 final drive, ZEX nitrous 65hp shot, 88 cradle w/ 325# coil overs, Poly everything, Upgraded sway bars, KYB's, 16X7 M11's, 11.25 "Zettner" front brakes, Complete MSD ignition w/ 6AL box, Custom 2.5" Flowmaster exhaust, Grand Sport Corvette paint, Carbon fiber interior trim, '98 T/A CD w/ ETR, Reverse Indiglo guages, Pillar mounted AutoMeter O2, Hella H4 conversion. Follow its built up here: https://www.fiero.nl/forum/Forum1/HTML/027460.html Sadly... SOLD.
IP: Logged
08:23 PM
Darth Fiero Member
Posts: 5922 From: Waterloo, Indiana Registered: Oct 2002
Wow, you are doing some really nice work. I am impressed. I really enjoy to see someone thinking outside the box. Keep up the good work! BTW what yr LT1 are you using? I hope you have a 95+ with the vented opti-spark. God, I hate the non vented types. I had to replace my opti 3 times in one yr on my 94 Firehawk.
Steven
This is a 96 Caprice engine which means it came with the vented opti-spark. Oddly enough, I helped a friend put a 94 Camaro LT1 into his 86 Trans Am a couple of years ago and his optispark did go out a year later. We went to the auto parts store and got a vented optispark distributor cap. As you know one vacuum line goes to the cap and one to the aluminum distributor body. All we did was drill a hole and press in a steel tube so we could hook a vacuum line to it. Never had another problem with it ever since.
IP: Logged
10:52 PM
Jan 17th, 2004
bushroot Member
Posts: 496 From: Grand Rapids, MI, USA Registered: Jan 2003
96 Caprice LT1? Thats the cast iron head engine??? I never thought to add a vent to my opti. The 3rd time I had to replace it I bought the GMPP kit to change it over to the vented style. That was alot of work since everything from the timing chain forward gets swapped out. And you know how much fun screwing with the LT1 is when installed on a F-body. Pretty cool you did the 3rd gen LT1 conversion. I had read up on that but the LS1 swap looks even better!
So what was needed to mate the trans to the engine? Did you use Archies adapter plate?
------------------ '02 Subaru WRX 14.61@91.87mph bone stock '95 R33 Nissan Skyline GTR V-Spec NISMO stage 1 400bhp '92 Mini Cooper 1.3i 74 brain-numbing hp!!! '87 Fiero GT 4.9/4T60e w/3.33 final drive, ZEX nitrous 65hp shot, 88 cradle w/ 325# coil overs, Poly everything, Upgraded sway bars, KYB's, 16X7 M11's, 11.25 "Zettner" front brakes, Complete MSD ignition w/ 6AL box, Custom 2.5" Flowmaster exhaust, Grand Sport Corvette paint, Carbon fiber interior trim, '98 T/A CD w/ ETR, Reverse Indiglo guages, Pillar mounted AutoMeter O2, Hella H4 conversion. Follow its built up here: https://www.fiero.nl/forum/Forum1/HTML/027460.html Sadly... SOLD.
IP: Logged
09:41 AM
LS1swap Member
Posts: 1181 From: McHenry,IL.USA Registered: Jan 2001
I like your cross over for the coolant. I put mine in the same place. I used 1-1/4 copper pipe instead. I will have to keep that way in mind if I ever do it again. I like that much better than the usual way I see it done. Looks much more professional from underneath. The only draw back is with my header set up, and the pipe in that location makes it even harder to change the plugs. Your manifolds don't look like they will present the same problem. Once again good work. I hope you come to the dells or something... We can compare notes.
IP: Logged
10:45 AM
Darth Fiero Member
Posts: 5922 From: Waterloo, Indiana Registered: Oct 2002
BV Motorsports -- Yes it is the Iron head Caprice LT1. About the optispark, that is exactly why we converted my buddy's non-vented over to vented so we didn't have to change all of the timing components. You can check out his page at http://LT4.cz28.com . And yes, I agree that the LS1 swap into a 3rd gen would be better . We used the Archie adapter plate, flexpate adapter, flexplate, and the motor mount that sits under the crank snout.
LS1swap -- I am trying to save Mr. Pat as much money as possible by using as many stock parts as I can. With that being said, it just worked out the best using the stock 2.8L crossover. I was thinking about some kind of tubing but I already had this piece. I am going to try to make it to the Dells this year and I think Mr. Pat might come with this car as well.
IP: Logged
03:29 PM
DustoneGT Member
Posts: 1274 From: The U.S. Superstate Registered: Dec 2002
I already asked this on the other forum, but what did you do to wire up the electronic controls?
------------------ May those that love us love us. For those who don't love us, may God turn their hearts. But if he can't turn their hearts, may he turn their ankles, so that we may know them by their limping.
IP: Logged
04:20 PM
Darth Fiero Member
Posts: 5922 From: Waterloo, Indiana Registered: Oct 2002
bushroot--------for future comparison when the auto LT1 is finished---I get 18MPG city and 25MPG hwy at 80 MPH. The 25 figure was on last years trip to the RFTH#8. When I first got my car back from Archie and after showing off to my friends what it can do (14mpg driving like a teenager) I drove VERY easy on the gas. Usually started off in second gear and short shifted the gears. Sometimes 2-4-5th or even3-4-5th. I got 22mpg but it was no fun driving it that way. It will be interesting to see what an auto will do.
IP: Logged
07:43 PM
PFF
System Bot
Jan 18th, 2004
Mr. Pat Member
Posts: 1860 From: Melbourne, VIC Australia Registered: Apr 2003
bushroot--------for future comparison when the auto LT1 is finished---I get 18MPG city and 25MPG hwy at 80 MPH. The 25 figure was on last years trip to the RFTH#8. When I first got my car back from Archie and after showing off to my friends what it can do (14mpg driving like a teenager) I drove VERY easy on the gas. Usually started off in second gear and short shifted the gears. Sometimes 2-4-5th or even3-4-5th. I got 22mpg but it was no fun driving it that way. It will be interesting to see what an auto will do.
You have a 5 speed right? Thats some pretty decent numbers all said and done. I hope to get about 25-27 on the highway at a crusing speed of 67mph. I drive it to Atlanta when its done, so ill let you know.
mr. pat--------67? Wait til you get behind the wheel . 67 will be your speed on the way up to your NEW cruising speed. What will be your final drive gear ratio with the auto trans?
[This message has been edited by LT188GT (edited 01-18-2004).]
IP: Logged
02:45 PM
Mr. Pat Member
Posts: 1860 From: Melbourne, VIC Australia Registered: Apr 2003
Ive got to be a good boy!! Ive already gone to jail for driving to fast. And that was with a 2.8!!!!!!!! But ill romp it once or twice Maybe 3 times, bloody hell, im gonna go back to jail
I believe the FD is 3.33. Not a bad ratio for MPG.
Got some more pics. Here is what I did for air induction:
If you are wondering what components were used, the stock induction setup on the late model Vortec Trucks uses 3.5" plastic tubing. This stuff is great and it has a smooth inside and flows a lot of air. Had to use the throttle body bellows from an 85-89 Z28. The K&N air filter is of the 4" open element universal variety. This particular setup should easily be able to support up to 500hp. The price was right, I had this stuff laying around my garage and gave it to him for free; the junk yard usually gives me this stuff for free anyway.
Yes, that is the battery you can see in the one pic; we still have not decided for sure if we want to keep it there but I think it looks good. The tray is held in by only 4 bolts and the battery does NOT move at all.
Here is a pic of where the PCM is mounted.
Cooling system -- done Induction -- done Exhaust -- waiting on parts to finish Suspension -- waiting on axles Wiring -- in progress
[This message has been edited by Darth Fiero (edited 01-19-2004).]
IP: Logged
12:04 AM
LS1swap Member
Posts: 1181 From: McHenry,IL.USA Registered: Jan 2001
I like your cold air induction. I am going to assume again and say that you probably plan to fabricate a sheet metal cover for the PCM? I know they are weather tight and mounted underhood originally, but still think some protection would be a good idea. I considered that location for my battery. I have a the water pump mounted where the battery originally was. So I had to find an alternative location as well. I eventually decided to go with a front mount. Good work ,and keep the info and pics coming
Mr.Pat---Darth Fiero-------Eventually when I get around to it, I plan on routing the intake duct back to the factory V6 set up using the original canister (which is removed) and my side scoops. This will give me cold ram air and still go thru a K/N filter. Right now it just sits in the open above and to the left of the exhaust. The L/H scoop opening is putting cold air into the eng compartment so I am not sucking up all that much hot air.
Edit for the pic
Clem
[This message has been edited by LT188GT (edited 01-19-2004).]
IP: Logged
10:46 AM
Darth Fiero Member
Posts: 5922 From: Waterloo, Indiana Registered: Oct 2002
Mr.Pat---Darth Fiero-------Eventually when I get around to it, I plan on routing the intake duct back to the factory V6 set up using the original canister (which is removed) and my side scoops. This will give me cold ram air and still go thru a K/N filter. Right now it just sits in the open above and to the left of the exhaust. The L/H scoop opening is putting cold air into the eng compartment so I am not sucking up all that much hot air.
Clem
Clem, might I offer some advice for what you are talking about doing. There is a reason why I removed the factory water seperator that sits between the side scoop and stock air canister, other than it was in the way. When I get the chance, I want to cut this thing apart and show everyone how horrible this thing is. Below is a basic pic of the path the air has to take just to get to the stock air filter... (please excuse the crudity of the drawing)
As you can see, the incoming air has to change directions several times, in some cases has to make more than a 90 degree turn. Something to also consider is that the flow path is not very big either and the bends are very sharp. I used this stock intake parth on my stock 205hp 3800 Series II N/A engine and when I removed it, I definately noticed a big difference in performance. I would say it picked up .3 sec in the 1/4 mile according to the ass-o-meter. So my advice to anyone wanting more performance is REMOVE this restrictive hunk of plastic.
About 5 years ago I removed all of that stuff in the air filter system. When Archie installed the LT1 last year, he removed the canister (filter housing) as it was no longer necessary. If and when I go back to the factory type of housing, it will be as straight as possible for the air flow. It is not a high priority item as of now but it will be done sooner or later. May be by the time I go to Daytona in March. My next project is Archies big brakes when he gets the 88 adapters, but thanks for your info.
IP: Logged
02:38 PM
PFF
System Bot
Darth Fiero Member
Posts: 5922 From: Waterloo, Indiana Registered: Oct 2002
Moser called today and said they could not shorten the stock Beretta CV axle because GM undercuts the shaft and then rolls the splines on, supposidly to increase strength. So they are building a totally custom axle for $160.
Better news on the right side. Went to the junk yard today and found the stock right CV axle assy from a 92 Lumina. Length was right but the outer tripod was too big. No big deal, brought it back and swapped out the outer end from another axle I had laying around and it is done.
Wiring for the car from the C500 connector (over by the stock battery location) to the shift position switch is done. Battery is hooked up to the starter and the car. All that is left is PCM wiring and then to hook up the cruise control; and finish the exhaust and left suspension/axle.
Here is the rundown:
Starting and charging system -- DONE Right side suspension and drive axle -- DONE PCM wiring -- IN PROGRESS Exhaust -- STILL WAITING ON PARTS Left side suspension and drive axle -- WAITING ON CUSTOM AXLE FROM MOSER
I am fact-finding to help Fiero_V6 put the '94 3100 SFI and 4T60E from his sister's rolled GP into an 85 SE V6, and I have a couple'a questions for ya.
Question 1: How did you mount the tranny? Using some combination of 4T60, 4T60E and THM 125 brackets and mounts or did you do something else? I guess the most important question is did you mount it in the same place front to back and left to right as the OE position. Can you use A body 4T60E mounts to place the transmission?
Question 2: For the axles, if you put the trans in the car in the same left to right orientation as OE, wouldn't it be possible to use '91-up A body axles since the cradle should be the same center to center. If the only axles that were ever offered with the 4T60E were of the larger (36mm nut) variety, would it be possible to use the smaller outer joints just stuck on the end of the A body axles? Did you try the manual transmission left axle on the right side thing that I have seen referenced in places like Space Coast Fieros?
Thanks Kurt Kimmerly
IP: Logged
01:58 PM
Darth Fiero Member
Posts: 5922 From: Waterloo, Indiana Registered: Oct 2002
I am fact-finding to help Fiero_V6 put the '94 3100 SFI and 4T60E from his sister's rolled GP into an 85 SE V6, and I have a couple'a questions for ya.
Question 1: How did you mount the tranny? Using some combination of 4T60, 4T60E and THM 125 brackets and mounts or did you do something else? I guess the most important question is did you mount it in the same place front to back and left to right as the OE position. Can you use A body 4T60E mounts to place the transmission?
Question 2: For the axles, if you put the trans in the car in the same left to right orientation as OE, wouldn't it be possible to use '91-up A body axles since the cradle should be the same center to center. If the only axles that were ever offered with the 4T60E were of the larger (36mm nut) variety, would it be possible to use the smaller outer joints just stuck on the end of the A body axles? Did you try the manual transmission left axle on the right side thing that I have seen referenced in places like Space Coast Fieros?
Thanks Kurt Kimmerly
Hey Kurt, here is answers to your questions:
#1) You are going to need the Front trans mount from a 92 Bonneville. This will bolt right up to the 4T60-E and sit down right onto the cradle in the factory slotting holes location. However, I have found that in order for the trans to sit on the cradle correctly you are going to need to enlongate the holes in the cradle because the mount it going to want to sit in the middle of the two sets of slots. In back, you will need a trans mount bracket from a 91 Buick Lesabre and the stock trans mount for a Fiero 125-C. Here too, the holes in the cradle or on the bracket will need to be enlongated slightly in order to allow the trans to sit slightly to the left side of the car. In effect, you are not moving the trans over to the left, but accomidating for the larger size of the OD trans on the left side, which is why the mounts need to move slighlty to the left.
#2) As I answered in Q1, the OD trans is significantly larger than the stock 125-C. You will need to get CV axles for both sides from a 94 Beretta that came with a 3100/4T60-E. These are the right length and correct spline for the Fiero. However, most 94 Berettas came with ABS so don't panic if your CV axles come with ABS reluctor rings on them, they can be easily removed with a punch and hammer. They are just pressed onto the outer tripod end. You cannot leave these on because they will interfere with the stock Fiero knuckle. Yes, I have used the stock Fiero manual trans axle on the right side of the 4T60-E and it works, so long as you have one to start with.
IP: Logged
05:22 PM
CTFieroGT87 Member
Posts: 2520 From: Royal Oak, MI Registered: Oct 2002
Mr. Pat, I'm sorry, but you will be going to jail soon. And I speak from recent experience ! I recommend to everyone financing a V8 install, make room for an Escort or a V1!
Mr. Pat, you're gonna LOVE it (dunno about the auto, though). Man, do I loooove my Centerforce, heheeh.
------------------ Christian Thomas 87 Pontiac Fiero GT Burgandy/Silver 5.7L ZZ4 5spd 86 Pontiac Fiero GT Red/Silver 2.8L 5spd
IP: Logged
08:18 PM
Jan 22nd, 2004
GKDINC Member
Posts: 1813 From: East Tawas MI Registered: Dec 2001
GKDINK -- Had to cut off the one corner of the block and part of the adapter plate to clear the transmission. This is the area of the block where the stock outer starter bolt hole is.
I had to heavily notch the left side of the cradle where the transmission side pan is but I did NOT have to notch the left chassis frame rail at all. There is still a good 1.5" clearance between the 4T60-E's side pan and that frame rail.
BV MOTORSPORTS -- I am using the 95 LT1 PCM to control the 4T60-E. I had to do a little modifying to the way the PCM sees the 4T60-E's gear position switch since what the LT1 PCM wants to see if different than what the FWD transmission's position switch puts out. Below is an explaination of what I am talking about.
Also, the 4T60-E does not have a 3-2 shift solenoid nor a Pressure Control Solenoid. Like I said before, the 4T65-E has more electronics which are more directly compatible with the LT1 PCM than the 4T60-E.
IP: Logged
09:43 PM
PFF
System Bot
Jan 23rd, 2004
Darth Fiero Member
Posts: 5922 From: Waterloo, Indiana Registered: Oct 2002
The shorter axle is the custom moser unit. I have always admired the quality that moser turns out. Now that I have this axle back I can reassemble the left side suspension and continue with the wiring.
PCM wiring to engine/trans -- DONE PCM wiring to cluster, IGN power circuits -- IN PROGRESS Cruise Control wiring -- IN PROGRESS Engine Beautification -- IN PROGRESS (put wire loom covering on, install covers)
Should be able to start this beast this weekend.
IP: Logged
01:08 PM
BV MotorSports Member
Posts: 4821 From: Oak Hill, WV Registered: May 2001
My best friend, garth is building a 4.3 powered Fiero using mostly GMPP and is est @ 425hp. For the NOPI COMP6 class. He wants to use the 4T60e or 4T65HD but is wondering what he is gonna use to control the trans. He says he may end up using the 4T60 or 4T40 (Is that right?) if he cant figure out the electronics of the tranny. So any help would be awsome! BTW since he won the class last yr and picked up a sponser he is hoping to build the first 10 sec all motor Fiero!!!!
IP: Logged
01:19 PM
Darth Fiero Member
Posts: 5922 From: Waterloo, Indiana Registered: Oct 2002
My best friend, garth is building a 4.3 powered Fiero using mostly GMPP and is est @ 425hp. For the NOPI COMP6 class. He wants to use the 4T60e or 4T65HD but is wondering what he is gonna use to control the trans. He says he may end up using the 4T60 or 4T40 (Is that right?) if he cant figure out the electronics of the tranny. So any help would be awsome! BTW since he won the class last yr and picked up a sponser he is hoping to build the first 10 sec all motor Fiero!!!!
4T60/440-T4 are governor shifted non-E trannys that don't need a computer other than to control the TCC. (the 4T40 is an electronic tranny made for smaller cars and not intended for hi-perf use, basically an electronic version of the 125-C with overdrive). Your friend can use a 95 S-10 Blazer PCM to control the TPI or CPI injection on the 4.3 (if he is using EFI), and that same PCM will be very compatible with a 4T65-EHD. If he is using carb instead of EFI, then he can still use the S-10 PCM so long as he feeds a tach signal and TPS signal to the PCM. In fact, even if he is using a carb, he can run the electronic distributor and a map sensor so he can tune the timing tables thru the chip rather than having to make changes to distribtor advance weights and vacuum diapram. Basically, everything on the PCM would be hooked to a carb motor with the exception of the injector wires.
The 4T65-E has a pressure control solenoid and a trans range pressure switch, 2 of the things the S-10 PCM wants to see. The only thing the 65-E trans does not have is a 3-2 downshift solenoid, but this circuit can be disabled thru the chip or pacified by a light bulb or resistor. Next to the 4T80-E, the 4T65-EHD is the strongest FWD tranny GM makes.
IP: Logged
01:46 PM
Mr. Pat Member
Posts: 1860 From: Melbourne, VIC Australia Registered: Apr 2003
The shorter axle is the custom moser unit. I have always admired the quality that moser turns out. Now that I have this axle back I can reassemble the left side suspension and continue with the wiring.
PCM wiring to engine/trans -- DONE PCM wiring to cluster, IGN power circuits -- IN PROGRESS Cruise Control wiring -- IN PROGRESS Engine Beautification -- IN PROGRESS (put wire loom covering on, install covers)
Should be able to start this beast this weekend.
I see it came early
I got an email from GM today, they just sent out the final part we need. Hopefully it will be in sooner rather than later.
IP: Logged
06:20 PM
Archie Member
Posts: 9436 From: Las Vegas, NV Registered: Dec 1999
-- Had to cut off the one corner of the block and part of the adapter plate to clear the transmission. This is the area of the block where the stock outer starter bolt hole is.
Next time you do that big tranny, let me know when you order, I have a limited production version of the adapter plate that allows for that tranny.
PCM wiring to car is DONE. Cruise control is mounted and wired up for the most part. Turned the car on and downloaded the stock program off the PCM to work on. This was a junk-yard PCM advertised to be from a 95 LT1 Caprice, and it even had "5.7" written on it. But wouldn't you know I downloaded the stock program and it is for the L99 4.3L V8 (LT1 look-alike) engine. Oh well, the internet is a wonderful place and with about 10 mins of searching I found a 95 Impala SS LT1 stock program and downloaded it and got it all fixed up and I am ready to flash the PCM tomorrow. Still waiting on the distributor coil wire from gmpartsdirect but since they shipped it via fedex, it might be here tomorrow (saturday) as well. Now all I need to do is finish up the very little bit of wiring left, do the other half of the exhaust, and install the new axle and she is ready to rumble.
IP: Logged
02:41 AM
BV MotorSports Member
Posts: 4821 From: Oak Hill, WV Registered: May 2001
4T60/440-T4 are governor shifted non-E trannys that don't need a computer other than to control the TCC. (the 4T40 is an electronic tranny made for smaller cars and not intended for hi-perf use, basically an electronic version of the 125-C with overdrive). Your friend can use a 95 S-10 Blazer PCM to control the TPI or CPI injection on the 4.3 (if he is using EFI), and that same PCM will be very compatible with a 4T65-EHD. If he is using carb instead of EFI, then he can still use the S-10 PCM so long as he feeds a tach signal and TPS signal to the PCM. In fact, even if he is using a carb, he can run the electronic distributor and a map sensor so he can tune the timing tables thru the chip rather than having to make changes to distribtor advance weights and vacuum diapram. Basically, everything on the PCM would be hooked to a carb motor with the exception of the injector wires.
The 4T65-E has a pressure control solenoid and a trans range pressure switch, 2 of the things the S-10 PCM wants to see. The only thing the 65-E trans does not have is a 3-2 downshift solenoid, but this circuit can be disabled thru the chip or pacified by a light bulb or resistor. Next to the 4T80-E, the 4T65-EHD is the strongest FWD tranny GM makes.
Thats excellent info. Yeah he has to run factory "style" FI the 4.3 came with so he is going to use the Holley TB FI set up they offer. I am not sure if the S-10 4.3 PCM could handle the cam he is using. Its a huge Crower roller cam.
IP: Logged
05:30 AM
Mr. Pat Member
Posts: 1860 From: Melbourne, VIC Australia Registered: Apr 2003
Next time you do that big tranny, let me know when you order, I have a limited production version of the adapter plate that allows for that tranny.
Archie
Im sure I told you I was using a caddy tranny when I ordered the parts. I have a question, I didnt use the ac mount and alt mount. Can I return those to you? Thanks mate.


 . We used the Archie adapter plate, flexpate adapter, flexplate, and the motor mount that sits under the crank snout.


.jpg)