Following is my documentation on the installation of a 4th generation Firebird dash, console and, Firebird inspired door panels in my 87 GT. Comments and clearification and corrections are welcome as these will be used to enhance the final product before publishing. Negitive criticisms, personal attacts, or attemts to highjack the thread will be ignored. To keep the thread positive and avoid verbal sparing, I would ask that, instead, just rate all participants according to their contributions.
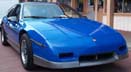
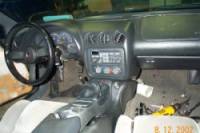
Introduction Most people who have any interest in the Fiero at all will agree that the bodylines of the car are nearly as fresh today as they were back in 1984. When the Indy �areo� nose was introduced in 1984 and then the fastback model in late 1986, the exterior design broke new ground in automotive styling. When the 1988 model rolled off the line with improved brakes, suspension and steering radio it officially and permanently became reclassified from a little commuter car to a mid-engined sports car. Unfortunately, thorough it all, the boxy, modular styled interior remained. Sure, the engine and performance gauge packages improved and interior colors changed but the base product remained the same. The interior -- along with pastel-colored cotton sport coats and warm-up socks -- just screams the 1980s. What I wanted was a car that looked modern both on the outside AND the inside. Thus began my quest for a new interior.
I briefly searched the various suppliers and vendors to see what they had to offer in the way of fiberglass redesigned interiors and, while some of the designs were striking they came with a heavy price tag -- far and away, way too much money for me to justify. But, while strolling through the local U-Pull-It yard, I found myself admiring the dashes in various cars and it struck me that, if I could find a dash that was close -- dimension wise -- to that of the Fiero, maybe I could find a way to make it work. So, armed with a quick sketch and some measurements of my Fiero dash, I started scouring the yard for a close fit. That, very simply, is how this Firebird Dash Project came about.
Objective The objective of this project was to update the Fiero interior by installing a 4th generation Firebird dash into my 1987 Fiero GT while keeping costs low and without loosing ANY functionality.
I accomplished the objective by shopping the local U-Pull-It yards, watching the Auto Parts sections of the local newspapers, and price shopping on eBay. Were possible, I negotiated with the local yards for additional parts that they would normally junk with the car. Parts like broken consoles and door panels were usually part of each deal and either thrown in for free or purchased cheaply. These parts were invaluable when trying out different ideas during the installation process. The factory Helms manual for each vehicle was an invaluable resource as was the help and encouragement from fellow Fiero enthusiasts.
Overview My custom Firebird styled interior is actually three independent projects: Dash, Console, and Door Panels. Any of these projects can be constructed independent of the other two which makes it nice if you�re on a budget or still collecting parts for the complete conversion or want to limit your vehicles down time. However, I created some overlap between the dash and the door panels because I wanted to move the speakers, power window switches, and power mirror switches to the door. The original console could have been maintained from the shift bezel back to the computer cover but � what the heck � in for a penny, in for a pound.
My documentation divides the project into the major categories: Dash, Console, and Door Panels. Each category is further broken up into the detailed the steps I used to reach the finished product. Keep in mind that these are MY procedures and that yours may vary depending on your skills, tool availability, and personal preference.
Please take this as a precautionary warning: This is not a weekend project or for the faint at heart. This is not a project for someone whose tool inventory consists of a Dremal, a set of screwdrivers and a starter metric socket set. This type of project requires as much, if not more craftsmanship than performing an engine swap. To pull something like this off successfully requires hours and hours of measuring, test fitting, dealing with setbacks, and lots of head scratching. It�s paying close attention to the details that will make or break the project. The first and only thought in my mind when I decided to undertake this conversion was that it needed to look totally factory stock. My success in this area would be judged, not by just fellow Fiero enthusiasts but, by non-Fiero people who, when looking at my interior wouldn�t know it didn�t come from the factory that way.
The steps I took to install the Firebird dash would be similar if a dash from a different car was used or for an after-market dash kit. Aside from the up-front savings and availability, some of the advantages of using a Firebird dash is that the dash comes already upholstered (a significant cost savings), are plentiful in the junk yards and, the up front costs are down right cheap when compared to the current aftermarket �kit� interiors. The downside of using this or any dash from another vehicle is they are not intended to fit into a Fiero like the aftermarket kits. In a sense, trying to put a dash from another car into a Fiero is a little like fitting a square peg into a round hole.
If you decide to tackle a project of this magnitude hopefully, some of the steps that I�ve documented here will help. Enjoy and good luck!
------------------ Roy :D Blue 87 GT w/ 4th generation Firebird interior. Suncoast Fieros
Let me know if I/we can help in anyway? As for the pics we (PBJ or Her86GT) have posted or brackets, you are welcome to use them in any way. I hope they can help in your site. https://www.fiero.nl/forum/Forum1/HTML/025069.html
Pete
[This message has been edited by PBJ (edited 01-15-2003).]
Beautifully worded Roy, I cant wait to see how this comes out. It will surely be well detailed and informative judging just from the other post and your extensive introduction here.
My plans have shifted a bit, I plan to use a Grand Prix GTP interior. Dash, doors and console. All HVAC controls, radio, and all other standard GTP features will be implemented. Save the air bags ofcourse since that would be a bear to setup.
IP: Logged
03:55 AM
Arizona Junior Member
Posts: 8 From: Mesa, Arizona, USA Registered: Jan 2003
Bring it on Roy! I wish I was there with you in the documentation phase, but I have a bit more to do on my car. At the rate I get to work on it PBJ will be finishing up his first.
The only other caveat I would suggest for your intro is that there are multiple solutions to some problems and each has it's pros and cons. In some areas I have chosen a different path and hopefully we will end up somewhere near the same spot in the end.
Good luck with this thread...and hope to see more pics of the finished car
------------------ If you find my advice useful, then please give me a positive rating, thanks...
IP: Logged
07:50 PM
PFF
System Bot
mrfixit58 Member
Posts: 3330 From: Seffner, Fl, USA Registered: Jul 99
OK guys. I'm having major problems with my computer. It won't click on some hyperlinks, the home page that i use is comming up blank, and now my Photoshop 5 program doesn't want to operate correctly so I can't resize my photos to post them here. This is truely frustrating. I'm NOT a computer guy. I really don't know how to fix it. If anyone has any suggestions, please email me at rlumsden@tampabay.rr.com .
I'll resize them at work tomorrow and try to post then.
Sorry, Roy
IP: Logged
08:58 PM
John Boelte Member
Posts: 1012 From: Indianapolis, IN, USA Registered: Jun 2002
You could e-mail or snail mail the pics to one of the forum members who are offering you the web space (and whom might be a little more proficient at editing pics and putting up web pages ) and let them take care of it for you, with your input of course!
IP: Logged
09:29 PM
warden Member
Posts: 391 From: east brunswick, NJ, USA Registered: Jan 2003
maybe im just a deer staring into headlights here.. but where are your steps and your little hints to help fabricate the 4th gen dash into the fiero? while it looks very nice i myself would want to know more so i can decide if i am up to it. thnx
Your not a deer! You must of missed previous threads leading to this where he explained that he will be doing this in segments. So you must be patient because more is coming. And just to let u know I am really looking forward to this thread. Nice introduction, I have bookmarked this thread and plan to follow it carefully because I think your interior is FAT and I want to do the same to my car. Keep up the good work!
IP: Logged
12:58 AM
mrfixit58 Member
Posts: 3330 From: Seffner, Fl, USA Registered: Jul 99
Here's the first installment of the tech stuff. I'll have to edit it to add the pictures. I'm still having computer problems,
-- DASH
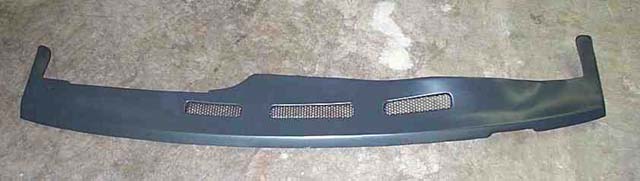
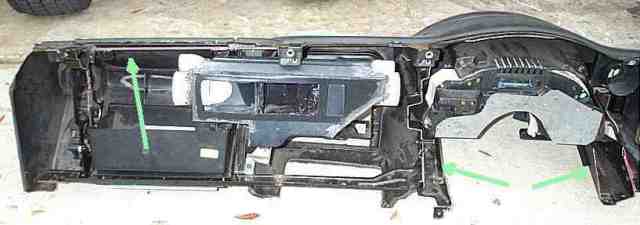
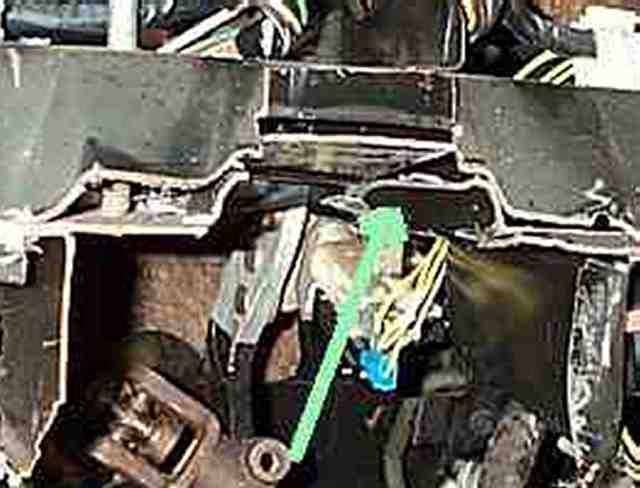
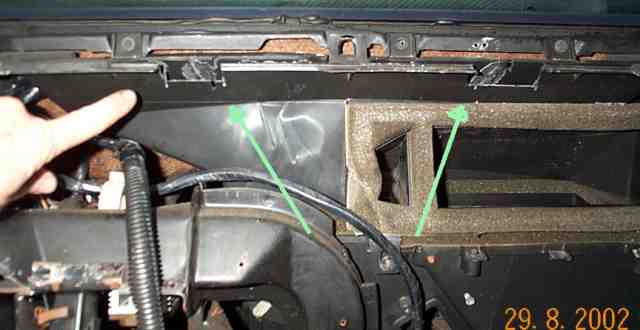
Firebird - Dash Alterations Rear Gauge Housing � To get the Firebird dash as close to the windshield as possible, I shaved all the protrusions from the rear of the gauge cluster housing. Anything that would hit against the horizontal support for the steering column came off. Steel removal � Because of interference problems with the steering column support in the Fiero I also removed the steel support from behind the gauge cluster. Basically, I removed the portion of steel that is used to support the Firebird steering column (see green arrows). To make sure that this area remains spaced correctly, I reinstalled the gauge cluster and the cluster bezel. (The sheet metal plate on the rear of the Firebird dash was installed to repair the area that I removed on my first trial fitting the dash. It�s not necessary unless the dash you choose is broken in this area).
Picture 1
Air Bag Glovebox -- Since I used a dash from a car where the passenger side airbag had deployed, I decided to utilize this space by installing a hinge. I can now add box for storage or, maybe some room for some fun stuff. I removed the entire airbag frame and drilled out the spot welds holding the airbag basket. I then reinstalled the vertical portions that are on each side of the glove box door to add support to the front of the dash. This is important because the dash moves a lot when the glove box door is slammed shut.
To make the air bag compartment useful, I removed a glove box door hinge from a late 80s GM mid size car. I believe it was 11 �� long but, unfortunately, I didn�t remember to write down the model but it was definitely GM, from the 80s, and was a mid size four door. (So it shouldn�t be too hard to find another). I used a piece if 1� flat-bar and removed enough of the hard plastic from the dash to slide the bar behind the air bag door. The flat-bar can bee seen in the photo of the dash above. It appears as a straight line just below the top of the dash. I used this as my support to install the hinge. One side of the donor hinge was bent in an �L� shape. I welded a couple of �L� shaped tabs to the bottom of the flat bar and used this to mount the hinge to the dash. This also gave me some up and down adjustment. To mount the hinge to the door, I used some two part hard plastic adhesive from 3M and simply glued the hinge to the back of the airbag door.
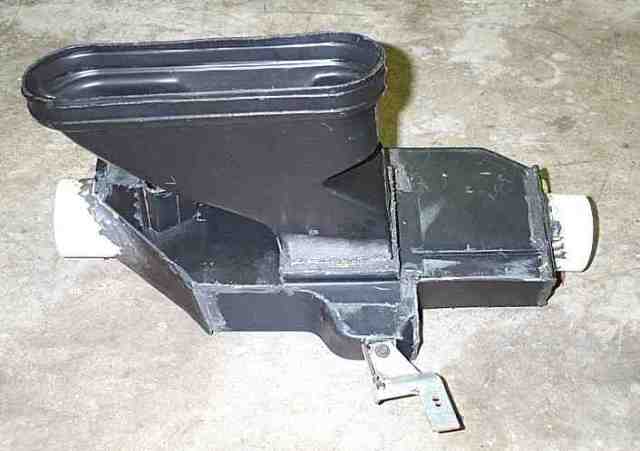
Ductwork � This is an area that I spent a great deal of time where others who attempt this will probably decide to do something different. What I wanted was a duct system that was integrated into the dash like the stock dashes. Why you may ask? Well, I like the idea of being able to remove the dash if needed and I hated the idea having a bunch of hoses� like octopus legs� getting in the way, being pinched, and trying to remember where each one goes. Besides, I�m kind of anal when it comes to the details of a project.
Picture 2
I cut up the Fiero box, patched the ends then used 2 �� conduit couplings and three inch duct hose for the outside vents. I mated the Firebird center air defuser to the modified Fiero air box for the three center vents. I had to make an exception to �totally integrated system� in order to keep the side window defoggers. I used �� PVC 90o couplings shaved, shaped and glued to the defogger duct on the box. I then used flexible tubing to connect to �� couplings I glued to the inside of the a-pillar trim (more on this later). The trim acts like the defogger duct and vents the air out the gap across the windows. I used pieces of the old Fiero and Firebird A/C duct as my patching material and 3M 2-part adhesive for rigid plastic to make everything stick together.
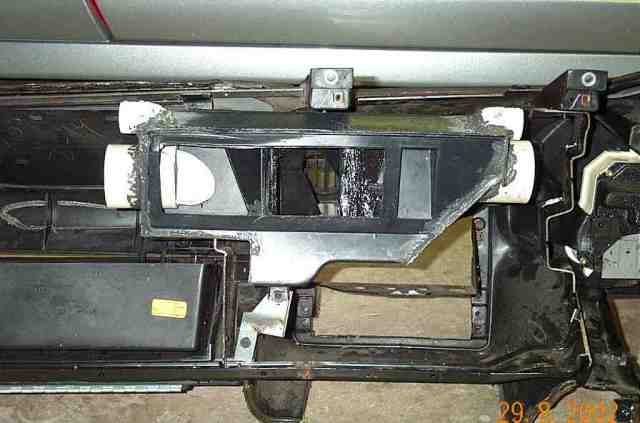
I spoke with a couple of kit car manufacturers and what they do for the A/C ducts is to remove the entire top of the A/C box, including the defroster vent, and fabricate a lid. Then a saw hole for each duct hose. Most of the time, the side window defoggers are ignored. It would be faster but very annoying to me if I were planning on removing the dash in the future. Additionally, if you choose to try and duplicate my method, the dash must be fitted to the car before you begin the ductwork. This is because the opening in the back of the integrated duct box must match the opening in the fixed portion. In other words, the two big rectangular openings must match up.
Picture 3
[This message has been edited by mrfixit58 (edited 01-17-2003).]
IP: Logged
12:13 PM
mrfixit58 Member
Posts: 3330 From: Seffner, Fl, USA Registered: Jul 99
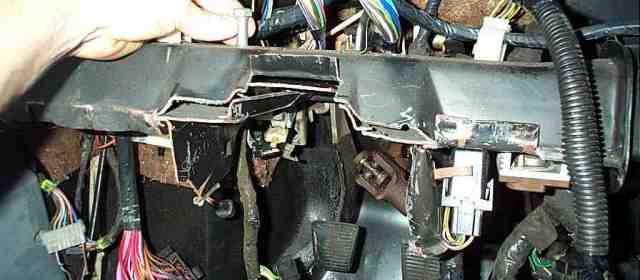
0 Steering Column Support -- This part is not for the weak hearted. Once you start cutting, you're committed. I started by removing the steering column snout and all the metal beneath it (If you're careful, the mounting clip for the trunk relay can be saved and the relay can remain in its stock location). I started the removal process by bending down the horizontal lip where the metal is sandwiched together. I cut the ends of the lip where it met the kick panel and the column snout and used a crescent wrench to bend it down and out of the way. I then took my handy saws-all and cut the snout off as close to the support hoop as I could get. The idea was to get maximum clearance.
Picture 4
With all the metal removed I was able to slide the Firebird dash back far enough that it's two upper mounting tabs on the right side made contact with the metal lip below the windshield. The two mounting tabs on the left required additional work so they could be used. I discuss this later. I used two 1/8" self tapping sheet metal screws on the two right side tabs to hold the dash in place while I rechecked its fit and to mock up the steering column.
During my inspection I noticed that the steering column did not fit up and into the Firebird instrument cluster trim bezel. To raise the column, I split the edges of the column tunnel -- parallel to the steering column -- and bent the sheet metal up. This allowed me the necessary clearance I needed around the column-mounted ignition switch once the column was moved up and into the center of the trim bezel. I considered this an added benefit because, in the end, it moved the steering wheel up by about two inches and made getting in and out of the car much easier. After I was satisfied with the final fit, to increase the rigidity I welded up much of the cut area as possible.
Picture 5
0 Relocating the Door Panel Switches oWire Routing -- I planned on using the Firebird arm rests with the integrated window, mirror, and door lock switches so I took this opportunity to reroute the power mirror control and power window switches from the console to the doors. I used a stiff wire, like a coat hanger, to fish through the boot from the door to the kick panels. I removed the Fiero window and mirror switch connectors and tape the wiring to the ��fish�� wire and pull them through. Try to stagger the wires to make it easier to slip through the boot. I also added the lighting wires for the bezel illumination and speaker wires for the door speakers. o Wiring for Passenger Door Switches �V To make the window switch for the passenger door, I spliced into the left window switch wires just as the came up above the steering column hoop. Then, using the same technique as the driver��s door I pulled the wire into the passenger door. While scrounging for parts, I took the opportunity to pull the connectors off of the donor vehicles. I made sure to leave enough wiring pig-tailed so I could solder the Fiero wiring to the Firebird connectors. Everything is pretty straightforward and if you can follow a wiring diagram or use a multi-meter it a relatively simple task.
[This message has been edited by mrfixit58 (edited 01-18-2003).]
IP: Logged
12:31 PM
Darth Fiero Member
Posts: 5922 From: Waterloo, Indiana Registered: Oct 2002
now these are the kind of people who are good for the fiero world. those who come up with different ideas and are not afraid to try them or post them to help others perform a similar modification.
keep the great info coming, mrfixit58.
------------------ 1987 Pontiac Fiero Coupe #18,838 3800 Series II SFI; 4T60-E Trans w/ 3.33 final drive; Terminator exhaust; 4 wheel vented disc conversion; Walbro 307 fuel pump; W-body air box w/ K&N filter; Rear 32mm sway bar; 134a functioning A/C; GM Pontiac CD player 7-band EQ w/ factory location sub; much more and...a stock GN's TURBO on the way!
hey Mr. Fixit.. i understand taht your havign a hard time with your computer and with teh pictures.. i am a visual communications student and i desgin webpages layouts for magazines, etc.. i think your instructions would be great as a PDF file.. it can be viewed with Adobe Acrobat you can have pictures with text and a index in the begining.. since i just can see by your last 2 posts you have alot of info if you want sned me all your pictures no matter how big and all the text.. and ill compile a PDF for you.. i personally think it will make it easier for you and everyboyd else that wants to do this conversion.. and ill put the pdf on my page so everybody can dl it.
if you want email me at wardenisback@aol.com
otherwise its lookin good :O)
IP: Logged
04:49 PM
Jan 18th, 2003
mrfixit58 Member
Posts: 3330 From: Seffner, Fl, USA Registered: Jul 99
Nice project, great fabrication work and a unique looking interior (we'll at least for a Fiero). Is the instrumentation on this dash digital? I have to believe that getting everything wired connected and working properly would take a 100 hours all by itself. The mechanical fab work doesn't scare me so much as the rewiring task...the switches, console harness to the speedometer, gauges, indicator lights etc. This project must be truly a labor of love.
What Roy and I discovered is that only the gas gauge is digital, (and only on the later Firebirds). The other gauges are plug and play into the Fiero senders. It really only took me a day to wire up the gauges once I had the wire mapping complete. I have posted my mapping to the "designing a new dash" thread: https://www.fiero.nl/forum/Forum1/HTML/023174-9.html
------------------ If you find my advice useful, then please give me a positive rating, thanks...
IP: Logged
11:54 AM
mrfixit58 Member
Posts: 3330 From: Seffner, Fl, USA Registered: Jul 99
Nice project, great fabrication work and a unique looking interior (we'll at least for a Fiero). Is the instrumentation on this dash digital? I have to believe that getting everything wired connected and working properly would take a 100 hours all by itself. The mechanical fab work doesn't scare me so much as the rewiring task...the switches, console harness to the speedometer, gauges, indicator lights etc. This project must be truly a labor of love.
The dash is analog. It was just about a wire-for-wire swap. I had problems with my fuel gauge so I replaced it with an older unit. It works great now.
Funny you should be intimidated by the simple wiring changes. I wouldn't think that any who decided to develope and build a "home made" turbo system would be scared of anything. Yes, it was a labor of love, just like your turbo project.
IP: Logged
06:47 PM
Jan 19th, 2003
FieroBUZZ Member
Posts: 3320 From: Ontario, Canada Registered: Feb 2001
Again, I'm sorry for the delay. I'm still having computer problems. Some of you may have seen me post in other threads but that is from work. The firewall there prevents me from posting picture so I have to do that from home. Please be patient.
Todays installment covers detais on installing the dash, modifing the steering column bracket and A-pillar trim notching. I've also included information on how I reworked my side window defogger vents. As mentioned before, constructive comments for clearifications are welcomed.
Enjoy, Roy
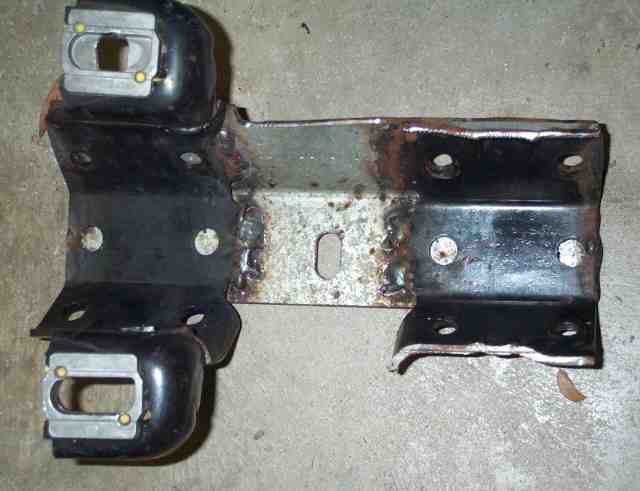
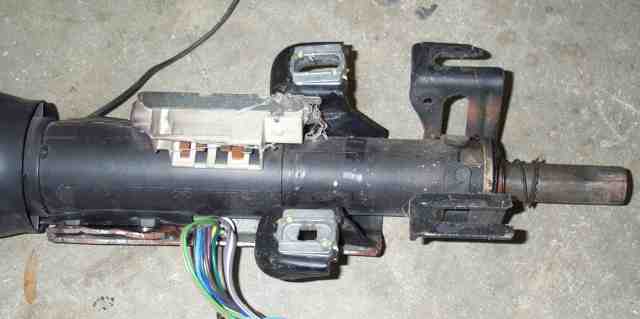
- Steering Column Support o Adding Stability - The stock Fiero steering column is held by a four point mounting system. When I cut the snout off the column support hoop, I lost the two front mounting points. To add some stability back to the column, I fabricated an extension onto the back of the column bracket to reach back under the dash below the column hoop. I used an extra bracket I had from an old column and a short piece of "L" channel opened slightly to match the angle of the brackets then welded the three pieces together.
I then bolted the new bracket to the column and used the rear holes as a guide to drill new mounting holes through the hoop. Next, I installed two new bolts through the hoop and bracket, bolted it all together and welded the heads to the hoop so they wouldn't spin when the steering column needed to be removed. The column is now almost as rigid as the stock column.
PICTURE - Steering Column Bracket
PICTURE - Steering Column Bracket Installed
- Relocating the Door Panel Switches o Wire Routing - I planned on using the Firebird arm rests with the integrated window, mirror, and door lock switches so I took this opportunity to reroute the power mirror control and power window switches from the console to the doors. I used a stiff wire, like a coat hanger, to fish through the boot from the door to the kick panels. I removed the Fiero window and mirror switch connectors and tape the wiring to the fish wire and pulled them through. I staggered the wires to make it easier to slip through the boot. I also added the lighting wires for the bezel illumination and speaker wires for the door speakers.
o Wiring for Passenger Door Switches - To make the window switch for the passenger door, I spliced into the left window switch wires just as the came up above the steering column hoop. Then, using the same technique as the driver's door I pulled the wire into the passenger door. While scrounging for parts, I took the opportunity to pull the connectors off of the donor vehicles. I made sure to leave enough wiring pig-tailed so I could solder the Fiero wiring to the Firebird connectors. Everything is pretty straightforward and if you can follow a wiring diagram or use a multi-meter it a relatively simple task.
-Firebird Dash Installation o Attachment Points �V The desired method to attach the Firebird dash was to utilize the four factory mounting tabs located at the top-rear of the dash. As I mentioned earlier, the two tabs on the right side fasted directly to the windshield lip using 1/8" self-tapping screws. The tab on the left required a small bracket and the center left required a spacer. For the bracket I bent some scrap steel into a "Z" shape and fastened it to the lip and to the dash. Here I was able to utilize one of the speed nuts on that was used to mount the left side of the Fiero dash. For the spacer, I suggest using a large nut and grind it into a wedge shape so it fits flat against the tab and the lip.
PICTURE - Windshield Lip
The bottom of the dash is supported in three locations: above the tunnel in the center and on each end at the kick panels. The center brace is simply a piece of flat strapping bent in a ��U�� shape and secured to the tunnel and the dash frame using 1/8" self-tapping screws. The side brackets are made from 5" - 90o shelf bracing from the hardware store. The drivers side was welded to the steering column support hoop directly above the mounting hole. The passenger side was a little trickier. I relocated the kick-panel courtesy lamp bracket to the convenience center that is mounted on the heater core access panel and made a bracket that both supports the dash and the factory subwoofer. It was welded to the right side kick panel, extended out toward the tunnel and then down to the dash.
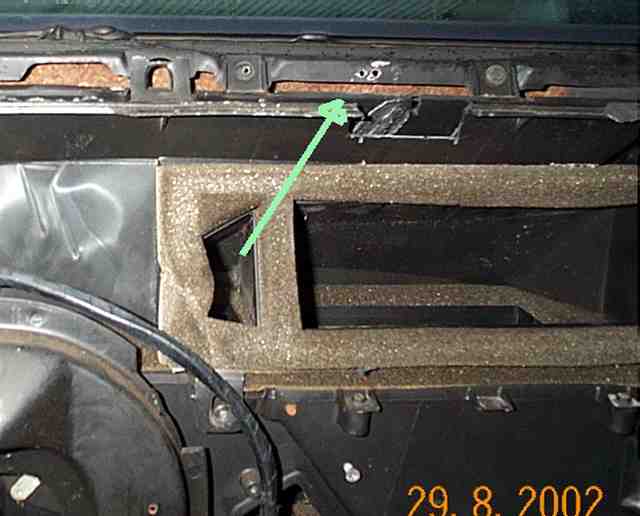
o Defroster Vent Notching -- By using the Fiero air box I was also able to use the Fiero defroster vent. Notice the notches along the top of the vents. These are necessary for clearance around the Firebird dash mounting tabs. If trimmed closely, they will add additional support to the top of the Firebird dash�K bonus.
PICTURE - Defroster Vent Notching
[This message has been edited by mrfixit58 (edited 01-21-2003).]
IP: Logged
11:49 AM
mrfixit58 Member
Posts: 3330 From: Seffner, Fl, USA Registered: Jul 99
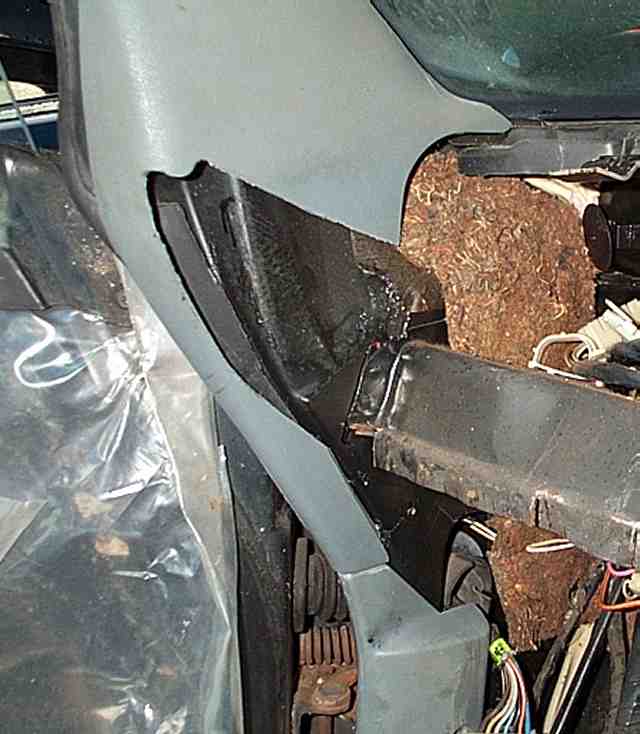
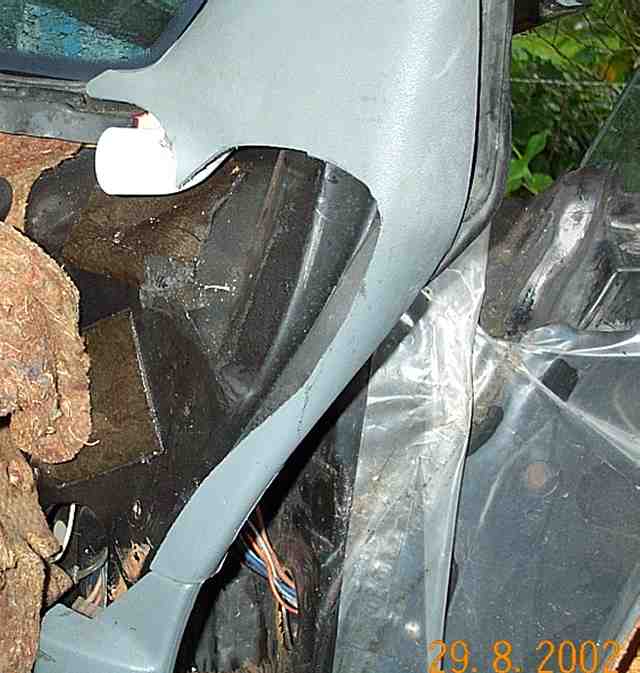
- A-Pillar Trim o Notching - To get a finished look to the installation, I marked and trimmed the a-pillar trim to match the contour of the Firebird dash. To do this, I installed the trim and slid the dash into place then mark the contour of corner of the dash onto the trim. I used a combination of tools including a band saw and rat-tailed file to remove the unwanted plastic and get to the final contour.
Caution: Go slowly. It's easy to remove a little too much.
Because the Firebird dash is wider than the Fiero dash, do only one side at a time to keep from distorting the Firebird dash. Once both pieces are trimmed, the dash will slide into place and really start to look like it belongs there.
PICTURE - A-Pillar LH
PICTURE - A-Pillar RH
Roy
[This message has been edited by mrfixit58 (edited 01-21-2003).]
IP: Logged
11:51 AM
Jan 23rd, 2003
Arizona85GT Member
Posts: 1667 From: Glendale, AZ Registered: Jan 2003
I guess my next question would be WHEN CAN YOU DO MINE lol, man its coming along cant wait till its done. Keep up the hard work.
Adam
Thanks Adam,
Actually, the reason I'm posting this info is so that YOU can do it YOURSELF . Either that or con a couple of buddies to help.
On mine, the hard work is finished. That is, the dash console and door panels. I've got to wrap up some details before the big Daytona show in March but it all do-able. And, of couse I''l post pictures when completed.
Roy
IP: Logged
07:36 AM
Jan 24th, 2003
mrfixit58 Member
Posts: 3330 From: Seffner, Fl, USA Registered: Jul 99
This update is how I made my dash filler. The dash filler is the piece that fits between the Firebird dash and the bas of the windshield. If you viewing this, be kind and give it an occational bump.
Thanks Roy
Dash Filler
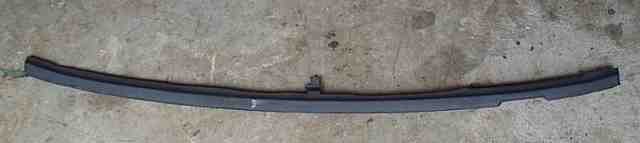
Sacrificial Dash - To make the filler, I started by cutting the leading edge off of the old Fiero dash. I had one that was busted up in the corners so no great loss. I then screwed this piece to the windshield lip. Be careful because the piece will want to twist a little because to will be mounted at a slightly different angle then originally intended.
PICTURE - Sacrificial Fiero dash
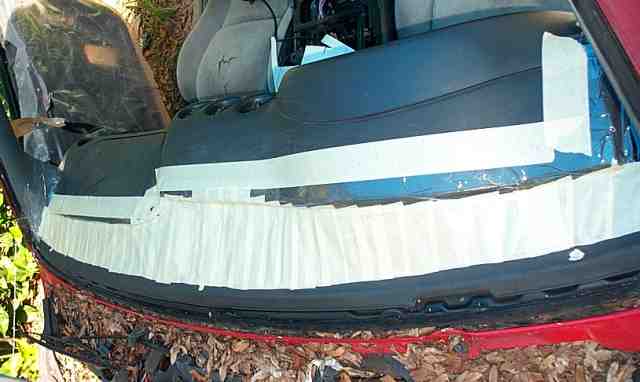
Masking Tape Bridge -- With the Firebird dash mounted, I used masking tape to build a bridge between the two dashes. For the first layer, I ran the tape from the Fiero dash mounted against the windshield to the Firebird dash. The tape naturally follows the contour of the Firebird dash and straight edge of the Fiero dash. I then went back and ran tape along the length of the bridge to add strength. I continued the taping/contouring along the sides of the dash to cover each hole along the sides of the dash where the original Firebird a-pillar trim mounted.
PICTURE - Masking Tape Bridge
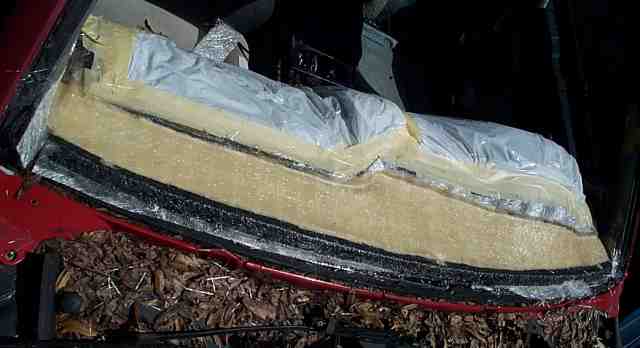
Time to Get Messy - If you�ve ever worked with fiberglass you know how sticky it can get. I taped plastic garbage bags over the dash for protection. The nice thing about masking tape and plastic garbage bags is that the fiberglass resin will not stick to them (Keep this in mind whenever you need to lay out a form for any custom part). I applied a couple of layers of fiberglass over the masking tape but before the resin cured, I pushed the fiberglass matting away from the screw heads holding the Fiero dash so I could easily remove them once the fiberglass had started to cure.
PICTURE - Fiberglass Application
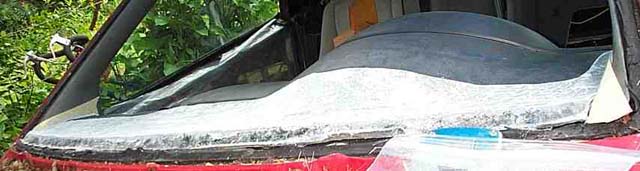
Smooth it - This is where a little backyard bodywork experience comes in handy. After the fiberglass had cured and the edges trimmed I reinstalled the fiberglass back into the car, but before I removed it from the car and added a thick layer of fiberglass reinforced Bondo. This adds strength and is the first step in getting the filler piece level and smooth. Next, I removed it from the car and set it on a couple of sawhorses and used regular plastic filler (Bondo) to finish building and contouring the dash. To get it smooth, I started with a medium density foam sanding block and heavy grit sandpaper to knock down the high spots, filled the low spots and followed up with lighter grits to smooth it to the final finish. I then cut the defroster vent holes, installed the screen (salvaged from the old Fiero dash), and painted it.
PICTURE - Filler Application
Here�s a Tip -- To easily locate the defroster holes, after the fiberglass had cured I took the filler piece out of the car and removed the masking tape. I then reinstalled the piece into car. Since the fiberglass is semi-transparent I was able to look through the fiberglass and - using a Sharpie pen -- trace the location of the defogger vents. After filling and smoothing the marks for the vent locations are still visible from the bottom. This made aligning and cutting the vent holes simple.
PICTURE - Completed Filler Panel
END 1/24/03 UPDATE
[This message has been edited by mrfixit58 (edited 01-24-2003).]
IP: Logged
04:47 PM
Jan 27th, 2003
mrfixit58 Member
Posts: 3330 From: Seffner, Fl, USA Registered: Jul 99
Sorry guys. I missed the last couple of "bumps". I've been in San Francisco. Interest seemed to dropped off so I haven't really been too motivated to update the thread. Is there anything in particular you'd like to see posted here?
Is there anything in particular you'd like to see posted here?
Roy
Yes. Door panels. Could you post a few words and pics describing how you adapted the door panels to fit and also how you finished them off so nicely where they were cut along the back of the door? Thanks!!
I have been following both Firebird dash threads with alot of interest. I am considering doing this swap. I was hoping for webpage with detailed pics but this thread is a great start. I would also like to know if you can still copy(splash) the filler panel?
I have been following both Firebird dash threads with alot of interest. I am considering doing this swap. I was hoping for webpage with detailed pics but this thread is a great start. I would also like to know if you can still copy(splash) the filler panel?
Speed1 -- Thanks for your interest. For now, I've stopped expanding this thread. I think that all the pictures that I use to describe the process makes the thread too large and too slow to load for those who have only dial-up systems.
Then good news is I'm still planning on posting all my documentation on a web site. Hopefully it'll make accessing the information a little easier. In the mean time, if you have any specific questions, please feel free to email me and I do my best to answer them.
Hey Roy, I've been following your dash with lots of interest. I'm planning on doing a fully custom conversion for the whole interior. I'm planning a wrap-around dash, new door panels, a new look to the rear firewall, and possibly a heavily modified headliner. I would like to get some info from you on fiberglass though to make my little project a success. I couldn't find an email for you so I'll give ya mine. Please contact me at v6monster@juno.com. Thanks


 . Either that or con a couple of buddies to help.