
 
     |
| [Tutorial] An easy way to change the color of your gauge needles (Page 1/3) |

|
JohnWPB
|
AUG 26, 02:34 AM
|
|
OK, I have seen a few posts on changing needle colors for the true custom gauge look. Most mention using a razor blade, sand paper, and other methods to try to scrape off the old dull orange paint. Others wonder what can be used to repaint the needles... I just found a really easy way to do it! Hopefully some of you will find this useful.
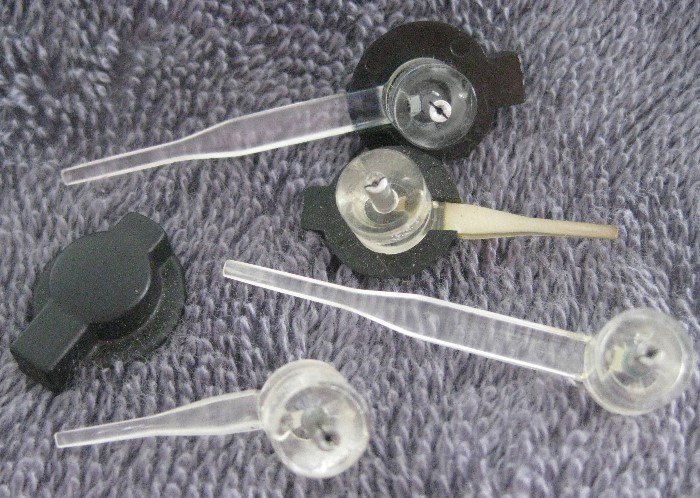
First I carefully removed the needles from the gauges, there really is no "sure fire" way to do this, other than to be very careful  I personally used two small flat head screwdrivers and pulled up carefully and they popped right off. NOTE: kikinz24 mentions below that a standard kitchen fork also works perfectly. I can see this as the curve would give you a bit of leverage to pry up slowly. I personally used two small flat head screwdrivers and pulled up carefully and they popped right off. NOTE: kikinz24 mentions below that a standard kitchen fork also works perfectly. I can see this as the curve would give you a bit of leverage to pry up slowly.
To clean them, I first tried using a razor blade as I had seen in other posts. I was doing it very lightly, and thought to myself this is gonna make scratches in the plastic. A light bulb moment occurred I grabbed a small bowl, and simply put some gasoline in it. Yea, yea yea.. warning, gas is flammable, do be careful!
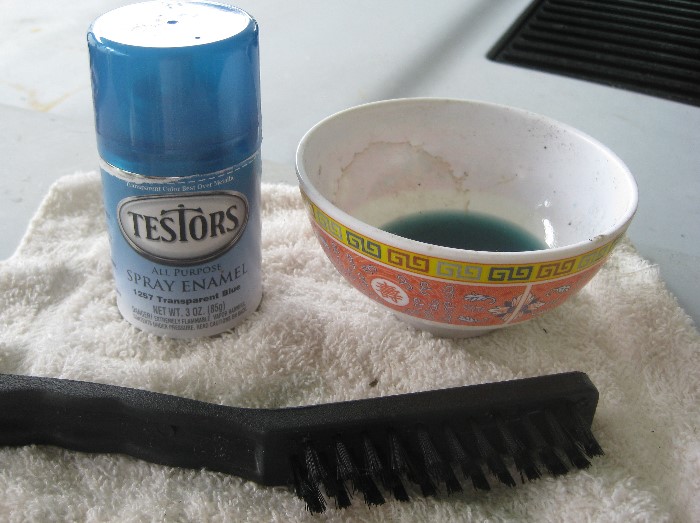
Plastic, 90% of the time, is not effected by gas, so I put ONE needle in the gas to test to see if it would work, and not damage the needle. I left it in there a couple of minutes. When I took it out, I was able to remove the orange paint very easily with my finger nail! I scraped most of it off, then used a small plastic bristle brush to get into the area between the needle and the hub. They came out with all paint perfectly removed, zero scratches in the plastic, and not harmed at all by the gasoline bath.
Notice the one needle that is still yet to be done:
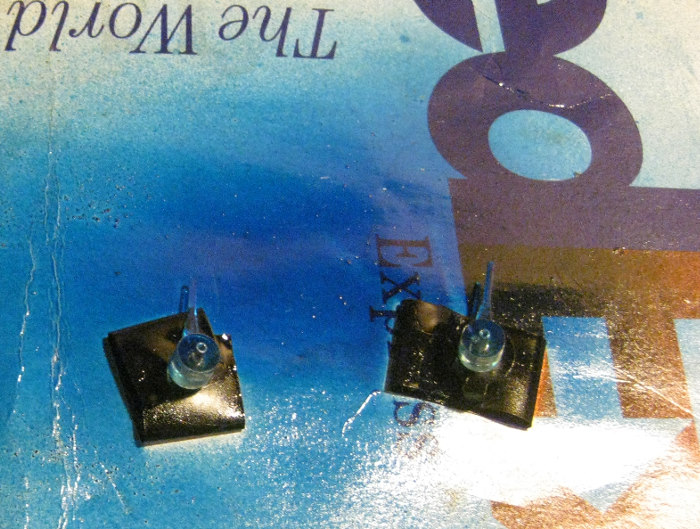
Next, I started trying to figure out how to paint them and have them look really good. I decided to go with blue needles, as my car is going to be blue... eventually I called up my local hobby shop and sure enough they had a transparent blue paint, so I headed over and picked up a can. I used some dawn dish soap & water in another bowl to clean the needles thoroughly, and dried them off. Then, I just used some electrical tape, rolled over backwards to make a quick 2 sided tape, and stuck the needles to it, back side up. I sprayed a very light coat to just mist the needles, to try to avoid fish eyes. I waited a minute then gave them a good coat. After about a half hour, I gave them another semi heavy coat. Then it was a matter of waiting for them to completely dry over night.
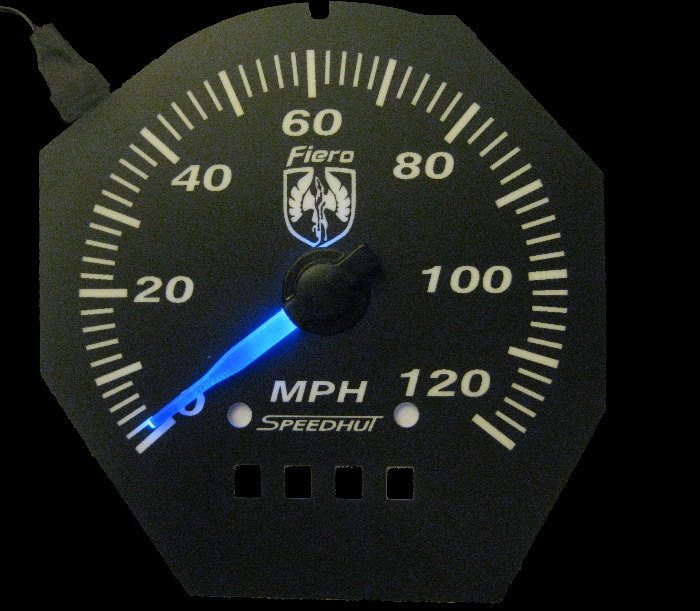
To test, I poked a hole in a piece of cardboard, and put one of my reverse glow gauges on top. (Sorry it is not lit up, as I didn't have 12v readily available to power them up, they are the reverse gauges with white letters that have a bluish tint. I wanted pure white, but SpeedHut does not offer pure white) I put the needle in the hole through the gauge and the cardboard, and then used a flashlight from behind to see how it would look. Needless to say, I am very pleases with they way they look!
If you find this helpful, please feel free to pass along a good rating  [This message has been edited by JohnWPB (edited 08-26-2010).]
|
|

|
ImperfectTruth
|
AUG 26, 03:03 AM
|
|
Thumbs up for you broseph! I'll be the first to say the needle looks great and I'm loving the gauges! I will have to check out this Speedhut place for sure.. Were those custom made for you? Great tutorial also, just as they should be - short and sweet.
I would've help you out with a positive rating, but I'm still just a bit too new here..
|
|

|
JohnWPB
|
AUG 26, 03:40 AM
|
|
Yea, they are "custom". You pick the color, reverse or regular, what color they light up, what logo and placement ect ect. They have a nice little flash app so you can build a custom set and see what they will look like.
http://www.speedhut.com/cus...-auto_number-251.htm
EDIT: Link no longer works, as Speedhut no longer makes the gauge overlays for the Fiero [This message has been edited by JohnWPB (edited 07-09-2017).]
|
|
|
|
kikinz24
|
AUG 26, 09:28 AM
|
|
looks good as a helping hint use a fork to pop the needles off it makes itsooo much easier.
I think they look damn good with those gauges.
|
|
|
|
skuzzbomer
|
AUG 26, 12:06 PM
|
|
 looks great! looks great!
Combine this with Emc209i's guide to the LED backlighting and you've got yourself one amazing dash setup. When I get home, I'm going to take my extra gauge pod apart and see just how difficult it really is. 
|
|
|
|
JohnWPB
|
AUG 26, 02:51 PM
|
|
| quote | Originally posted by skuzzbomer:
looks great!
Combine this with Emc209i's guide to the LED back lighting and you've got yourself one amazing dash setup. When I get home, I'm going to take my extra gauge pod apart and see just how difficult it really is. |
|
I am gonna test it without the LED's to see if it is bright enough for me.... The reverse gauges have a small circle around the hole, that is not covered with the black material. This give a git of a light ring around the needle hole that MAY give a little extra light. If not, I will definitely try to implement some LED's
|
|
|
|
Trust one
|
AUG 26, 06:19 PM
|
|
Excellent Job,Thanks for the post,I have learned sooooo Much from you guys!! GREAT JOB...
|
|
|
|
mmeyer86gt/gtp
|
AUG 26, 11:26 PM
|
|
|
i ordered a set from speed hut. Not happy even with the second set. the gauge overlays do not line up on the extra gauge cluster. and there were no cut out for the volts / oil light. Also i did the black with red lightup and had to go back through every hole so that when the gauge is lit up you do not see any blue light. IMHO not happy but i guess they will work........ I have spent about 5 hours on them to get them right i will show a pic when i get them installed.
|
|
|
|
matchmade
|
AUG 27, 02:52 PM
|
|
|
I used to paint game miniatures and would soak minis (usually overnight) in a jar of Pine Sol. It would strip the paint easily, never came across a mini I couldn't strip that way. It might be a safer alternative to gasoline if it wouldn't harm the plastic needles.
|
|
|
|
infinitewill
|
AUG 27, 04:04 PM
|
|
|
. [This message has been edited by infinitewill (edited 01-05-2016).]
|
|
|
|