
 
     |
| IMSA widebody installation - Russ style (Page 1/56) |

|
Russ544
|
AUG 29, 11:36 PM
|
|
Seems to be some interest in following along as I do this widebody kit, so I keep posting as long as people keep watching I guess. I'll be doing this a bit different than some others have in the past, and perhaps if it comes out well we can even talk Sage into re-doing the molds a bit to save others some work. IMHO a race inspired car should look like a race car, and those tiny wheel openings on the street version of the IMSA with 215x14 tires just dont look like race material to me so I'll be opening those up to allow for some serious rubber to meet the road. I also ordered my kit "wing deleat" and had Tedd make me up some 5" wing stands for a stock type wing.... but that's just my preference.
BTW: here is some info on the 4.3L Chev that powers the car:
http://www.fiero.nl/forum/Forum1/HTML/044164.html
So without further ado........... First we gota get nekid.
This has been covered numerous times so I won't go into how the old cloths come off, but it's a fairly simple matter and should only take about a half day for a first timer. 
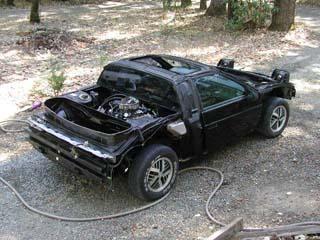
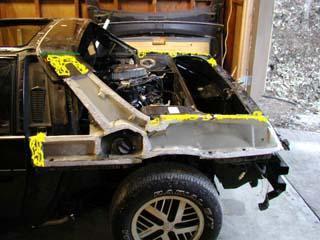
We'll be re-using the substructure from the rear clip and a small portion of the original skin. Start by cutting just deep enough to go through the skin without damaging the substructure under it. When I did this step I hadn't received the IMSA parts yet, so I left much more of the old skin than I needed to, but you'll want to cut closer to the red lines. It's hard to see in the photo, but all but about 1 1/2" on each end of the rear "tray" will be re-used as well.

Carefully pry loose the sides with whatever tools you have handy, but the key is to go slow and try to only sacrafice the old skin and not the substructure that needs to be re-used. Fortunatly the substructure seems to be a stronger material, so it's not as hard as it sounds.
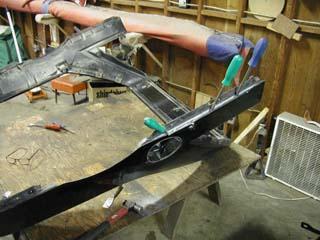
A couple of alteration will need to be done to the rear bumper area. About 2" needs to be cut off each end to clear the mating flange where the rear fenders and rear facia join. A small portion of the rear facia support tray needs to come off also, and the old lower facia support hardware can hit the dumpster as well.
I found out the hard way that once the IMSA rear fenders and facia are permanently joined, it becomes imposible to remove the rear clip as you can no longer lift the rear of the clip up that few inches needed to free the three roof studs. You can laugh at me later when you see what I had to do to remove the bumper bolts with the clip on the car, but just trust me for the meantime and cut about a 2" x 6" piece out of the lower ends of the bumper where noted in green before you glue the parts together  . .

To be continued:[This message has been edited by Russ544 (edited 07-07-2009).]
|
|
|
|
Electrathon
|
AUG 29, 11:52 PM
|
|
|
Russ, Is that my old 85? Cool build too. For those that are not aware Russ deos great looking work. Aaron
|
|

|
gascarracer
|
AUG 30, 12:37 AM
|
|
|
Great start. Keep up the good work.
Thanks!!!!
------------------
Ernie 1988 Silver GT
One owner 47000 miles.
Soon to be a 3.4 DOHC powered.
|
|
|
|
Vonov
|
AUG 30, 01:54 AM
|
|
|
Drooling so much over this one, I feel almost like I should be looking over my shoulder for the Vice Squad...great start, keep it coming. The fish will wait, and grow bigger in the meantime too...yeah, that's it...let dem fish grow. ------------------
88 Formula, "Asphalt Aviator" Celebrate Artesian New Year!!!
|
|
|
|
NotAFieroAnyLonger
|
AUG 30, 01:58 AM
|
|
I love thread's like these... Thank's for sharing!!  ------------------
*Custom-Shaved HandBuilt!!*
*First Chopped-WidebodyGT!!*
*~*going 4.9L*~*Pic's Coming Soon!Stay Tuned!!
|
|
|
|
FieroRumor
|
AUG 30, 04:24 PM
|
|
|
Cool! *adds this thread to favorites*
|
|
|
|
Russ544
|
AUG 31, 12:39 AM
|
|
Thanks guys.
I was gona use your 85 Aaron, but at the last minute I decided to use this 88 coupe I had laying around. this is also the car that I built and installed the 4.3L into, so it should be a fun ride
================
CHAPTER 2:
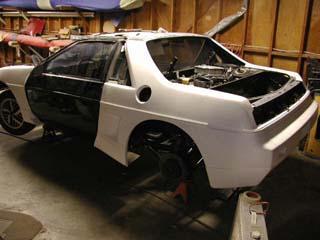
Before trial fitting of the rear fenders and facia begin you'll want to set them on the floor and carefully align the parts wile you drill 4 or 5 1/4" holes in each flange and bolt them together. it's much easier to do this off the car. When you're satisfied with the alignment of the parts you can remove the bolts and set them aside for now.
After setting what's left of the rear clip back on the car, you can begin trial fitting of the fenders and rear facia to locate areas of the substructure that will need slight trimming. The thickness of the new fiberglass parts require that you do some slight trimming of the substructure to allow them to fit over it. The areas that I found necessary to trim are noted in red. I removed the tab near the door ( the IMSA fenders have a tab that replaces this tabs function), and trimmed about 1/8" off the other areas. the red dots indicate that the area trimmed was on the inside edge and not actually visible in the photo. Each body will no doubt be slightly different, but this should give you the general idea.
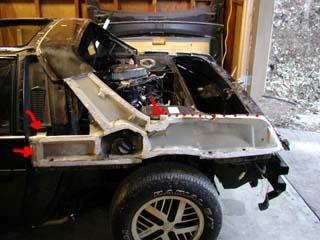
The better the fit of the IMSA parts on the substructure the less bodywork will be required to fill any gaps and smooth the transitions, so spend plenty of time on this phase. When you have everything fitting as well as you think you can, install a couple bolts in each flange and check some more. fitting and adjusting until the parts feel like they belong together. Once the parts are glued together you can't come back and adjust anymore !!! When the parts fit on the substructure to your satisfaction it's time to reinstall the rear decklid to check the gaps between it and the fenders, and to locate the two screw holes in each side that retain the top of each fender. I placed a piece of tape over each of the original fender mounting holes on the chassis and drew a line on it to indicate center. At a marked distance out from the hole I drew a crosshair over the line so when the new fender is installed, and covers the hole, you still know exactly where the hole needs to be drilled in the IMSA fender to line up with the chassis hole (it's easier than I make it sound ). With the rear decklid installed you can check the gaps along the fenders, and when the're straight and equal on each side, you can drill the mounting holes in the fiberglass.
When you're comfortable with the fit of the parts on the substructure and have checked that the gaps at the door and rear deck are straight and not too wide or narrow, and holes are drilled in the top of the fender flange........ you're almost ready to commit to the glue. I highly recommend 3M panel bond adhesive #8115 (thanks for the tip Sage). It gives the needed working time to get everything aligned and provides excellent strength and flexibility. A special applicator is needed for this, but most automotive paint suppliers who sell this product will loan you the applicator gun. One 200ml cartridge will JUST be enough to join all of the rear clip components. (also available at handsontools.com if you prefer online purchase)
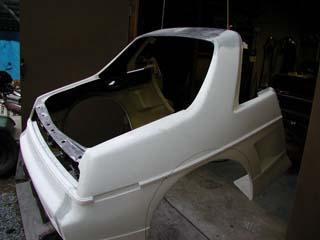
Place the substructure on the car and have all your tools, nuts and bolts, adhesive, cleaning solvent, rags, and whatever else you might need in a handy place next to the car so you don't have to chase all over for them wile the adhesive is setting up. You should have plenty of time to work, but not a great deal to spare chasing tools, so prepare for battle early.
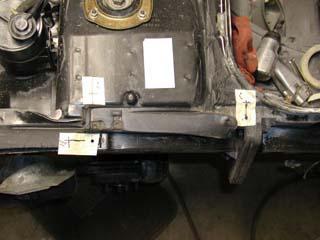
The areas noted in yellow below are the only points that make contact between the substructure and the IMSA fenders, and are therefore also the places to place a generous amount of adhesive. Set one fender and quickly pull it off again to see where the adhesive has made contact. you can add more adhesive to areas now that didn't make contact. set the fender again and bolt on the rear facia using adhesive this time on the flanges, then on to the other fender. use clamps to hold the roof section in alignment and recheck for rear decklid and door alignment as you install the upper fender mounting bolts.
Once the rear clip is glued on you can take a day off to drink beer and watch the Speed Channel wile the adhesive cures. you earned it
 [This message has been edited by Russ544 (edited 07-07-2009).]
|
|
|
|
gumert
|
AUG 31, 01:02 AM
|
|
| quote |  |
|
sexy [This message has been edited by gumert (edited 08-31-2004).]
|
|
|
|
Russ544
|
AUG 31, 09:58 AM
|
|
| quote | Originally posted by gumert:
sexy
|
|
It's gona get even better soon. note line around wheel opening
 [This message has been edited by Russ544 (edited 07-07-2009).]
|
|
|
|
MinnGreenGT
|
AUG 31, 10:01 AM
|
|
|
|
|
