
 
     |
| Installing New Camaro T-top Seals on a Fiero with lots of pictures (Page 2/5) |

|
bowrapennocks
|
OCT 18, 10:18 AM
|
|
|
Yesterday I worked on the passenger side. I removed the old weatherstripping, cut the B pillar, and cleaned and painted everything. I will be installing the weatherstripping today and realized that I forget to talk about the fitment of the butt joints in my previous post. Proper alignment is critical and I chose to align them before applying any glue. I carefully moved the wearstripping until all the joints lined up. Then I took a felt tip pen and put some alignment marks all the way around so that when I applied the glue I did not have to move anything much. As mentioned earlier, I used Butyl because it remains flexible, so you can always pick up the weathestripping and move it around if need be. ------------------
|
|
|
|
bowrapennocks
|
DEC 08, 10:06 AM
|
|
I finished the seals and have been driving the car for a while...but it came to be time to do the final water leak test. I pulled the interior out including the rear speakers, so I could see where there were water leaks. As you may remember, I had not yet installed the sound insulation because I wanted to make the car leak free before completing the interior. By having the interior out, it is eay to spot the hidden water leaks. I set up a lawn sprinkler on the driveway, mounted on top of a step ladder. I got in the car in the garage, made sure everything was shut tight & dry, then drove next to the ladder. Sad story, water came in behind where the speakers mount..again. I pulled the car in the garage and removed the rear roof trim molding for the fourth time. As you may recall from a previous post, I thought the water was leaking from behind the seal at the top of the B pillar, and getting inside the roof. Well it was leaking somewhere else too! After carefully examining the Butyl caulking that I applied between the rear clip and the T-top frame, I could noy find a leak. I stood inside the car with the t-tops off and carefully examined every spot and then I found the leak! For some unkown reason, there was a small (3/32") hole drilled through the T-top frame dead center about 1/2" behind the center molding. This hole is under the rear trim piece and not visible when the trim is installed. It was probably covered with sealant when the t-tops were installed. I guess I uncovered when I cleaned and painted the frame. It is not easily visible from the side of the car. This is probably why I missed it the first two times I was checking for leaks. I filled the hole with epoxy, let it dry and tried the leak test again. There were a few minor leaks at the bottom of the door window glass; I addressed those by shimming behind the seal. Also, water was bubbling through the seal at the bottom of the door. I cut a drain hole in the seal and lots of water came out. So water is somehow getting inside the seal, perhaps where I spliced it. The butt joints looked pretty good. So now I am ready for the hopefully final leak test, BUT it is 18 degrees out and going down. This is the coldest it ever gets in western WA. Hopefully it will warm up next week and rain. The final test will be to leave the car outside in the rain for a week. Here in western WA it rains most of the time Dec-Mar.
Stay tuned!
Jim
|
|
|
|
fyrebird68
|
DEC 08, 11:01 AM
|
|
This is good news. Encouraging. Shows what needs to be done to REALLY get the leaks stopped.
 On to Act III .... On to Act III ....
edit: '+' for you[This message has been edited by fyrebird68 (edited 12-08-2009).]
|
|
|
|
bowrapennocks
|
DEC 15, 08:50 AM
|
|
The weather has warmed up and turned to normal....RAIN, so on with the leak test. After soaking the car under the sprinkler I found that none of the T-top seals were leaking (the good news), but there were still other minor leaks to address, as follows:
Weatherseals at the door bottom: Water was seeping through and bubbling up. I realized they were full of water. I cut a few drain holes in the bottom. I looked at the factory door seals and realized the had drain holes and the ones from the Fiero store did not. PROBLEM SOLVED
Inside the passenger B pillar: After sealing the hole in the top, a small amount of water was seeping inside. After careful examination, I realized it was leaking between two of the sheet metal pieces of the spaceframe, where GM spot welded them togther and sealed them, but of course not good enough. I had exactly the same problem on my 1980 Buick Sport Sedan (special order 2.8 4sp) in the front passenger foot well. To fix the Fiero, I had to pull off the body panel; the blue tape is pointing to the leak:
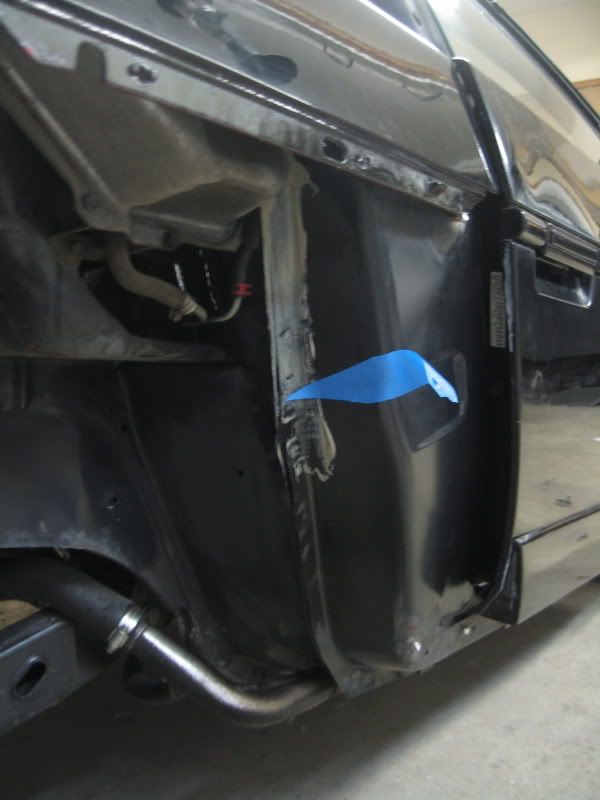
Notice how clean and rust free the western WA/OR chassis is (67K miles on it now). I washed the frame thoroughly and calked it PROBLEM SOLVED
Minor leak around the back of the passenger door seal on the bottom. Water was getting around and underneath. I pulled the seal back and caulked it. PROBLEM SOLVED
I still have a few minor leaks at the door seal where it contacts the bottom of the door glass on the passenger side. I will address this hopefully last problem today. Once I pass the sprinkler test, the car is going to sit out in the rain for a week to assure no leaks.
What I have learned in all of this is that there are lots of little places where water leaks in the Fiero and that is perhaps why most Fieros that I have looked at in western WA are moldy smelling on the inside. Unless you take out the interiror, you can't see many of the minor leaks. Although my car is garaged, I want it to remain dry on the inside when I drive it in the rain.
Jim
|
|
|
|
bowrapennocks
|
DEC 19, 09:44 AM
|
|
I did more testing and resolved a few minor leaks:
Passenger door, bottom of the glass in the front. I made a spacer to go behind the weatherstripping:
As installed and covered with black tape
There was a minor drip on the passenger door B butt joint, so I made a little bracket out of brass to push the seal out:

It also turns out that the air vent was leaking a little bit, so I grabbed one from Pull a Part (nice guys no charge)
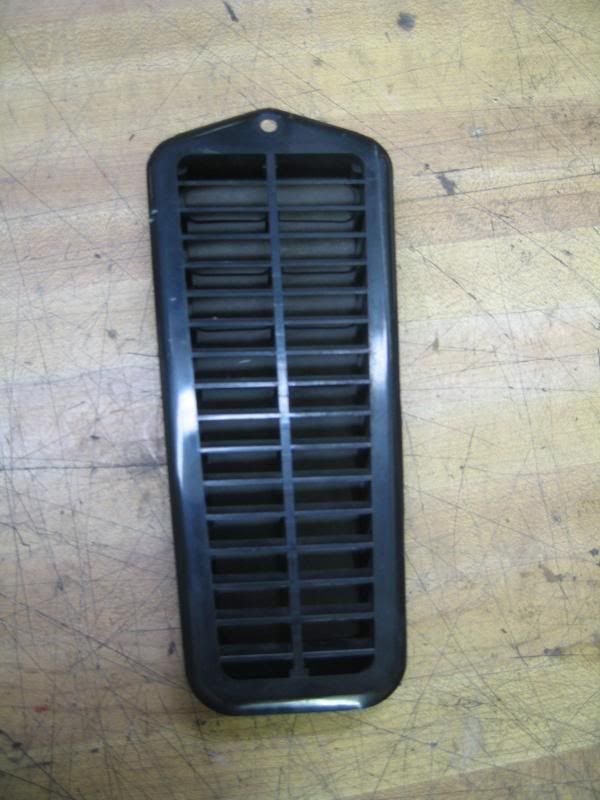
and the back

This has a rubber flapper valve to let air out and not water in, and was dripping slightly. Now with the car back together, I put it outside in the Northwest rain. But of course the Gods have not been supporting me...no rain for a few days.
Stay tuned almost done.
Jim
|
|
|
|
Icelander
|
JAN 23, 06:59 PM
|
|
|
ok... it's been raining... Enquiring minds want to know. ------------------
Kendall (Icelander) Whitlatch
'85 Fiero 2M4 - 5spd Isuzu
'88 CJB - EcoTec - In progress
'67 LeMans/GTO clone 6.5 litre TH400 - For Sale
All the rest aren't Pontiacs, so what does it matter?
|
|
|
|
bowrapennocks
|
JAN 24, 11:28 AM
|
|
Kendall,
Well, real rain rather than a sprinkler has ways of finding a water path to the inside. I left the car outside and the butt joints dripped a little. However, there was a new leak in the center of the driver’s door T-top. Water was getting around the seal and dripping on the center console. I was completely frustrated and confused as to how the water was finding a path around a brand new, well compressed seal. I put the car in the garage and went inside ready to let the rain gods win. Later, I pulled the T-top off and had it sitting on the bench. I noticed that there was a fir tree needle stuck to the top laying crosswise where the seal met the glass. This little needle provided a perfect water channel. I cleaned the top, and with the needle gone, it looks like there are no leaks in that place anymore. I also found that the passenger side T-top glass seal was leaking through the middle of the seal and dripping out a hole. These seals are hollow and glued to the T-top and also screwed with two screws. The seals have metal plates inside at the end and pre-drilled holes for the screws. On the problem seal, the screw was in the wrong place and water was coming out the hole where the screw was supposed to be. I ended up re-caulking the back of the seal to solve this problem.
Since I want a zero leak car, I decided to adjust the windows and seals to eliminate the minor butt joint drips. The more I fiddled, the worse the drips got. The mechanical adjustments include two screws on the T-top itself to adjust height, door window height front & rear, and window tilt. You can also remove and reposition the seals, if needed. There are seemingly infinite possibilities with only a limited number of finite solutions that work.
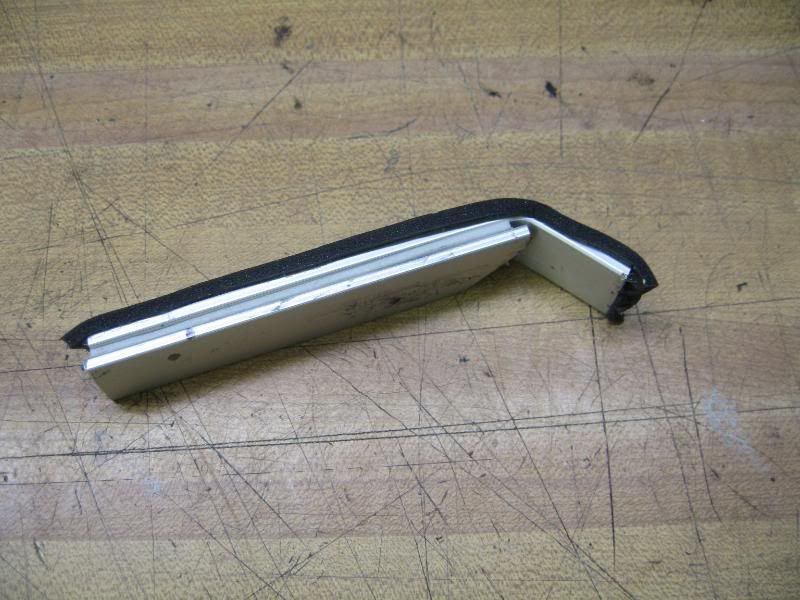
I pulled the T-tops and carefully examined the seals. I noticed that the butt ends of the seals on the T-tops were somewhat deformed:
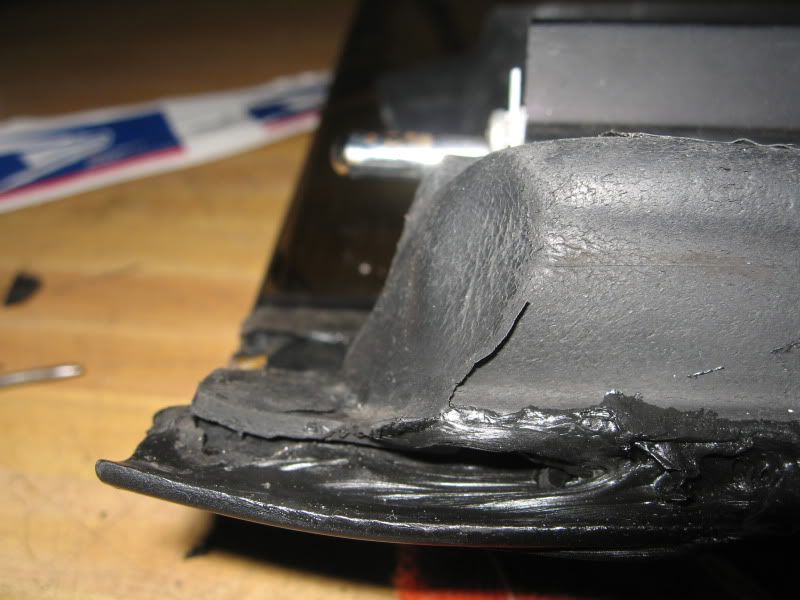
If you look at it carefully, you can see that this one is bowed out in the middle. It looks worse in real life than in the picture. I made the (expensive) command decision to buy a new set of T-top glass seals. Since there were only a few new sets left in the world, I did not want to let time pass and miss my opportunity. So I ordered a set and installed them. Here is one after cleaning the T-top, just before installation:
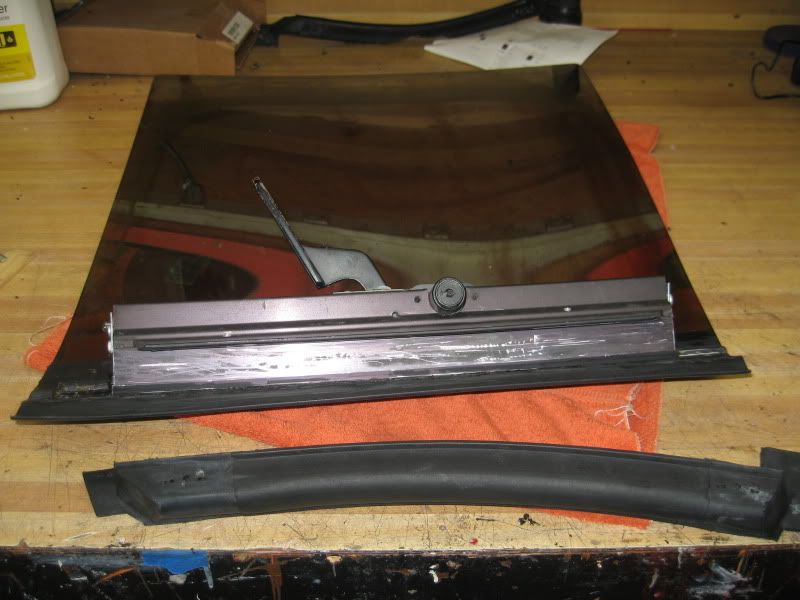
If you compare the old vs new side by side (not visible in the pictures), you will find that the old seals are all deformed at the butt ends. They are mostly bowed out. I put the tops with the new seals on the car and squirted at the passenger side butt joints full force with a garden hose. No leaks so far. The driver side had a leak, where water was getting around the back of the body seal. I pulled the top off and re-caulked the body seal. I will test it tomorrow.
One thing I did when I installed the body seals was to go lightly on the caulking and not caulk all of the areas. I took this approach because I was not sure if I had to remove the seals to re-section them. This was probably a mistake. I had a leak around the backside of the body seals (both sides) at the front of the doors, just below the top of the door. I had not caulked that area, because I could not get to it with the dash installed. As you may recall, I have a Camaro dash, which is a little wider than the Fiero dash. I ended up removing the dash to re-caulk the back of the seals. This cured the leak here.
Determining if you have a leak is much more difficult than you would think. First, you need to have all of the interior out, because a minor leak will soak into the upholstery and you will never see it. You need to have a completely dry interior so you can see water coming in. Remember, once you open the door, a lot of water drips into the car from the top, because there are no drip rails. So I have adopted the following approaches to leak test
(1) Put a sprinkler on a ladder in the driveway, and turn it on. Start with a completely dry car inside the garage and drive it under the water shower. Bring reading material, because it will take quite a while for minor leaks to present themselves. Remember to have a flashlight to clearly see where water is coming in. I had to explain to my neighbors why I was sprinkling my driveway in the middle of winter.
(2) Put a dry car outside when it is not raining and squirt it with a garden hose.
(3) Put a dry car outside when it is not raining and wait for the rain to come.
Just to give you and idea of how much water can come in from a minor leak. If your leak dripped one drip every 5 seconds for a day, based on an estimate of the size of a drop of water, you could accumulate 1-2 quarts of water in a 24 hour period. No wonder so many Fieros are musty smelling in western Washington. So getting to the zero leak status is important!
Kendall,
FYI there is a large supply of NOS T-top glass seals for CJB tops and they are much cheaper than the ones I bought. The CJB vs Non CJB t-top glass seals are different lengths and are not interchangeable. When you are ready to leak test your car, I would be more than willing to help. I do not think there are any body seals around though.
Jim
|
|
|
|
bowrapennocks
|
JAN 28, 08:07 PM
|
|
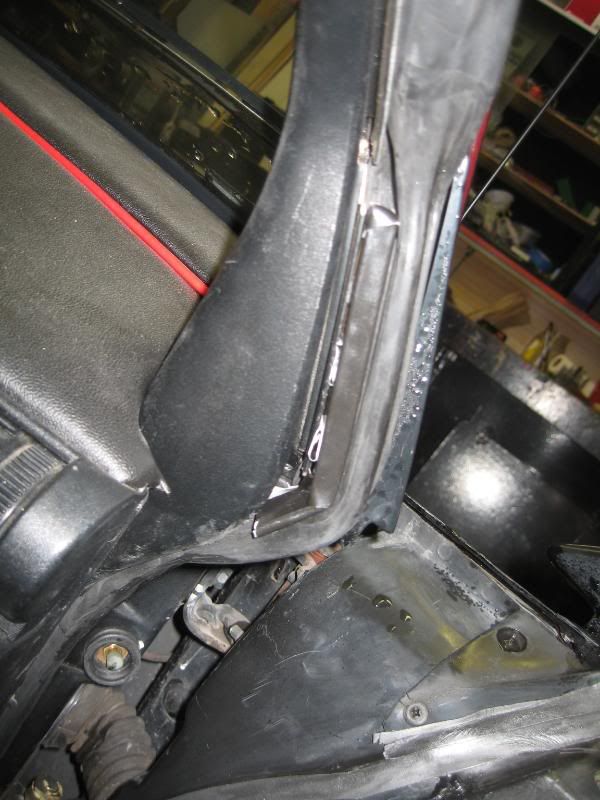
Back outside for more tests. All seemed good except the driver's side B pillar would fill up with water. Upon inspection, I reaized that water was getting inside the roof above the left edge of the backlight. This leak seemed to be another body panel problem and appeared to be behind the rear clip. So today I pulled the rear clip off and here it is at the top of the blue arrow (you are looking at the driver's side B pillar rear of car to right).
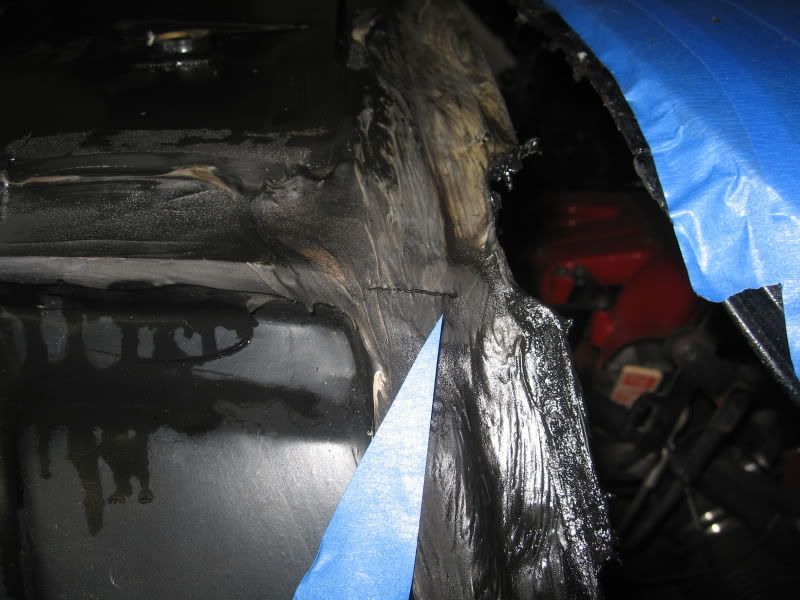
The horizontal line is a crack in the sealer at a body panel joint. So I cleaned all the sealed joints and recaulked all of them with Butyl. Now time for a test (again).
Jim
|
|
|
|
bowrapennocks
|
FEB 01, 07:41 PM
|
|
I re-caulked every seam on the spaceframe that is under the shell, using Butyl. I put all the body panels back and put the car outside and let it sit in the rain for two days. It has not been much of a rain, but neverthless I supplemented with a sprinkler. This is supposed to be the rainy NW, where we get rain about 25-30 days in January.
I found a few minor issues that I am dealing with, but mostly I am in good shape. With the car parked on a side slope (right side lower). There was a tiny drip at the inside front bend of the drivers glass. The way the car was parked, the water tended to pool up on the right side of the driver top in the channel under the top. I think the water was getting in where I seamed the weathstrip because it was not perfectly aligned. I think that the water is running down the center of the top of the weatherstrip and through to the inside at the bend. The cross section is slighty cup shaped allowing the water to travel this way. I put some caulking to even out the seam (testing now in progress). I also had a slight leak on the passenger door seal, near the top. I will show you my solution after testing.
The most trouble that I have had after replacing both the body seals and the seals on the tops, has been with the new Fierostore seals. I think therr quality is not what they should be as they too flabby and at the bottom of the door, a little porous. I have had to shim behind them in several places to keep them from leaking. I can't return them, because I have cut them to integrate with the T-top seals.
The car is under the sprinkler now. We will see what happens.
Jim
|
|
|
|
bowrapennocks
|
FEB 02, 02:07 PM
|
|
Still fighting water leaks.......ugh
I am down to little ones now
Water is coming in through one of the shifter cables....from the engine compartment
A little drip inside drivers side B pillar....looks like the air vent thing is leaking, but removing the rear clip and recaulking the spaceframe stopped the leak up high inside the B pillar.
I think Fieros were not made for the rainy Northwest
Jim
|
|
|
|